

I’m a huge fan of Halloween. Anyone who knows me can attest to this. So can the neighbors, the people who own the masquerade store, my dogs (who have their own costumes), and the pumpkin farm we drop loads of cash at every year. It’s my favorite holiday, mostly because it involves costumes. I love getting to dress up and being someone else for the night. In fact, I’ve been known to plan themed parties (80’s night anyone?) just to have an excuse to wear a wig.
Every fall, Teague and I daydream about making our house the scary one on the block. You know the one – the one that each Halloween goes all out with strobe lights, sound effects, cobwebs on the bushes and fake skeletons hanging from the porch rafters. We had a house like that in our neighborhood when I was a kid, and I was absolutely terrified to ring their doorbell. My father had to coax me up their porch steps every year. It scarred me for life, yet for some reason I feel the need to recreate that terror at my own house!
We can’t really afford an army of fake plastic skeletons, so we’ve got to DIY it. This is the first year we’ve actually had time to craft up anything spooky, so of course we went big. We decided to carve our own graveyard out of 2″ thick rigid insulation. Fitting, isn’t it?
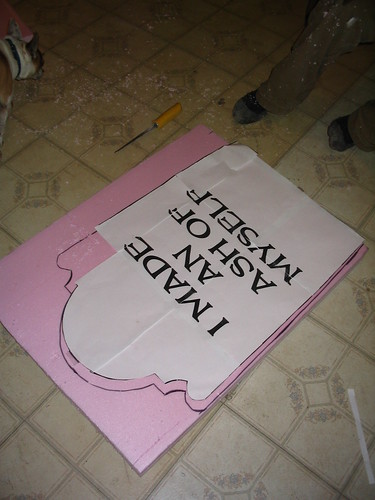
As a starting point, I used templates found on Micheal and Tamara Hedstrom’s Halloween Site along with some fancy looking free fonts. I set everything up in Photoshop at full size, and printed it out in sections on 8×10 paper. Then I taped it altogether to make one giant template.
Here’s a photo of the template. We traced the overall grave shape right onto the foam:
We used a small drywall saw because we had one on hand; I’m sure there are easier tools, but it was free and available and worked just fine. The edges were pretty rough and far to crisp for an old weathered tombstone, so we used regular sandpaper to smooth and round them. A word of caution – the cutting and sanding made a HUGE mess, with little bits of static-clingy insulation flying everywhere. That’s why we did it in one of our junky upstairs rooms, with a ShopVac on hand for cleanup.
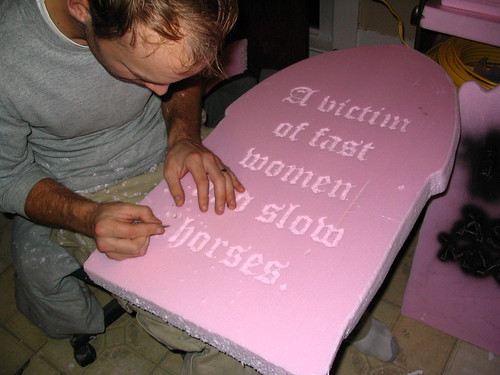
The next step was to cut out all of the lettering using an Exacto knife. We taped the paper template to the insulation and carved out the shapes, then removed the paper and cleaned it up a bit afterwards, like so:
That’s as far as we’ve gotten. Next up will be adding bases and a metal rod to keep them standing. Then we’ll be priming them with gray primer (NOT spray paint, as the tutorials stress and Teague learned the hard way – it eats away at the insulation), and adding some faux finish to them to make them look ancient.
We’ll show you the other half of the process when we get to it, but if you’re itching to make your own tombstones I’ve got some excellent tutorial links for you. There are some VERY dedicated tombstone makers out there, and they’re happy to share their techniques. Check out:
- http://www.hedstorm.net/HAUNT/instructions/tombstones/painting.html
- http://www.horrorseek.com/halloween/juggernaut/stnd1.html
- http://www.aidtopia.com/halloween/tombstones/index.html
- http://www.halloweenpropmaster.com/tombstones.htm
Take a look at the galleries on those sites, and you’ll see that these people are GOOD. Their creations could pass for the real thing. Like this one, from Hedstrom’s site:
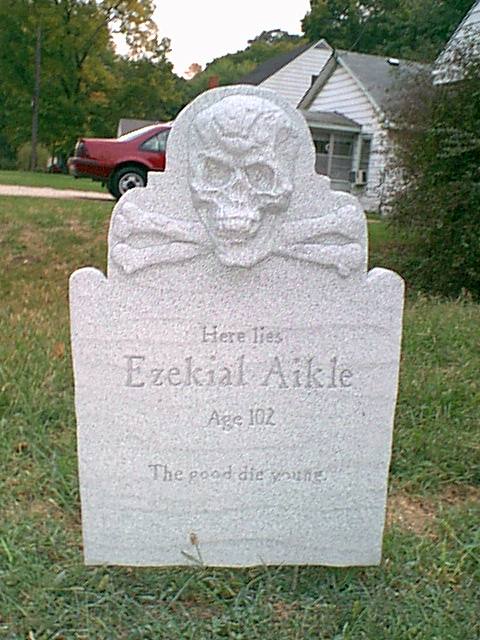
How cool is that?? Ours will be less impressive, I’m sure, but good enough for our small town!
Comments, Thoughts, and Feedback
I LOVE these. And I had one of those houses in my neighborhood too. I love Halloween.
Looks like you guys are having fun!!!!
On the Carol Duval show when they are making things with styrofoam they use a scrap piece to go around and smooth the edges. You might see if that works.
Happy Halloween
do you make halloween treats? one of my favorite memories of upstate NY at halloween are homemade treats (popcorn balls, caramel apples) and then cider and donuts and bobbing for apples at the village high school.
HA! I totally did this too! I havent put mine in the yard yet but they will be there soon!!
So cool! My sister went all out with her yard last year. I think she made her tombstones out of cardboard, but I’ll have to give her this insulation tip. She’s not doing it this year because she moved and doesn’t like her new neighbors … they don’t deserve a Halloween house! :)
Love the tombstones… I am the haloween house … Takes about 6 weeks to set up …
I have made my own tombstones just like you,, But I use a wood burner tool for the writing of words and drawnings. The only thing is that you MUST be in a well open area. Like outside..
Use also a mask. Then I paint the words any color I want , then spray paint
them.
Just an ideal. Not for kids to do.
i go all out for halloween too I’ve made tombstones out of old skids. Trouble is I don’t have any good sayings to put on them. Well I do have a couple. ” I should have stayed in bed” and “this one is reserved for you” Could you help me out?
Great instructions. Just made my first Styrofoam headstones from “found” Styrofoam” Getting the hang on lettering. Lots of fun. I have my instructions on my website and well my talent on making is not as well seasoned as yours. Kudos
LOL. “Victim of Slow Horses”!
We love Halloween tombstones, They are one of our favorite decorations of the season! Funny tombstone sayings on these props always catch out eye!
Thanks for sharing.
Yours HeadStone13 from http://www.halloweentombstone.net
We love to hear from you, dear readers.