

Whew – it’s good to be back! My week away, spent partially in Southern Maine and partially at a design conference in Boston, was fabulous. I was inspired, energized, educated and de-stressed. I got to spend quality time with my parents and the ocean. Minus missing my husband and my pups, it was the perfect retreat.
Teague got no such vacation time – he was hard at work repairing and painting the exterior of a sweet bungalow owned by two fellow house enthusiasts. When he wasn’t busy with his day job, he was busy working on OUR house. Specifically, the crumbly chimney the insurance peeps wince at.
While I was jogging on the beach and rescuing land-locked crabs, Teague and his father were busy manhandling the chimney bricks to get all the loose debris off. They power washed it and used 9″ strips of masonry mesh to reinforce the corners. The mesh was hammered to the brick with cement nails, which Teague says take about 50 good knocks to get in.
Last weekend he and I found some cement/mortar tint in a red hue that looked promising. Ever the optimists, we picked it up. Since we can’t afford brick, red tint seemed like the next best thing. Teague mixed up a batch of mortar and tint with his father, and was very pleased with the color. However – filling in the chimney took more mortar than he’d been planning for, and it became apparent that mixing up a zillion batches of red mortar was going to be problematic. The first two batches had color differences, despite careful measuring, so it’s safe to guess that the rest would have slight variations too. So, unless we want a striped chimney, I guess red tint is out of the question.
Here’s a great illustrative photo featuring the red mortar, plain brick with mesh corner, and then the grey mortar:

ANYWAY…….. they gave up on red for the time being, but kept moving on the project. To reach the top, they built some impressive homemade scaffolding (it costs about $175 a week to rent) out of extra lumber we had lying around. You have to see it to fully appreciate, so here are the glamour shots:

Front
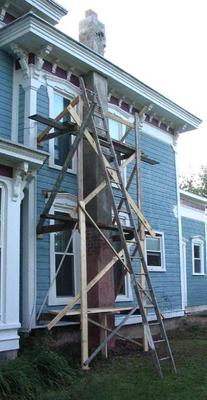
Side
Comments, Thoughts, and Feedback
Impressive indeed. So are you going to paint it once all is said and done and dry?
Hope you had a good trip! Sounds like it was…
House is looking good. Those two crazy cats with their home-made scaffolding. I hope you have a
first aid kit handy…
e.
How could anyone not want to insure that house? It’s looking better all the time, and it started out gorgeous! :)
okay…dude…that homemade scaffolding is impressive! we could so use some of that to get our windows back in!!
also, if the chimney covering need not have structural benefit, have you considered throwing on a finish coat of stucco? It’s cheap, you can tint it in big batches, and it only requires some primer adhesive, and you’re off and running.
Just a thought.
‘m looking for details for homemade scaffolding. These pics are great, but is there a resource with some actual plans to construct homemade scaffolding? THANKS
We love to hear from you, dear readers.