Yes…….. happy days are upon us, because we’re finally getting to the really fun part of the bathroom remodel. Beadboard went up last weekend, and this weekend was tile-o-rama!
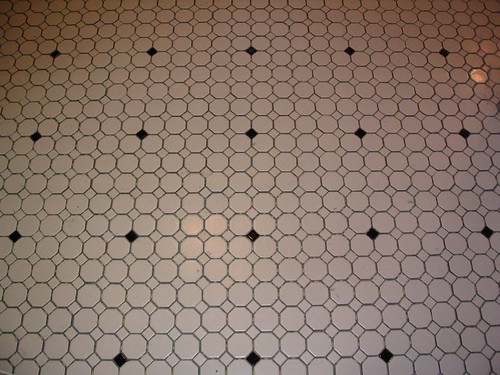
We chose white hex tiles from Home Depot, and mixed a few black accent pieces in to make it interesting. The tiles have a very historic feel to them, and at $1.86 a square foot you can’t beat the price. I eyed a few other styles, including basketweave and pinwheel type patterns in black and white, but I just couldn’t justify the extra money. The American Olean 1″ hex tiles, for example, were over $12/sq ft. Since our bathroom is 80+ square feet, that’s a lot of extra cash!
When choosing grout, we took into account what dirty slobs we are and went with a dark charcoal color. If we went with a light grout, our ever-present dirt and grime would be very noticeable. Not that the white hex is gonna hide much… but at least the grout will look clean!
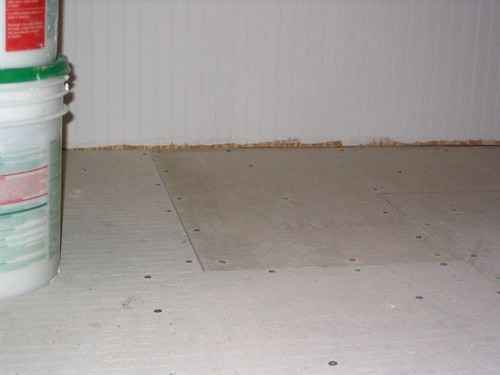
The first step when tiling a floor is to lay down cement backer board. You screw this down to the floor with special screws made with a special corrosion-resistant coating. Ours happened to be green this time around – how purdy. You drive them down nice and low so that the head of the screw gets buried below the surface. Where you have plumbing, you’ll need to cut holes in the backer board to let it through; a jigsaw works fine for this.
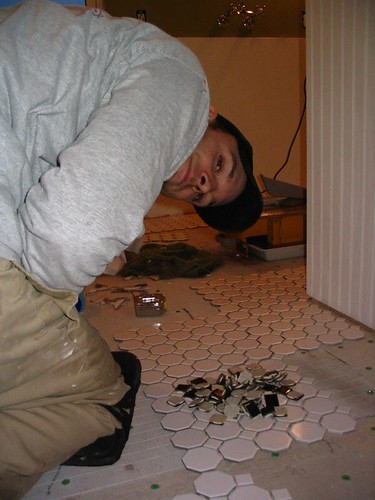
The backer board promotes bonding and provides a clean, sturdy surface to lay your tile on. After the backer board is down, you can take measurements and lay out a chalk line so you know where to start your tile. The hex tiles require a little more planning than big 12″ ones, since there are more cuts to be made. We laid the entire floor out as a “dry run” so that we could see how our black and white pattern was going to look. We laid one black accent piece for every 5 hex tiles, vertically and horizontally.
That’s a picture of Teague and our “dry run” floor – plus a pile of black accent tiles. You can see the tile saw in the background. We’ve tiled here before, when we laid 12″x12″ porcelain in the kitchen, so we’re lucky enough to own our own tile cutter. If you don’t have one, definitely rent or buy one – you can cut tiles with by scoring them and breaking them with tile nipper, but it takes FOREVER and it’s tough to get your breaks right.
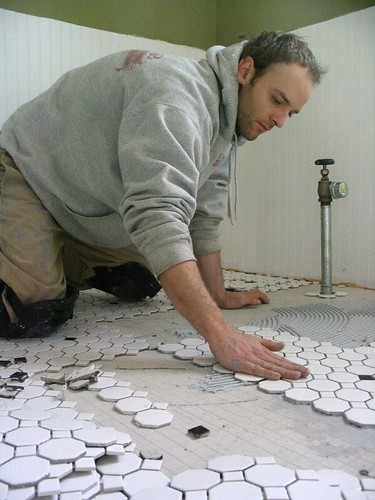
Once we were satisfied with our layout and had all the edge pieces cut, it was time to mortar. To do this, you apply a thin set of mortar using the smooth side of a trowel. Then, use the notched edge to comb the mortar into ridges. Make sure you don’t have any high or low spots, especially if you’re using smaller tile.
(Note: the extra-tall radiator pipe is raised up to get it out of our way; it’s not permanent!)Â
Carefully lay your tiles down, applying pressure evenly over the surface. Be sure they’re straight and exactly where you want them. Teague is great at this part… I’m a little too impatient. It’s slow work, with constant checking and rechecking to be sure your spacing and alignment looks good. He kept running his hand lightly over the edges of each sheet to make sure it was always level where two sheets met.
Once everything is laid out, leave it be for at least 24 hours to make sure the mortar sets. Whatever you do, don’t walk on it! If the mortar isn’t set all the way, you’ll squish the tiles every which way.
Stay tuned for part two…. grouting. It’s finger-wrinkling, mess-inducing fun.


Comments, Thoughts, and Feedback
It’s looking great! I just read a post over at Enon Hall. They used a fairly expensive type of grout that does not get dirty. He says they’ve been bathing for quite some time and haven’t cleaned a thing and it looks like brand new. I don’t know if you are interested in the extra cost and I know you’ve made up your mind but I thought you might like to check out their latest post for details.
Looks fantastic!
Looks good!
I am about to embark on a similar project in my 1910-ish bungalow. I was looking at some of the pre-patterned 1 inch hex tiles from American Olean but was also balking at the price.
Do you happen to have a brand or model number for the hex tile you got at Home Depot? Was it special order? I looked on their website and they didn’t have much for a selection of tile. Thanks!
Hi Rick,
I think they’re American Standard, but I could be wrong – we dumped all the boxes so I don’t have anything to refer to. It wasn’t a special order (hence the cheapness) – it was one of their regular in-stock brands.
Hope that helps!
~Mindy
In reply to Rick’s question, the tile you are viewing appears to be 8-sided which is really an Octagon tile w/dots. The hexagon tile is 6-sided. I know sometimes Home Depot will have the Octagon shaped tiles in 2″ or 4″. But it is a hit and miss on their stock. I got my hex tiles at http://www.MontereyCeramicTile.com. There hex tiles ranged from $6.95SF and up. I did a white hex and randomly inserted black hex piece.
Daisy
Beautiful job. Thanks for the guidance. Is there a particular tile saw that works best for the octogon tiles. I’m concerned that trying to cut across the diamonds will be a problem (need to have them held rather firmly?).
Thanks for your help.
A
A second question I forgot to ask. I want to lay the new tile on an existing mosaic tile floor. I’ll put a leveler solution on first. Any input on doing it this way?
Thanks again.
A.
I agree, this is an “oct & a dot” (octagon and dot) floor, not hex. We just layed a hexagon tile floor and used a simple hand-held wheel tile cutter (called tile pliers, you can usually get it for less than $10). It worked easily. You simply score the tiles and use it to snap the excess off. Pretty clean cuts. With these tiles, you really only need to cut off around the perimeter of the room, which is usually covered with base-board. So if it breaks a little uneven, it will not even be seen. Home Depot and Lowes did not have the plain white unglazed hex tiles in-stock. We ended up finding them at Century Tile. It was $5.49 s.f. If you get the unglazed, you can also paint random ones any color you want before sealing. They are porous and will take paint nicely if you choose to do so.
I am doing exactly the same tile in our bath, up against wainscoting. I have one question…what did you do about the edges – did you cut the hex/oct tile to abut the wall…did you fill in the edges with grout? Thanks.
i am trying to match vitage tile in a 1927 home. 2 bathrooms, one with 4inch yellow hex tile. and the other the pink subway tiles with a uniqu patern. where do i find a place to match.
The tiles shown are octagon not hexagon. With hexagon you don’t need the extra square tile.
Hi – I bought some 1″ by 1″ hex tiles that were rated for floor use, but now the contractor is telling me they look too thin to be used safely on the floor. I measured and they are 3mm thick. Yours look thicker, I know you laid the floor a while ago, but any thoughts on tile thickness? The contractor said they were so thin that the cement would gush over them, leaving no room for grout….
Did you cut the small tiles with a wet saw? I’m actually putting down the same Dal Tile, and trying to figure out how to make clean cuts to these little tiles without cutting my fingers off.
We are laying that same tile and the matte finish seems to mar easily. We are looking for a solution to this. Did you use a sealer to protect it?
Nicole – get yourself another contractor – this particular tile is very thin but is intended for floor use. If they are the white ones make sure to use a white mortor in case anything bleeds thru the grout. I also suggest grout boost be used to eliminate need for sealing the grout.
I also want to comment – his quoted price of over $12.00 per foot seems outrageous. I would sell it for $7.50-8.00/sf. Also the tile used in these pictures is octagonal not a hexagon.
You should know that those are Octagon tiles, not Hexagon.
Saw a nifty way to cut your sheets of tile instead of having to snip with cutters… They used a blow torch on a low flame and melted the row of mesh off the back!
[…] love the old school tile and I even found some closer up images of an octagon and dot tile on this Fixer Upper web site. Although we’d prefer the hex tiles, the oct and dot are only $2.50 sqft at the Home Depot, […]
The real question is: how did you disconnect the radiator?
We are using this same octagon tile from Home Depot about $3/sq ft here in Honolulu. I asked various tile stores and my builder about how to cut the sheets for a straight edge and was told you can run it thru a wet saw. Can also tape over the section to be cut to minimize movement of the tiles. We are inserting blue square tiles in a similar pattern as the picture but will likely add 4 more blue squares around the center Octagon. We will also have white beadboard (Home depot pine kit $12.50 for 3.5ft length) along the walls, carrera marble countertop ($340/9’slab with pre-fabbed bullnose edge), Kohler oval undermount white porcelain sinks ($67 on sale), delta faucets;kohler archer tub; American standard champion 4 toilet. Shower tiles are white porcelain 6″x6″ squares laid in brick pattern and an accent section along shower perimeter at about 5′ height as follows: 4″ white tiles set on diagonal with blue square tile in between. White dot listello ($2.87 per 8″ pc) on top and bottom of these tiles.
Where did you get the small black accent tiles? I bought the octagon tile in white to save money as the white with black accents was over twice the price, but cannot find the small black ones to place into the pattern
I had problem cutting the tile on a wetsaw as the sheets fell apart. I ended up clamping the tile between a small sheet of plywood and a loong piece of wood. I used a grinder with a diamond blade to cut (dry). This worked very well, easy setup.
We love to hear from you, dear readers.