

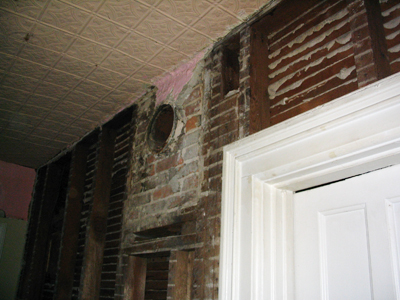
We haven’t made too much progress on our hallway since gutting it, but I’m finally getting around to sharing the pics. We were hoping to find a wad of cash in the wall, but so far no luck. Instead, we found lots of sketchy looking wiring (including electrical outlets that weren’t attached to anything solid, ots of frayed fabric wire coverings), a crumbling plaster ceiling, and the back side of the old chimney.
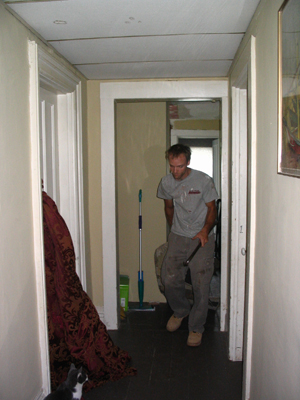
Here’s the hallway pre-demolition. And if you go back about a year you can see the true hallway “befores”, complete with pepto-pink walls and a urine-soaked rainbow rug. We took a few baby steps to stop the gagging.
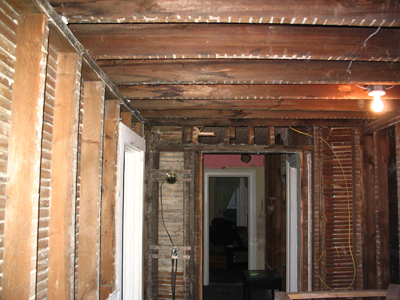
This is the hallway now. We still have a tiny bit of gutting left to do, as is evidenced by the shocking pink at the end of the hallway. This portion still has some ceiling left too. Why stop at 90%? Because we were both so tired, sweaty and cranky that crowbars were going to fly if we didn’t call it quits. Seriously. The number of times I broke out in tears during our hallway demolition: 3, and we’re not done yet.
Here you can see the ceiling that needs to go. No worries – we’ll be carefully removing and saving the tin, since I’m in love with it. Do I care that it’s rusted and rotted through in many places? No, I do not. It will be saved.
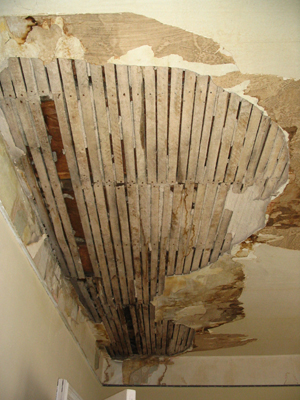
This is the adjacent bedroom ceiling. We took down 2 of those lovely acoustic-tile drop ceilings while we were feeling frisky. This ceiling has seen many leaks, and is the reason we’re redoing the roof. Once the acoustic tiles came down, much of the plaster decided it too wanted out. Even a few lathe pieces jumped ship. And now, if you slam a door really hard upstairs, you can watch plaster rain from the ceiling. Neato!
Comments, Thoughts, and Feedback
Put down that crowbar and slooooowwly back away….
Wow, do these pics bring back memories…
We, too, hoped to find some pirate booty (since our house was supposedly built by a Sea Captain), but, alas, NOTHING. Cheap bastards.
We did find crappy wiring too–six buried “junctions” (sans an electrical box), aluminum and copper wiring mixed together, and lots of yucky things that I can’t talk about cuz it still brings on the nightmares….
I’m glad its done. You’ll have the warm/snuggly feeling too when you get it completed–there’s something comforting to know what is in your walls.
Just an idea, but before we buttoned up our walls, we left a “time capsule” so future re-habbers won’t call me a cheap bastard.
Oh yea, I forgot to mention….
A rule for spouses during a re-hab should be that neither applies for a gun permit until the house is complete.
Hi Mindy,
I think we have the same tin ceiling pattern, which is neat because i never see mine in catalogs or stores (i’m up in central VT). Mine was in AWFUL shape before the PO did his updating, so there’s apparently hope. i think he must have put on loads of rust reformer and then primed and painted. It will probably be much easier to deal with on the ground. I just used a little Killz Bin sealer on the rust spots from a small internal flood. Also, to stabilize it, he nailed every single square, which means it won’t ever come down, which is fine with me. Lastly, one neat idea i haven’t done is to add a little darker color to the recessed areas and then sponge a lighter one on top to see the pattern more clearly. Good luck with your tin ceiling! (and so glad you didn’t get caught withthe roof off in all this rain :)
Wow! Is there a wall missing on the right? The hall looks much bigger in the after pic. Maybe this has been explained already … must check the last few entries I missed.
Patrick – I’ve been meaning to do the time capsule thing – we definitely won’t be leaving them any $$!! :)
Annie – Thanks for the tips, we did a bit of tin salvaging for our kitchen backsplash and I was amazed at how well they clean up. Cool that we have matching patterns – this one is also in our downstairs pantry. Love it!
Kristin – You’re right – there is a wall missing; we ripped out two plywood “walls” that boxed in the stairwell area – they were in place of the old stairwell railing. It also had a sliding door attached. The upstairs was at one time a seperate apartment, so these features were built to seperate it from the downstairs.
The worst part of that story is that PO’s removed the railings, balusters, and any newel post that may have been there. We can see the baluster holes, so we know at one time it had something cute there, but no more :(
We’re going to try to find something salvage that will fit. Until then, we’ve got 2×4’s keeping us “safe”.
~Mindy
Hi Mindy,
I have been following your site for sometime, but have never written. I too love old homes and although it is difficult work, I find it very rewarding to bring an old home back to life.
You write in your blog that you removed acoustic ceiling tiles. What process did you use and were you not worried about aesbestos?
Mary
Hi Mary,
Thanks for writing! We love comments ;)
The tiles appeared to be less than a decade old, so I wasn’t very worried about asbestos. They stopped manufacturing the asbestos type around 1980. Also, I might be using the wrong words here – they had an insulation-type fiber on the back, with a plasticy white front. They were suspended about a foot from the ceiling on a metal grid system.
My process was to remove all of the tiles from the grids – they’re flexible, so this was very easy – and then pull down the metal grid system bit by bit.
We love to hear from you, dear readers.