

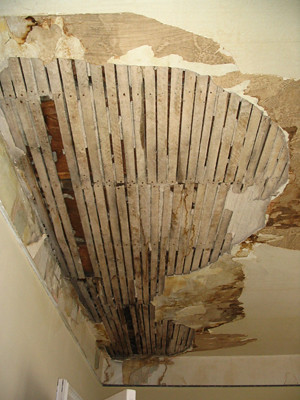
Yep, the mania continues. Fueled by fresh ground Starbucks (from the bag, we’re not fancy enough to have a Starbucks in town. I think we’re the only town in America without one, actually.) we spread our chaose into one of our spare bedrooms this past Saturday. Overall, it’s not a bad room at all. It is fairly large, has a closet and three big windows, and gets the most light of any room in the house. It’s biggest problem was the plaster ceiling – after years of a leaking roof, it was crumbling right off. When we took the drop ceilings out last year, everything else came down with them and it looked like this for about 6 months:
But we made some repairs and snuck nice new drywall up there back when we rented the drywall jack. So the hard part was essentially done – no overhead lifting of 4×12 sheets of drywall for this girl. Whooo.
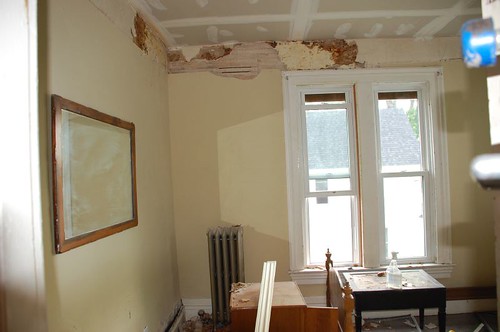
Unfortunately, the drop ceiling grid had been nailed into the plaster, and the nail holes ended up ruining much of the top part of the walls. There was also had about 8 layers of wallpaper border up there, and the stuff flat out refused to come off. It took me about 30 minutes to scrape down a 1′ wide section. Frustrated and tired, we decided to forgo “saving” this top foot or so of plaster. But we did want to keep the rest of it, so we took a circular saw and ran it around the room, cutting off the border and removing any chunks of plaster that was no longer sticking to the lathe.
This particular demolition tactic worked much better than I expected, taking only about an hour. It was messy, but not nearly as messy as gutting the room would have been. Minus the bad plaster, it ended up looking like this:

Within a few hours, we had new drywall patched in around the entire room. I know it’s not exactly cool to mix drywall with plaster, but we’re not hardcore preservationists and at this point in our remodeling process we’ve given up on “perfect” in exchange for “done”.
We bondo’d all the big cracks, and once that was dry we made quick work of the seam taping.
Comments, Thoughts, and Feedback
Let me give you a ‘hell yes’ on the ‘exchanging perfect for done’ bit. We’re so there. Those stilts are so cute! I’m totally going to get Don a pair.
Mindy, Can you send me your regular email address? Thanks, Aunt Sue
Lookin’ good on those stilts, Teaguer!
So impressed with the latest progress…you guys are TOC.
Can’t wait to see the place in a few weeks!!
A wise man once told me:
Perfect is the enemy of good.
So true, so true.
Hey, that worked out great. Our plaster is so thin, that we couldn’t use drywall without removing the lathe too. I used this stuff called concrete fill, it’s a heavy duty drywall compound, with fibre in it. Would have taken a while to do that that way though. Plaster washers are a big help too.
I just found your blog, and it’s great to see all the work you’ve done on your house! I just purchased a house that needs some work, but nothing like your projects… seeing all of your befores (worse than mine) and your afters (better that I’m hope for) makes me optomistic about my adventures ahead. Keep up the fantastic work!
Derek – I’ve yet to order those plastic washers everyone talks about, but I’ve heard lots of good things. Our plaster is very thick in most places – 1/2″ or so. It’s kind of nice because where we did have to take it down, we could grab big chunks of it without a ton of that dust-piling effect.
Nathan – GOOD LUCK!
At least Teague isn’t doing this on his stilts:
http://www.youtube.com/watch?v=uebX_6Anhw4
sorry to say this but you should have staggered your drywall joints for increased strength and to avoid a long butt joint across the room. difficult to conceal.
We love to hear from you, dear readers.