

A few weeks ago, I got this undeniable urge to give our living room some love. It’s the room we spend most of our free time in, but we’ve spent very little time fixing it up. It wasn’t a quick-fix room, so it just got ignored. The huge bulging cracks and holes were artfully hid behind paintings, like this:

Barely noticeable, right? Haha.
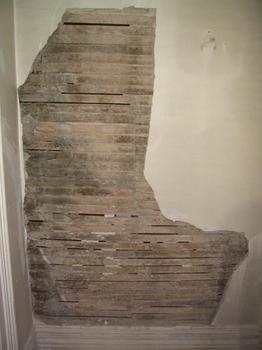
Months of staring at the nicotine-stained plaster falling off the wall got to me, and I couldn’t take it anymore. So I bought a sheet of drywall and went to town one day while Teague was at work. Keep reading to see the step-by-step process I used to repair some very large holes….
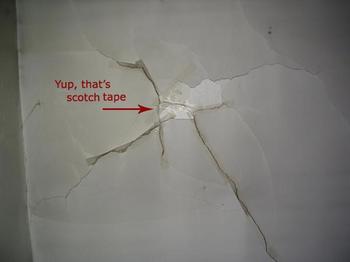
1. Take the previous owner’s fix (scotch tape) off the wall, and remove all bits of loose plaster. I used a utility knife to score and remove chunks. I didn’t want to remove any more plaster than was necessary, so got some weird shapes….
2. I traced templates of the holes onto newspaper so that I could cut drywall patches to fit right. This worked great and was very easy – saved alot of measuring.
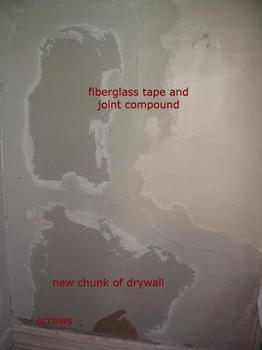
3. I screwed the patches securely into the lathe.
4. I used fiberglass patching tape over the gaps between the drywall patch and the plaster wall. Then I filled the gaps with joint compound, smoothing it outward so there weren’t noticeable edges. (My technique isn’t great, but it’s improving!)
5. After the compound dried, I had to lightly sand and apply a second coat to a few places where the compound shrank and made little cracks. Then came more smoothing, waiting, and sanding.
It was easier than I expected, and I got good results. The walls look nearly flat! A huge accomplishment giving the starting point. We have since primed them, so the living room (though way too white for my taste) is much more tolerable these days.
Comments, Thoughts, and Feedback
Been there and feel your pain. It looks like it turned out pretty well. For future repairs of the same sort of thing, you should check out Plaster Buttons to secure the edges of the plaster where the old stuff has been but away. It was cracking for a reason, and securing it will help it to not crack anymore. http://www.kilianhardware.com/ceilbutplasw.html They work well on walls and ceiling (and even on drywall where you want to get it in really tight to the wall and plan on adding a skim coat over the whole thing. Also, I noticed that slapping a whole bunch of joint compound on the back of the drywall that is being applied to the lathe helps it to act more like plaster. The joint compound then keys through the lathe like the old plaster did, makes the new pieces one with the wall, and does not resonate much when you knock on it, where plain drywall tends to leave that old hollow sound. Looking great overall!
Crafty, crafty! Lookin’ good! Can’t wait to see it all in person…
e.
Alex –
YES, I was looking for the plastic washers or something similar to secure problem areas, but hadn’t been able to find them. And I did put compound behind the chunks, thinking it’d help further secure the pieces. Thanks for the link!
Eilis – See you tomorrow at 34a!
It seems every time Teague leaves the house, amazing things happen! Concrete gets destroyed, walls repaired…
Don’t let him get wise or he’ll disconnect the tv and leave for a month-long vacation in the hopes he’d come home to finished house!
I’m sure Teague appreciated the picture of him stuffing his face being posted on the internet! LOL.
Your repairs look super. I thought your method of creating a template was very clever.
What I actually love about this photo is that both dogs are staring longlingly at the popcorn…. they are such beggars!
Hi Mindy! Oh, gosh! I’m so sorry! You actually responded to a message I left for you about a week ago!! I was the one who lives relatively close by, remember? You were very sweet to respond and I just love reading up on your projects! I must have been in quite a “mood” when I wrote that…I sounded like such a crab!! LOL Sorry! Thank you for dropping by and leaving such a great comment! Have a super weekend!
I am impressed- you are really handy there. We used those plaster plugs in our house- they seemed to work- no cracks. Not the kind of thing you can find at Home Depot though-specialty item.
We have 2 little beggars at our house too- yours are cuties!
wow I’m impressed. I didn’t know you could use drywall as a patch right alongside plaster?? We have the same problem in our plaster walls…it’s now starting to fall off the lathe! Are you concerned about settlement in your area, which might undo all your hard work in a matter of months? We have a terrible settlement problem; I think our house MOVES about a 1/2 inch per year (expansive soil is the main culprit)
Keep up the good work! :)
-Nina.
Nice job! I feel for you. We’ve got a lot of that going on too. Keep up the good work.
We love to hear from you, dear readers.