

Haven’t read part one, which covers cement backer board, tile layout and mortar? It’s right here.
Once the mortar is fully set, you can move on to grouting. We chose charcoal gray grout to hide our dirt and grit; white grout would look pretty for a week or two, but I know after that I’d regret it ;)
We bought one bag of sanded “polymer-modified” grout. The grout comes in powder form, and is mixed with water. Follow the instructions on the bag, mixing well with the trowel. We used a shallow mop bucket for mixing, which makes it easier to scoop the mortar out.

We mixed the grout right in the bathroom, since our faucet is all hooked up. Convenient, eh?
Using a grout float, which has a spongy bottom to it, start at the back corner of your floor and put a big glob of your grout down. Spread the grout with the float by holding it at about a 30 degree angle and wiping it across the tiles. Keep pushing the grout around until all of your gaps have been filled. Then angle your float up closer to 90 degrees and and grab as much excess grout as you can.
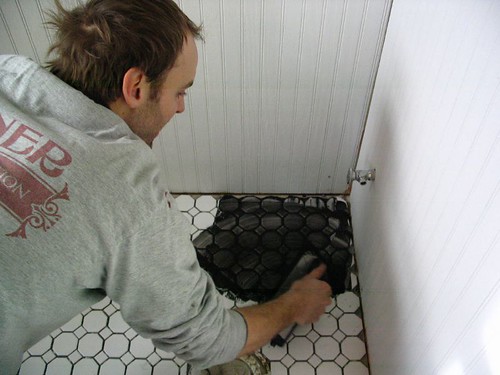
(Teague was just behind me commenting that his hair didn’t look too bad in these pics. He didn’t see this one! Obviousy, we’re far too busy to bother with silly things like combing our hair when we have exciting projects to get to.)Â
We went about 2′ deep with the first pass, and then went back and wiped everything with a wet sponge to get more of the excess off. About two minutes into it, we realized why dark grout kinda sucks. It’s really, really messy work getting the residue up off your tiles. It required lots of trips up and down the stairs for clean water. Somewhat frightful trips that had me praying that neither of us spilled the dark and murky water that sloshed in our buckets with each step. We kept two water pails in the room at all times; one large paint bucket filled with warm water for our first sponge pass, and another large plastic bowl filled with warm water for the second sponge pass. We alternated bucket fill-ups so we could work continously.
When I ran the sponge over the tiles, I made sure to keep my pressure very light and my sponge wet. You don’t want to pull grout out of your gaps; you just want to clean the surface of your tiles. I found it best to make one pass with one side of the sponge, one pass with the other side, and then rinse and wring it out before going back for more.
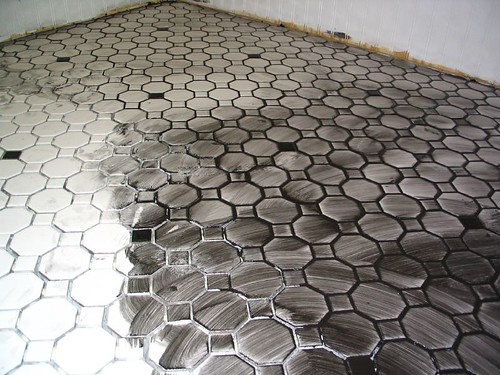
Here you can see that the left corner has had 2 passes with the sponge, while the right corner has only had one. You can also see what a nasty mess the black grout was!
We continued in this fashion, doing sections at a time, until the entire floor was mortared. Then we let the grout sit long enough to harden up (about half an hour) so that we could take a final cleaning pass with a damp sponge.
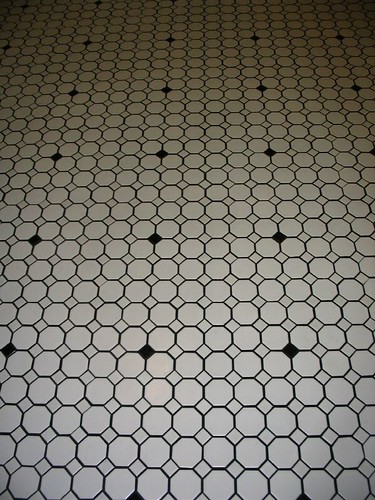
And here is the final product, looking totally amazing! It’s still drying so I couldn’t get full beauty shots, but you can at least see how the charcoal grout looks with the black and white tile. We’re very pleased with the effect, but I will say that my hands and fingernails are disgustingly black right now despite multiple scrubbings, and the black grout makes any variation in the tile layout pretty noticeable. Despite these minor issues, I’m in love with it.
Comments, Thoughts, and Feedback
That looks great! I’m sure that your patience with using dark grout will pay off in the future. I never understood why people used white grout in a bathroom…
And you are now that much closer to the highly anticipated hot soak in the beautiful claw foot tub!! Awesome!
Wow. That is gorgeous! Have you all done a tile floor before? If you haven’t, you can’t tell. Well done.
That turned out really nice!
Wow wow wow! I’m feeling so jealous right now. We got almost nothing done this weekend. You guys are so beating us.
Still, I’m glad for the tiling/grouting tips. I need to bookmark these posts because after we finish the bathroom, we’ll be tiling our kitchen countertops in black and white with dark grout.
That looks friggin’ awesome! Teague’s hair that is …. Oh, and the tile came out great too!
Teddy called me to tell me to check out this latest post…he’s in love with how it came out! Looks awesome you guys! I cracked up at Teaguer’s hair…I don’t know what the people in my family do when we are sleeping, but we all have those little “nests” when we get up. Classic!
Gorgeous! You two did a fantastic job!
That looks fan-freaking-tastic. The dirty nails were TOTALLY worth it.
very nice job…
Oh, Mindy, your floor looks awesome! I love it! I really like the pattern, too. Great job!
Do you mind me asking what kind of beadboard you are using and where you got it? What we were thinking about using is not primed and is very raw looking and rough to the touch. We’re going to have to do a lot sanding! But if we can avoid all that, it would be great!
Love the wall color, too – it contrasts with the floor nicely:)
That looks awesome. I love the way you mixed in the occasional black hex tile. Imitation is the greatest form of flattery, isn’t it? We’re totally going to copy you.
Hey guys – THANKS! We love it, too :) As Beth said, totally worth the dirty fingernails. I still have black cuticles after multiple showers and soaks. I think maybe I’m gonna go goth and keep the look.
John, Teague has quite a bit of experience tiling – this is only my second project. The kitchen floor being my first. That’s why Teague rocks at it so much more (at least, that’s what I tell myself).
Kim – We used the plain beadboard Home Depot sells. It comes in 8′ sheets and runs about $18/sheet, if I remember correctly. It’s not super smooth, but after a coat of primer and a coat of paint I think it’ll be fine.
Our houses’ original beadboard, which is downstairs in the dining room, is similarly rough. So you can consider that finish “authentic”!
It looks beautiful. Our floor didn’t turn out as well- we thought we had leveled the subfloor, but those tiny little tiles found all the bumps. Ours look great, but you can feel slight height variations when you walk on them. Ah, the benefit of experience!!! We also did dark grout, but not as dark as you, and you’re right, any small spacing issue is very noticeable!
Thanks for posting all of this information. Every time I get frustrated and consider calling a pro, I end up reading this site and getting back to it. I’d comment that white grout shows so little contrast that you entirely miss the shape of the tiles. It all washes out to a sea of white. I’m considering something in the middle (maybe beige).
I chose to do an all-white hex floor tiling in our bathroom (1907 Craftsman) myself instead of having a contractor do a linoleum floor. I will be starting soon (never have done it before) and your instructions and photos give me courage to do it. Love the way yours looks. Wonder if I should use dark grout too…I’m also planning on doing subway tiling around the tub. I’m scared but hopeful. Thanks!
We are installing the same tile from Home Depot. Except I got the black and white one. I love the look of yours and am considering changing my selection to white. (P.S. The brand is Daltile)
Also, where did you get your fabulous faucet from? Thanks!
Where did you get the black dots? I’m using the same tile but haven’t found the black dots other than buying some white/black and using those dots. thanks!
Elise – that’s exactly what we did. Just bought some extras and punched the black dots out so we could create our own design.
Any chance you have finished pictures of the bathroom? Would love to see the total effect.
Also, what are you guys’ opinion on hex/oct tiles in a kitchen? We have an 1885 Victorian that we’re renovating, and really want to do something cool in the kitchen, but EVERYONE is steering us away from hex/oct because of all the grout being susceptible to getting dirty so easily in the kitchen. I suppose if we did dark grout, that would eliminate that argument, but people just seem to be turned off to the idea in general. Any thoughts?
Thank you so much for this post. I am wanting to do the exact same thing in my bathroom and I heard not to do dark grout because it never comes up. I was so discouraged that it was not going to work until I saw this beautiful tile!!! Thanks for giving me hope.
We love to hear from you, dear readers.