Taunton Press carries some of the best home building and decor books out there, and they also cover crafts, woodworking, and gardening. So if you’ve got a book lover on your list, head to their site – they’re having a 30% off sale. Merry Christmas!

With old houses, you come to expect it…. even the easist of projects are never easy, because you’ll inevitably uncover some mindblowing new problem while trying to fix the original one. And when you gut a room? OHHHHH, the things you’ll uncover. It’s the reason our kitchen remodel took 6 months, and our master bathroom remodel will probably take 2 years.
Today, we found two surprises in the master bathroom. One, we saw coming – the floor isn’t level. That much was obvious to the naked eye, especially once we removed the half-wall that broke the room up. I wasn’t too worried; I’m ok with floors that aren’t perfect. NOTHING in the house is level, so having level floors just might give me vertigo. But when we ran a plumb line from one side of the house to the other (the bathroom & closet will span the back side of the house) we found that the outside edges are fine, but the middle dips down nearly 2 3/4″! That’s a major difference, and will require some time, effort, and expense to make right. Here I was, all ready to soak in a nice hot bubble bath. Pfffft.
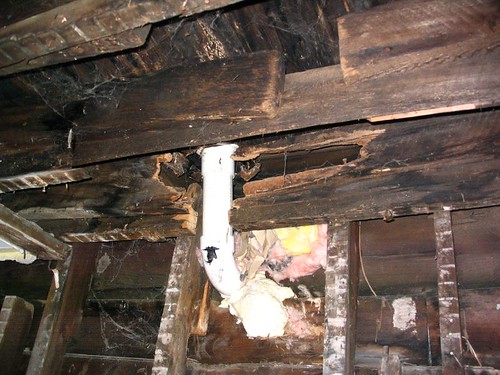
The second surprise came when Teague took the remains of the craft room ceiling down and found majorly rotted wood hiding underneath. It’ll need some reinforcement, but it’s not as sigh-worthy as the Grand Canyon running down the middle of the floor. We should have known something was up; that ceiling had been redone fairly recently. The previous owners didn’t upgrade just to upgrade, as far as I can tell. Just about every repair job in the whole house was done to hide some sinister problem behind it. We’ve gotten better at reading the signs, which is why Teague bothered to pull down the ceiling in the first place. We’re developing a spidey-sense, fixer-upper style.
The good news is, these things don’t phase me anymore. Teague is always mellow, rolling with whatever comes our way. I, on the other hand, have been known to burst into tears over the slightest change in plans. I used to get flustered and stressed when our project doubled in size overnight, but now I’m an old pro. I nod, and sigh, and start getting creative with the budget so we can stretch it to meet the new demands.
We just finished up the type of work weekend you can only pull off a few times a year….. one where you get more accomplished in two days than you usually do in two months. And even though my lungs are full of drywall dust (despite the safety gear), my snot looks like dirt, and my muscles are screaming from all the odd things I made them do, I’m feeling all sorts of revved up because we made a HUGE dent in our master bathroom. The demo is done!
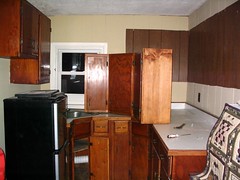
This is no small feat when you consider that we actually had to gut 1.5 rooms down to the studs – the bathroom AND a portion of the craft room next to it. We blew out a section of wall between the two rooms so we can have a bigger bathroom. The north side of the craft room was a small kitchen when the house was a two family. So in addition to removing a bathroom vanity, tub, toilet and two wall sections we also had to remove a whole bunch of kitchen cabinets and nasty linoleum. We got everything into the dumpster by chucking it through the stairwell window – including the tub!
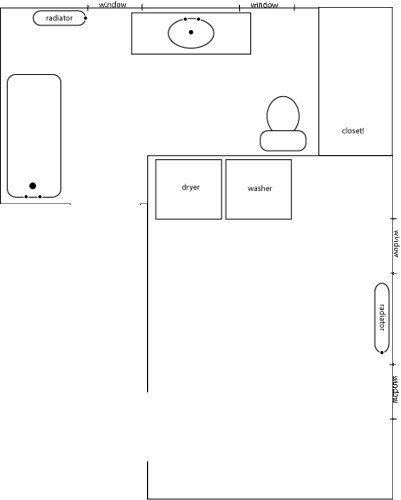
Our plan, illustrated somewhat roughly in diagrams below, is to bump one side of the bathroom out about 3 feet. We’re going from 8×10 to 8×13. The craft room, which acted as a kitchen/dining area when the house was a two family, had room to spare – it was 10×21. So it will lose 7 feet in the back – but 3 feet of that will become a closet. A closet I cannot wait to fill!
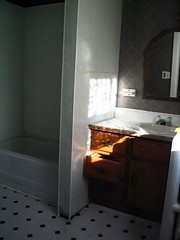
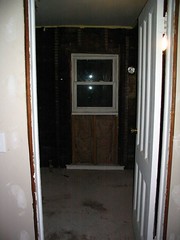
Here’s the bathroom, before and after demo – click on the thumbnails for bigger pics.
 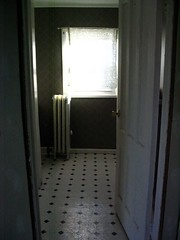
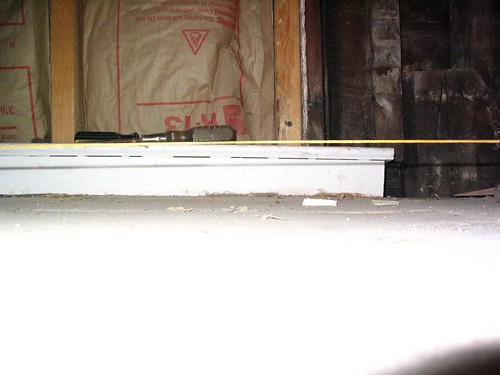
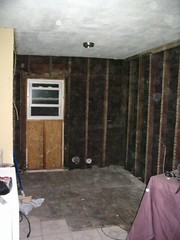
And here’s the craft room, before and after demo – click on the thumbnails for bigger pics.
 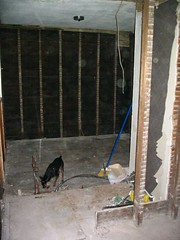
The picture on the right (the one with Nero sniffing around) is taken from the bathroom, looking through the new hole in the wall into what used to be the craft-room-kitchen area.
FLOORPLAN, BEFORE:
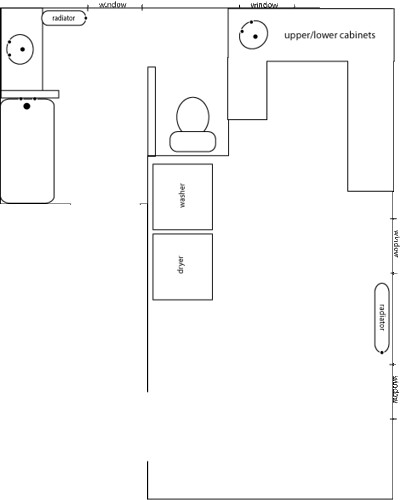
FLOORPLAN, AFTER:
Now that everything is out, we have a clean slate. We took the lathe out so that we could put up insulation. This is the north end of the house, so it should be very beneficial to have something in the walls besides mice!
Our next step is to start running new electrical lines and move the plumbing around to where we need it. We have our work cut out for us, but we’re excited to finally get started. Hopefully this energy lasts a few more weekends…
For more fun photos, including some really scary bathroom “before” pics from two years ago, check out our Flickr photosets:
Master Bathroom
Craft Room
Every time we open up a wall, we’re secretly hoping to find a big wad of cash – or at least some fun little trinkets. Obviously, I’ve watched too many episodes of “If Walls Could Talk” on HGTV. When we started busting open the master bathroom walls this afternoon I was really optimistic. Alas, we came up empty handed yet again.
We did find something else in the walls, though. Or many things, I should say, that explain why the bathroom has always had a funky smell despite a few detox cleanings.
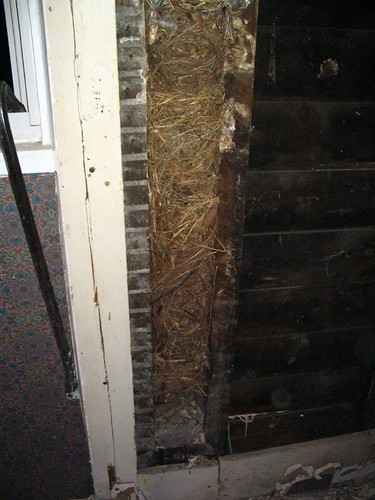
First, we found a birds nest. It was packed in there so nice and tight we thought it might be some type of primitive insulation. Right up until we got to the top and saw the poop and feathers….
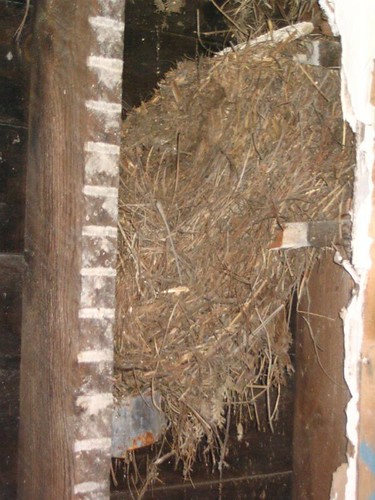
Next, we unearthed what appears to be a squirrels nest. Some of the fillings, and the (quite different, equally pungent) smell gave it away.
But the best find was the last one. Because when we went to unlodge an old and intricate wasps nest from another wall cavity, we saw two small field mice scurry out of it. It appears they built a nice warm bed for themselves on top of the wasp nest. My first comment was “Well, at least they’re the cute kind!”. Teague was not nearly as amused.

We think they might be entering through an old vent hole in the exterior wall, since it was covered with DUCT TAPE. Yeah…. duct tape. A single layer, with a hole in it. They didn’t even bother finding an old tuna can lid!! I don’t know how we managed to miss seeing this patch job when we were up there re-roofing, but it gave us a good laugh.
Though it needs a railing, newel post, trim, and some touch-up drywall, you can now see where we’re headed with the stairwell project…
Here’s the new view from the dining room:
And here’s the new view from inside the stairwell:
When you compare it to a photo pre-removal, you can see how much more open it feels. It was a nice improvement since the stairwell is very cramped and steep. It’ll also make it easier to get our clawfoot up there.
Now, if only we had a straighter ceiling………. but wonky lines are part of that old house charm, right?
Removing this section of the wall took a few hours, about as long as it took me to fight my way through Home Depot this morning. Because, of course, we needed supplies on the craziest shopping weekend of the year. And as usual, I ended up in self-checkout behind someone who clearly shouldn’t have been allowed near that particular aisle, or even an ATM machine. Yee-freaken-haw.
In other news, we decided to have the tub professionally refinished. We found a local guy who will do it for $400, inside and out. We’ll drop it off at his shop, and he’ll have it back to us in about a week. We’re going with an all white finish, and he’s going to smooth the exterior because the original cast iron finish is quite rough. By the time he’s done with it, he says it’ll look like a brand new tub.
For the amount of money we would have spent on a kit and cleaning supplies, plus the time and energy it would have taken, this is one I’m very happy to hire out for. I wasn’t totally convinced that the DIY kit was a good idea, and not having this on our to-do list means we can spend that time on other bathroom projects. Which means we’ll be soaking in a nice relaxing bubble bath that much sooner!
Did you ever think you’d reach a stage in your life where Home Depot felt like Toys-R-Us? I never would have guessed it, but I find myself wandering through the aisles eyeing all sorts of unnecessary (but oh-so alluring, just look what it can do!!! or lives would be so much easier!!!) tools and tool accessories. But I’m a frugal gal and always aware of our bottom line, so I rarely buy something we don’t really need. I save the “fun” tools for holidays.
Here are a few goodies that any DIY’er should appreciate in their stockings this year:
Magtite 25 Foot Magnetic Tape Measure ($23)
How many times have you gotten up on a ladder, roof, or otherwise inconvenient location only to realize you forgot your tape measure? And how many times have you’ve lost it mid-project in the same black hole that takes all your pencils and masking tape? Well, problem solved….

This belt clip keeps it the tape measure right on your hip without adding extra wear and tear to your belt loops the way that little metal clip does. Hurrah!
VETO Pro Pac Tool Bag ($94)
This bag isn’t cheap, but it’s made to last forever, gets great reviews from the pros and has a pocket for everything. Over 60 pockets of varying sizes, infact – enough to hold over 75 hand tools. It’s also got a padded strap and grippable handles in case you’re lugging it around alot. It’s the Rolls Royce of tool bags!

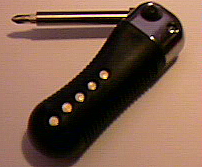
Switchblade Screwdriver ($20)
How McGyver will you look when you whip this puppy out? Push a button, and the blade flips out. It’s smaller than a 4-n-1 and carries 5 tips in it’s handle. Cool and handy!
The “Slanket” ($50)
Our house, like every other old house in upstate New York, is uncomfortably cold from November until late March. As soon as day light savings hits, we dig out the extra blankets, fluffy slippers, and long underwear. Even with added layers and blankets, I always seem to be cold. This blanket is genius – it comes with sleeves, so you’ll stay nice and wrapped up without having to readjust things every time you shift on the couch. And crafty people ought to be able to make something similar for about 1/5 the cost!

The Silent Paint Remover ($400)
I have spent many an hour laboring over paint removal. I’m a heat gun devotee, but I’d surely be an SPR addict if it was anywhere near our price range. It uses infrared heat to soften paint and varnish, and their scraper tools are supposed to be better than any you get from the hardware store. If you have large paint removal projects in your future, it’d be worth the investment for all that time saved. Or, if you’re feeling super DIY, you can try making your own!

iPod MP3 Player ($100 – $250)
Ok, so it’s not exactly a tool. But having music keeps my mind from wandering when I’m doing the mindless projects, to the point where I can happily spend hours removing wallpaper with my fingernails. It’ll increase your efficiency and keep you happy. That’s what tools are for, right?

In order to get our rather large tub upstairs, we knew we’d be doing some finagling. Our stairwell is tight, to say the least. It twirls to the right the minute you enter it. It’s steep angles and uneven steps are not for the faint of heart.
We’ve had a number of run-ins with large furniture and this tight space. We *used* to have an ok time, because an oddly-placed doorway leftover from the houses’ duplex days gave us some extra wiggle room. The door, however, was not safe, well insulated, or useful (except on rare moving days) so when we gutted the stairwell, we took it out.
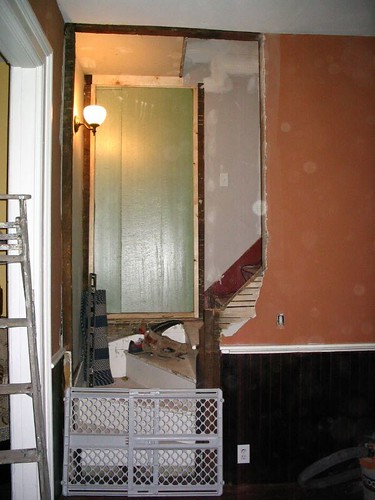
Now that we’re planning to lug a big clawfoot tub upstairs, we’ve decided it’s time to knock out some wall and open up the space a bit. Below is a diagram showing what we plan to remove:
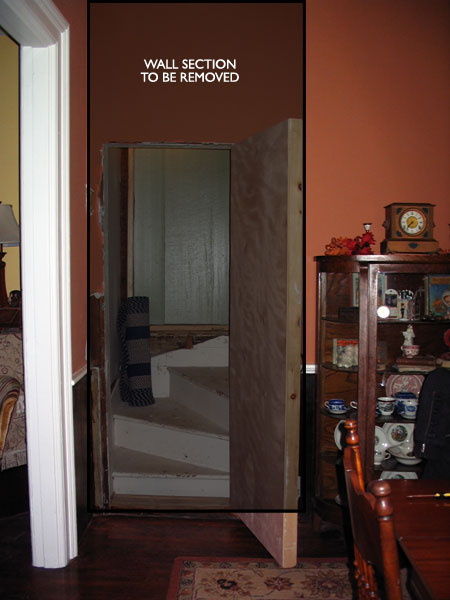
The shiny green insulation board you see back there is covering what remains of the old doorway. See how the first step you take in would put you about halfway between two curvy stairs? That’s what I meant when I said it was unsafe. You literally fell into the house when you tried using this door.
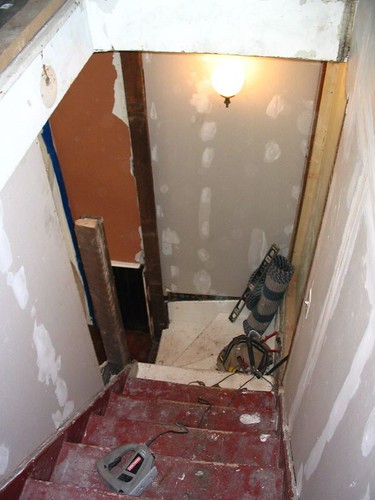
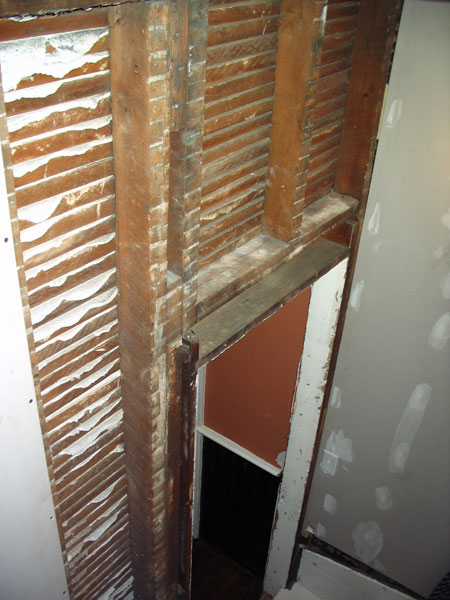
Here’s what it looks like from inside the stairwell:

Anyhow……. over the holiday weekend, we hope to take out the section of wall that is grayed out, along with the makeshift door that hangs there now. We’re not gaining too much width – about 8 inches – but combined with the extra height I think it’ll make a huge difference. And we’re reinforcing the header so we won’t need a column there.
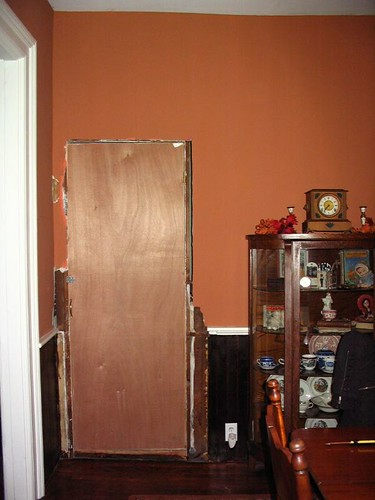
Here’s the inside of the doorway; we’ll be cutting back to the stud on the left, where the pretty new drywall ends.
I’m excited about getting started. It seems we’ve been crawling at a snails pace lately; the bathroom remodel is so overwhelming, and will be so disruptive, it’s been hard to put a stake in the ground. But we’re finally ready to just do it!
Black Friday is upon us, which means……… ’tis the season for frantically running from store to store in search of the perfect Christmas gift. I love giving presents, but I hate finding them; the perfectionist in me is never quite happy with what I find. In the back of my mind, there’s a little nagging voice telling me that something even better awaits at the next store. So I shop, and shop, and shop…….. and end up procrastinating and debating over things until finally I give up and “settle” on something that, in my minds eye, isn’t quite right. Maybe this year I’ll just do gift cards ;)
To get myself in the holiday spirit, I thought I’d share some gift ideas for the fixer-uppers in your life over the next few weeks. It’ll give me something to do with the giant list of bookmarks I’ve been collecting all year.
Part 1: Magazines!

I love giving magazine subscriptions as gifts, since it lasts all year. And everyone love to get mail, especially when it’s a well-designed and inspiring magazine. It’s an easy gift to find, and you don’t have to worry about sizes. What’s not to love?
For the restorationist:
This Old House
Learn about using traditional tools, how to get started with green building, and where to get all the goodies that’ll really blow your budget… all in one magazine. Even though I love this magazine, it’s not a favorite because the projects tend to be higher-end than our budget allows for, and they often showcase “new old homes” rather than actual old homes. Still, a great bet for any historic homeowner!
Old House Journal
This one focuses on preserving, restoring and maintaining old homes, with plenty of how-to’s, resources, and inspiration. You can find sample articles on their website.
Old House Interiors
Quite possibly my favorite of the bunch; gorgeous photos and attention to detail make this one a stand-out. It covers American period design from 1700 to 1940 with articles on restoration, preservation, and “period-sensitive” decorating.
Victorian Homes
Excellent pictures covering various Victorian decor (new and old), arts, and lifestyle. Though I mostly buy it for the pictures it also has interesting articles about daily life during this historic period. I always learn something new when I pick this one up.
For the new homeowner:
The Family Handyman
Great for home improvement amateurs because it provides detailed step-by-step instructions and great little tips and tricks each month. They’ll show you what tools to use for various jobs, and include lots of helpful pictures. It can be a little goofy at times, but overall it’s a great magazine that anyone even the experts will learn something from.
Fine Homebuilding Magazine
Taunton Press puts out great stuff, and this magazine is no exception. It’s much more in-depth than Family Handyman, with professional-level information that’ll help bring your remodeling skills up to snuff in no time. They also give great tool reviews.
Real Simple
This magazine is pretty AND useful. Lots of articles on organizing your home, and handy tips, recipes and cleaning shortcuts to make life less troublesome. Because a simple home life is a must for someone spending 99% of their free time stripping woodwork.
For the DIY’er whose addiction to creating things goes beyond house projects:
ReadyMade Magazine
It’s a hipsters Martha Stewart Living…. with articles on everything from food, to crafts, to homemade furniture with full how-to’s that actually make sense. It takes a while for this one to show up on your doorstep, but it’s worth the wait.
Make Magazine
This one is perfect for the gadgety gizmo lover on your list. With articles like “How to make your own night vision headlamp”, how can they be disappointed?
Stay tuned for Part Two: Wearables…..
I was digging around Greg’s site last night, since he’s in the process of remodeling his downstairs bathroom and as usual has some great eye candy (like this AMAZING toilet) and detailed information on where he’s getting all his goods.
Anyway….. he posted a link to Vintage Plumbing Bathroom Antiques, a salvage shop in LA that has extremely nice stuff for sale online. Everything’s out of our league, of course, but they were nice enough to post scans from their collection of old plumbing trade catalogs. Since it’s damn near impossible to find a photo of an actual Victorian bathroom, this excites me beyond belief.
I’m including a sample scan of a 1910 New York Brownstone bathroom to what your appetite, but for the full collection go to:Â http://www.vintageplumbing.com/generic7.html
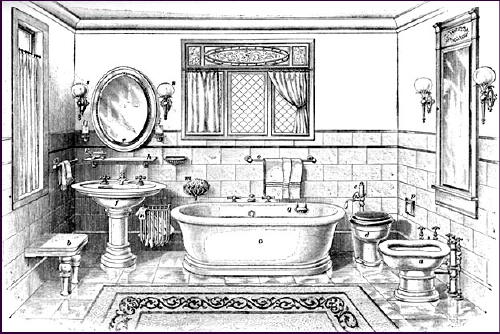
That’s a pretty complicated bathroom, isn’t it? So many fixtures and doodads, yet no place to hide your makeup and hair gel stash! Ours will certainly be simpler, but it’s nice to see the styles.
They also have some Victorian kitchen photos, but Victorian kitchens were so utilitarian that they’re not much fun to look at. The stoves though? Gorgeous!
As you may recall, we were thrilled to pick up a salvaged clawfoot tub a few weeks ago. We still haven’t gotten to the cleaning stage yet, but I’ve already lept ahead to the refinishing process because I love me some research.
There are basically three parts of the tub that need restoring, and each needs something different. The claw feet are painted, with a bit of rust, so they need to be sandblasted. There is chatter among Teague and one of his construction buddies about getting this done through a friend, which would be great. Otherwise it’ll probably be me, a wire brush, and 3 weeks of hell ;)
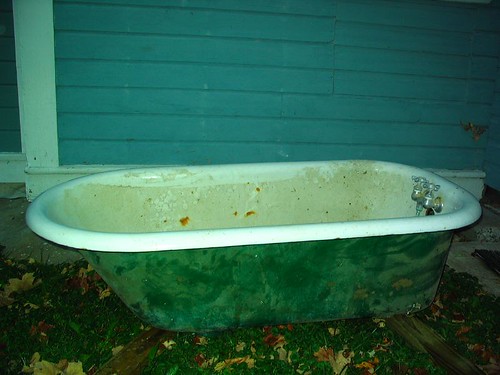
The exterior was painted with dark green latex. It’s not in very bad shape so we could just repaint it. Or, if we’re feeling extra plucky, we could strip the paint and sand it down nice and smooth. I’ve even read about people who use bondo to smooth it out completely – they do that because the original cast iron finish was never (and will never be) smooth. Honestly, I think I like a little bump, for character’s sake. The one hesitation I have with the exterior is that there is a spot where it has rusted through to the inside. Will this be a problem down the road, if we leave it there and paint over it? I have no clue. More research is needed, obviously.
The third part is the most complex – the porcelain interior. The other parts I’m confident we can DIY. This, I am not so sure of. You can buy spray-on enamel restoration kits. They seem pretty straightforward, albeit time-consuming and tedious. Two talented housebloggers over at Domiciliate managed to tackle their tub on their own, and the results look fantastic. But will that finish hold up? Or should we save up some money and find a professional refinisher like Jeannie and Aaron of House in Progress did? Decisions, decisions.
This will be in our master bathroom, so it’s going to get daily use. If the DIY chemicals aren’t going to hold up for a few years (at least) then I think it would be worth it to pay a professional. Assuming we can find someone in this area to do it, that is.
Any thoughts, warnings, or experiences you care to share, dear readers?
Here are some useful links on the topic:
Don’t Throw Away that Blemished but Beautiful Bathtub – This Old House
Refinishing Clawfoot Tubs – VanDykes Restorers
Reglazing a tub – DIY Network
Integrity Coatings – A source for reglazing chemicals and kits
|