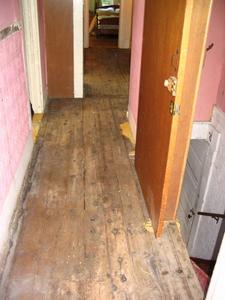
As promised, here are the photos of our hallway after my battle with the rainbow rug:

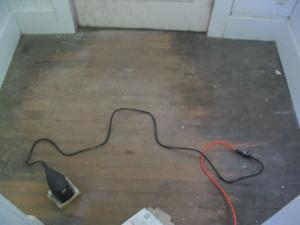
The disintegrated carpet pad along with 2 out of 3 of the tools I used (the other was a hammer)
The “after” shot. Ignore the unmade bed.

A good shot of the pink tin tiles. You can see where they had a chair rail up – and, the bits of original wallpaper showing through.
The hallway is going to stay like this for a while, because it’s not at the top of our fix-it list. We just wanted to get rid of the smelly rug while we had a dumpster nearby. I feel much cleaner and happier the way things are now, even if it’s equally ugly.

On Saturday, I got one of those rare burts in energy that makes me want to run around the house tackling the largest, most tiring projects I can find. Maybe it was the break in the 90-degree weather, or the 4 cups of coffee I’d gulped down that morning. Or maybe it has something to do with Teague’s new business and the anxiousness that brings with it; I tend to get overly productive when I’m nervous.
In any case, I decided that I would pull out the rug in the upstairs hallway. It’s that yummy 70’s rainbow striped stuff that Jeannie and Aaron also had to get rid of. And, surprise, was soaked in decades of cat urine. Mmmmmm.

(before)
Ripping out the rug revealed a carpet pad that had turned to dust, a layer of backer board, and then, lo and behold, some decent looking wide planked wood floors. Hurrah! By decent looking, I mean that with a good sanding, staining and coat of polyurethane, they will pass as quaint.
Of course, getting these layers off the floor was no small task, because the backer board was nailed down every few inches and the carpet pad dust was causing sneezing fits. And then, as with all of our demo jobs, it kept expanding. After I got the carpet off, I decided to remove the wood paneling as well. And what did I find underneath this? PINK! Bright pink walls, the same shocking color that we found in the downstairs bathroom, and also on the walls in the stairwell. Where will we find this crazy color next, I wonder?
The big find, though, was more tin – old ceiling tiles, painted pink, cover the bottom half of one side of the hallway. It’s the same tin used in the stairwell.
I’d have lovely “after” pictures for you, but I forgot to upload the latest photos…. I’ll get them up tomorrow, I promise.
Everyone knows our floors are a mess. What you may not know is how badly this sometimes depresses me. Mostly because, no matter what we do to to the interior decor, the floors stare back at me in all their paint-spattered, buckled, worn out glory. There is no escaping them.
The other day, I decided I’d sand down the tiny little entryway area so that I could see just how nicely the floors *could* clean up, when we get to that project. I figured it’d make me feel better, and it did. For a few hours of sanding, staining and varnishing, I got piece of mind and a very pretty entryway floor.
Here it is mid-sanding, so you can see the worn “before” area and the newly sanded exposed wood:
And here’s the same spot after 2 coats of stain and 3 coats of marine-quality spar varnish:
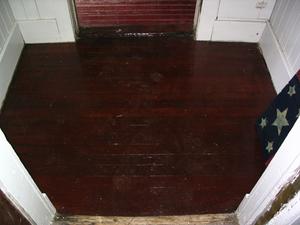
(Pretend I took the time to sweep & mop before photographing, ok?)
So, you see, there is hope for the rest of the floors. I got down on my hands and knees with a palm sander for this one ;)
Thought I’d make myself feel better by posting a before and “during” (because of course, there’s always more work to be done to ALL our rooms) of our living room. It’s not great now, but it is MILES away from where it started…….
For two young newlyweds on a budget, paint is the best thing ever invented.
Before:


During:

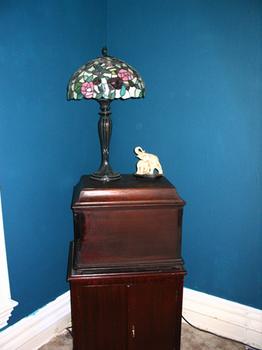
Our new blue matches local artist and friend Steve Thompson’s watercolor painting perfectly, and our new plants (thanks to HD gift cards) make it feel kinda tropical and fun in there. We need more art on the walls, less yucky rug, and some cute curtains, but it has come a long, long way for very little money, so there’s something to be said for that.
Thought I’d make myself feel better by posting a before and “during” (because of course, there’s always more work to be done to ALL our rooms) of our living room. It’s not great now, but it is MILES away from where it started…….
For two young newlyweds on a budget, paint is the best thing ever invented.
Before:
During:
Our new blue matches local artist and friend Steve Thompson’s watercolor painting perfectly, and our new plants (thanks to HD gift cards) make it feel kinda tropical and fun in there. We need more art on the walls, less yucky rug, and some cute curtains, but it has come a long, long way for very little money, so there’s something to be said for that.
Another week has flown by…. we’ve been hopping from project to project, including Teague’s new business (which is really taking off!).
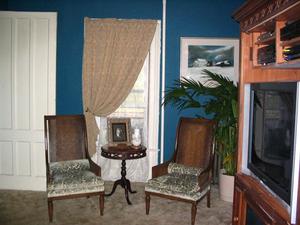
I promised a photo of the newly repainted living room, so here’s a comparison shot – you can see how much louder the first color was:
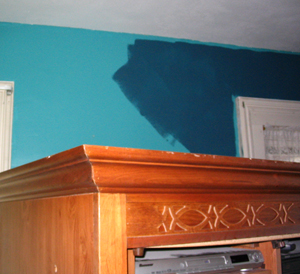
I like the new color much better, and it still matches the dark wood tones that are predominant in the room. Like this:
Teague is getting ready to side the third and final wall of our new kitchen addition. We’re running out of the original clapboard, so we’re looking into a few options to match things up. There is quite a bit of “close, but not exact” siding that we pulled off when we tore down the old walls, but if we want to match exactly then we’ve got two options. 1 – find a supplier of historic siding (or maybe a salvage place that carries it?) or 2 – make our own from rough cut lumber. We’ll be weighing the options, including time and cost. As always……..
If the raging thunderstorms stay away for a while, I’ll be finishing up the front door and scraping/priming the kitchen addition. Oh, and hopefully I’ll be cleaning, because our house is getting incredibly nasty. In our last apartment, I was a neat freak. Now, I’m learning to be comfortable with dirt and grime…… maybe a little too comfortable!
Like many of our fellow housebloggers, we had a productive weekend. The garage sale was a bust despite my 6 brightly-colored signs and newspaper ad, but we donated most of the leftovers so they will live on in someone else’s house. Ours is one ounce less messy, and that’s enough to make me happy. And in case you’re wondering, someone took the green velvet couch off our hands.
Teague finished shingling the roof on the kitchen addition, and started putting clapboard up on the other side of the house. The roof was a messy job. Everywhere you look (our laundry basket, our car seats, his work boots, the windowsill….) he has left little tar smears, lest I forget how hard he was working in the noon-day sun while kneeling on thick black shingles. FYI, Goo Gone works great on tar when it’s on a hard surface. Not sure I’d try it on fabrics though.
My weekend duties included overseeing the garage sale, stripping one of our front doors, and painting the living room a darker teal color. It looks MUCH better – pictures to follow very soon. We had a few visitors and all agreed it was nice, I hope they weren’t just being kind!
The front door turned out to be a hassle, of course. What project doesn’t? One half was painted white with shellac underneath, and the heat gun worked great on this side. The other side has an opaque brown shellac with no paint over it, and is proving much harder to clean. It looks as though some type of red paint is actually the first layer – then a brown shellac. In any case, the heat gun just made a sticky, hard mess of this stuff so I’ve been using chemical stripper which is not nearly as enjoyable or fast, especially with some deep molding that is fighting me at every turn.
Here’s the shellac-only side of the door, in progress:

Here’s a closer look at the shellac mess after two rounds of chemical stripping and scraping:
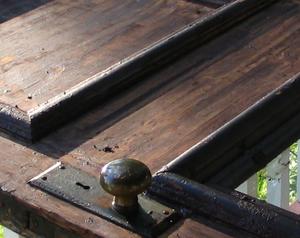
It’s mostly clean now, but is going to needs lots of scrubbing with denatured alcohol to remove all of the shellac. For those curious about a good paint-stripping process, check out House In Progress’s latest entry on the subject. They know their stuff!
This weekend, we’re holding our first garage sale since moving in. When my parents ran off in their RV, they left us with a bunch of new-to-us stuff. Their stuff was better than our stuff, so our stuff went away into storage. Now, it’s time to finally get rid of it, and I can’t wait.
My one regret is that attending to a garage sale means I won’t be getting much work done. But it’ll clear out our shed and basement, which makes more room for tools and materials. Productive, no?
If you’re in town, stop by and see us – we’ve got some fun stuff, including a nice 23″ tv and a green velvet couch that’d look perfect in an opium den. ;)
Cumberland Woodcraft carries a reproduction wallpaper that exactly matches the type we found when exploring our cupola. They are part of the Cooper-Hewitt Museum inspired line.
This one is on the walls and ceiling, and this one is very similar to the border used with it.
Pretty cool, right?
I’m a fan of pretty paper, be it stationary or wallcoverings, so the next time I’m in NYC I’m stopping at the Cooper-Hewitt National Design Museum to explore their wallcoverings collection. The museum happens to be housed in Andrew Carnegie’s former digs, a 64-room mansion, which I’m sure is a sight to see.
If you visit the Cooper-Hewitt site, check out this awesome toy. It lets you design a room with wallpaper, furnishings and accessories found in the museum.
This weekend felt LONG…… and not in a good way. Teague and I spent most of our free time wandering from project to project. But at least the weather cooperated. For the first time in weeks, it was actually enjoyable to be outdoors.
I accomplished just about everything on my immediate to-do list, and also managed to put up Tyvek, mow half of the lawn, and weed our flower beds. I also got the shopping bug, so used some of our Home Depot gift card money to buy pretty house plants. I’m always to cheap to buy the nice big ones, but now I have a bunch. Hooray, and thanks to our generous wedding guests ;) We also got a very generous gift certificate to a local nursery (Thanks, Diane!), and I can’t wait to go. I realize I shouldn’t be this excited about greenery, but I can’t help myself. I keep spiralling further and further into house-geekdom. I think I need to get out more.
Teague had to work both Sunday and Monday, but still managed to get a great deal of work done on the kitchen. One of the windows now has trim – and it matches the rest of the house wonderfully. The man has a way with a mitre saw.
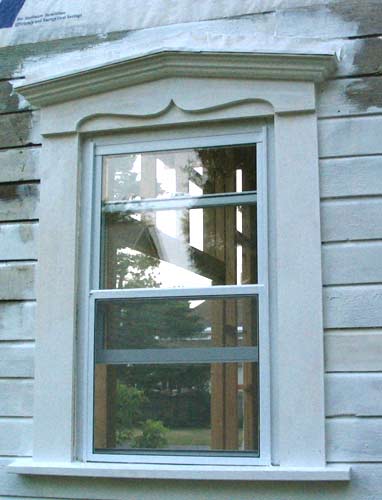
Old house enthusiasts might wonder at a few things – like, why we used a vinyl replacement window. We decided that since all of the other 23 windows in the house are vinyl replacements, anything else would look out of place. I’d certainly rather have old pretty ones, and maybe someday we’ll get around to installing something more historic looking, but for now at least they all match.
|

