Well, it’s official – we’re waiting until next weekend to start sanding down the other 2 floors. I can’t say I’m excited about pushing our timeline back a week, since it means our house will be ripped apart that much longer, but I suppose we’ll survive.
The living room floor’s last coat of varnish is hard enough to walk on, but not quite hard enough to put giant pieces of furniture on. And it’s supposed to rain for about 8 days straight, so nothing we do will dry. To add to our list of excuses, Mothers Day is on Sunday and I have a big deadline at work that requires some overtime. Add it all up, and this weekend’s project was just not meant to be.
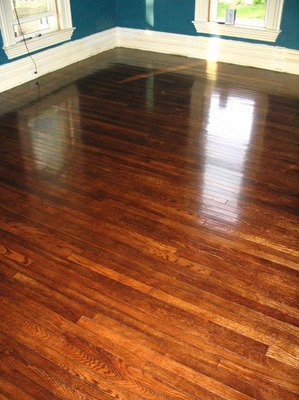
Ah well…… we’ll bask in the glory of what IS done for one more week. Namely, the bedroom and the office. Here it is again folks – the before/during/afters that prove we were not insane for holding out on buying a wall-to-wall rug to cover these beauties up!
BEFORE:

DURING:

AFTER:
Now that we know the process takes about 2 weeks from start to finish, we’ll be planning a little more carefully the second time around. Our biggest obstacle will be how to make the downstairs bathroom accessible for those two weeks. Right now you HAVE to cross hardwood to get to it, so we’re either going to build a catwalk or climb through the window……

If all goes well, I will go home tonight and check the bedroom floor and it’s newest coat of varnish will be hard as nails.
If it’s dry enough, we can move all our living room and dining room furniture into the bedroom, clearing them out completely. Then, this weekend will be floor-o-rama as we sand/prep/stain floors #3 and #4 in our series. When I hobble back into the office on Monday, I want to be able to say that ALL our floors are varnished and looking beautiful.
So, cross your fingers for us!
Thanks to everyone for the great landscaping advice – I’ve got a running list of things to check out now. While we wait for the hardwood varnish to dry completely (STILL….will it never end?), we’ve been entertaining ourselves by fixing exterior annoyances.
Yesterday the weather was beautiful (so rare in Central New York!) so we grabbed the dogs, jumped in the truck, and headed out to Teague’s parents’ house. They have somewhere around 30 acres of wooded land, so it’s the perfect place for tree hunting.
You may remember me mentioning their house before – it’s a log cabin that Teague’s father and mother built by hand, with lumber from their own property. Don is an extreme DIY’er and tackled nearly everything himself, from pouring the basement to stacking the logs to putting on a roof. It is a great place that fits perfectly with it’s surroundings, and I have always admired it.
Here is a photo of the cabin, for your viewing pleasure:

Isn’t it picturesque?!? You should see it in winter, blanketed in snow with smoke swirling up from the chimney.
We spent a few hours here roaming around the woods, selecting good-sized trees and a few smaller plants for the flower beds. Digging them up was easier than I expected – the pines were simple. The hardwoods had more roots and took longer to extract. Our haul included 9 white pines, 3 small poplars, a handful of lilac bush stalks, 1 pretty tree we haven’t identified yet, and a few ferns. We filled the whole truck bed with greenery!

Finding them was fun, and digging them up was tolerable, but having to put them back into the ground was exhausting. It required such big holes, and we had to drag water to the far-away places our hose wouldn’t reach. Let’s hope that most of them recover from yesterday’s uprooting and find their new home suitable…. I have a feeling that not all will flourish because of our clay soil.
We put 6 of the pines (3-4 ft. tall) on the back edge of our property – our house is on a double lot, so our backyard ends at the street and there is no fence. Once they grow larger, they’ll provide some privacy and should also act as a wind break. These were by far the best addition – it looks better already!
The lilacs went on the chimney side of the house, where they will one day disguise some ugly foundation and lawn issues. Other trees were planted in the backyard to provide shade, and a single tall poplar now lives outside the kitchen window where we can admire it while cleaning the sink ;)
We would have spent hundreds to get the same trees at a nursery, so the outing was definitely worthwhile. And there’s something nice about knowing where your trees come from!
When we took our first trip to a nursery last spring, we were shocked at how much plants and trees go for these days. Our dreams of a nice, lush yard full of trees, bushes and flowers quickly vanished as we looked at pricetags. We ended up settling for a spindley little crab tree from Home Depot.
This year, we’re planning to buy another tree (thanks to a very generous gift certificate from my cousin!) and will probably plant some annuals to prettify our somewhat meager flower beds.
We’re also interested in finding some native plants to fill out our landscaping. There are plenty of woodsy areas around that wouldn’t miss a small bush or two – especially out where Teague grew up. We’ll be sure to ask nicely before digging ;)
Here are a few good resources on landscaping with native plants:
Frugal Landscaping with Native Plants – The Dollar Stretcher
Lady Bird Johnson Wildflower Center
US Dept. Of Agriculture’s extensive plant database
Wild Ones: Landscaping with Native Plants
Has anyone taken the “dig it up” route, as opposed to buying everything from a nursery? If so, any pointers about where to dig, or how to ask?
We wait, and wait, and wait for the varnish to dry (and apply a second coat, and wait some more).
While we wait, we sleep on a mattress on the living room floor, between a displaced radiator and a giant mound of STUFF. The floor is our new bedroom – here’s what the house looks like right now, plus a queen-sized mattress and a pile of blankets:
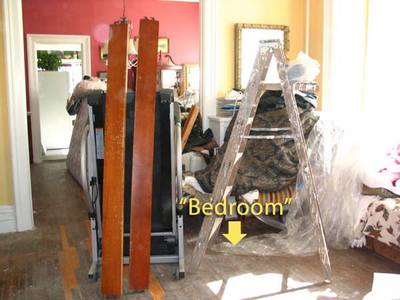
The dogs love the new sleeping arrangements, because it means comfier cuddling and more blankets to burrow under. It’s growing on me also, since we can now watch tv in bed – the epitome of lazy. Pretty soon we’ll move a Foreman Grill in there, so we don’t have to get up to eat. It’ll be heaven.
How much Advil does it take to dull the pain caused by 2 12-hour days of kneeling and squatting? And why the hell didn’t I buy my own set of knee pads???
Our weekend can be summed up in a few words – pain, exhaustion, and exilhiration. We rented an orbital drum sander Saturday morning, and worked diligently all weekend to get two (of four) hardwood floors sanded, stained, and varnished. Here’s a quick summary of events:
Friday Night:
We removed everything from the two rooms (the bedroom and office) and piled it up in the living room and dining room. We wrapped and taped anything in the house that dust could potentially ruin, like the tv and computers. Then, we did one last round of carpet-tack hunting and went to bed early so we’d be ready for the weekend ahead.
Saturday:
We rented the orbital sander from Home Depot ($70/day, plus sanding pads) and went to town on the office floor, which is roughly 200 sq. ft. The sander was not nearly as hard to work with as we had imagined. In fact, I wish it had been a little more powerful – it took a long time to get everything off! We found that only one of the four sanding pads had much oomph to it, so we lead with that pad and replaced it about 2-3 times more often than the other three.
The main sanding took a few hours, and then we had to go around the edges with a power sander, which took another few hours. We weren’t incredibly anal about getting every last speck of color off them because we like the aged look.
After the entire floor was sanded, and all big gaps/holes filled with wood putty, I vacuumed like crazy (on my hands hands & knees with the Shop-Vac) and then used tackcloth to get every last bit of dust out of the room. When it was dust-free, I threw on a pair of shoe covers and started staining the edges and floor. The edges by hand with a rag, and used a lambswool mop-head-ish attachment to stain the rest. We used two applications of Minwax red mahogany, which gives makes the problem areas less noticeable and matches closely to the old finish.
While I stained the office, Teague was busy sanding in the bedroom. By Saturday night at 11pm we had finished all of our major sanding (hooray – no extra rental fees!) and had 2 coats of stain on the office floor. We taped up the doorway to prevent fumes from escaping (works better than it sounds!) and crashed on a mattress in the middle of our living room floor, where we slept uncomfortably until early the next morning.
Sunday
Ahhh….. nothing like waking up, knees throbbing and bones creaking, and having to start all over again. I thought about having a nervous breakdown to get myself out of more sanding, but decided the pain would be worth it. So, about half of Sunday was spent crawling around sanding the edges of the living room, vacuuming up the dust, and getting it ready to stain.
We threw a coat of poly on the office floor around 2pm, and spent the rest of the day peeking in with wonder and amazement because it looks AWESOME. So very, very good.
By 10pm on Sunday, the living room was fully stained and ready for it’s 8+ hours of drying time.
Teague threw a coat of varnish on it this morning, so now we’ve got to wait it out for 3 days before sanding both (lightly) and adding another coat of varnish to them. Then, 3-4 MORE days before we can put furniture in there. That means another week of camping on the floor. Good times! It’s definitely worth it though, and we’re thrilled to finally tackle this project.
I’ll give a post-project wrap-up when it’s all over, but here’s some photos to tide you over:

Before – lots of paint specks, scuffs, and crud!

During – here you can see the edges have been stained, and I have just laid a new layer of stain on the right-hand side.
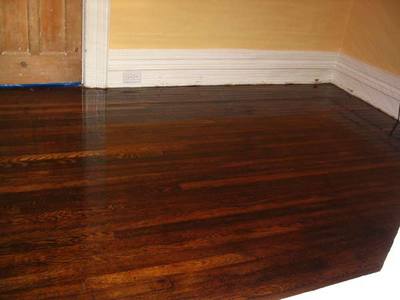
After – with one layer of varnish (still wet)
Last night, at 2am, we were awakened by the “beep….beep….beep” of our fire alarm. I, being the paranoid one, shot straight up in bed and tried to wake Teague, who declared “The fire alarm just needs batteries. It’ll go off on it’s own.”
Now….
A) It wasn’t the “low battery beep, and no it won’t just stop on it’s own
B) I was way too freaked to stay in bed and not check on things
So, I get up, bleary-eyed and stumbling, and open the bedroom door to find our living room and office FILLED with what appears to be smoke. My heart drops, and I yell “Oh my god, Teague – the house is on fire!” and make a beeline for the office, where the smoke is densest. I don’t see any flames, so my first thought is some type of electrical fire in the walls. Teague has finally gotten out of bed and is wandering silently through the fog with a very confused look on his face. Keep in mind, we’ve only been awake about 30 seconds and are still extremely out of it.
My brother Cody (who lives in an apartment upstairs, and works a late shift so was awake at the time) hears the commotion and comes down to see what’s going on. I tell him I think the house is on fire, and his reply is “But it doesn’t smell like smoke… it’s like steam, or something.”
DOH! All of a sudden the lightbulb goes off in my head. Teague had unhooked one of our steam radiators to prepare the office for hardwood floor sanding. This particular radiator had no shut-off valve. Neither of us had remembered to turn the heat off, and temps dropped into the low 30’s last night.
When the heat kicked on, it filled the house with STEAM – which apparently will set off your fire alarm.
So…. yeah, we’re idiots. We had a good laugh about it, turned the heat off, and went back to bed.
I think it’s especially funny that I was walking through a moist, non-smelling, non-cough-inducing fog yet it never occured to me that it wasn’t smoke. I guess in my stupor, alarm=fire and that was that!
I shared an embarrassing story, so now it’s your turn. What’s been your biggest “DOH!” moment related to your adventures in home repair?
We knew we needed to tackle some roof repair about a month after moving into our house; we had some minor leaking in the bedroom after a major rainstorm. Since the initial discovery, that spot has been patched twice, but continues to find new ways to let in the rain and snow.
Teague’s been up-close and personal with the outer roof plenty of times, but looking at the inner portion is actually quite a bit harder.
To find out the true extent of our roof problems (namely, how much of the original decking had been ruined by these leaks) we had to climb up into the crawl-space above the second floor. And the only way to get into this space is through what used to be the stairwell to the cupola, and what is now a bedroom closet.
For those who don’t know what a cupola is, it’s that little boxy thing with windows that sits on top of our house. I have yet to snap an exterior photo that does it much justice, but maybe this spring I will finally get around to it. Our cupola has 8 double-hung arched windows, 2 per side. It’s about 8’x8′ inside, and would make a lovely artist’s studio or secret hideout someday when it has a stairwell leading up to it, and perhaps a floor to stand on. Right now, it’s pretty much gutted.
We have explored the cupola before, but never in daylight or nice weather. It’s a much different experience!
Here’s Teague climbing into the closet (which happens to be in our storage room, hence the total mess) – he’ll be hoisting himself up through a hole in the closet ceiling. You can see why we don’t get in the cupola often….

This is what it looks like from the opposite side – that’s the whole in the closet ceiling, and what’s left of the old stairwell ceiling/walls. The white board is what we stand on so as not to fall through the ceiling.

And here is best view of the cupola innards I could get. It’s taken with the camera down on the floor, facing up. You can see the ceiling and arched windows, plus about 100 years worth of cobwebs.

All 4 sides of the cupola had been boarded up due to broken window panes (3 out of 8, not bad!), but Teague recently took one of the sides off which is why one side looks so bright and the others look so yucky.
With a little paint, I think this could be my favorite spot in the house.
The good news is, the original decking (extremely wide boards – maybe 8″? – laid side by side) is in good shape in most parts, and we can replace the pieces that have rotted using custom-milled lumber. This means no worrying about buying, transporting, and lifting giant sheets of plywood. For once, luck was on our side!
Aside from Teague, who of course is “in the business“, we have spent the last year and a half on the DIY straight and narrow. No outsiders – just Teague and I (and the occassional family member) pushing through all sorts of crazy projects.
Now, as we’re nearing our floor-sanding days, we’re finding all sorts of little things that we should do in keeping with the “top to bottom” rule of thumb. (Do the ceilings, then walls, then floor!) Most notably, we have lots and lots of trim painting to finish, and the office ceiling needed to be re-sheetrocked to hide some nasty cracks and rough, sandy texture. What can I say – I’m a smooth ceiling kind of gal. Since the last ceiling we did together was kinda painful for me, and it’s definitely a two-man job, we decided to enlist Teague’s work pal Chris to help out.

Chris taught Teague everything he knows about sheetrocking and drywall. He also owns a pair of stilts, which require good balance but allow him to work very quickly (no ladder to move). Given the job will get done quicker, and with less threat of personal injury, the decision was a no-brainer. Plus it frees me up to paint more trim…. yippee.

I’m happy to report that our first contractor experience was a positive one, and the results are looking good! The ceiling was up in a night, and the seams are getting taped today. After that, a little bit of sanding and painting, and it’ll be good to go.
Tired of ruining every piece of clothing you have? Sick of washing dirty, grimey work pants with your delicate whites? Embarrassed because every time you go to work, someone finds paint specks on your dress shirt?
This guy has the right idea…..
|

