SEARCH SITE:


BROWSE BY CATEGORY
Endsleigh specialise in Home Contents Insurance for people in the UK

Calculating credit card payments

Tips & Tools

If you’re doing any type of home remodeling, you’ve probably had to pull out the credit card at one time or another. And the credit card companies are incredibly sneaky about your total payments, APR and monthly minimums.

This tool, from Maeda Studios, is the best online calculator I’ve found to help sort it all out:

http://www.maedastudio.com/2006/credit/index.php

Have fun calculating just how long it’ll take to pay off that new tile floor……

Back to top

The end of the flip-flop era

First-Floor Basics

flip_flop.jpg

We pulled up the downstairs carpet the day we moved in, over a year ago. Since then, we haven’t dared go barefoot for fear of stumbling upon one of the carpet staples or tacks that were scattered across the hardwoods like little landmines.

But now, finally, we’re free to let our feet breath! I spent Saturday on my hands and knees with a pair of pliers, a hammer, and a cat’s paw pulling up every single staple I could find in the 4 rooms downstairs that used to have carpeting. And in case you’re wondering, the cat’s paw proved to be by far the best tool for the job.

While I was busy doing that, Teague was hanging out in the basement getting prepped for more jacking. Deciding that the walls could use a little more stability before we shift more weight onto them, he mixed up some mortar and started parging the walls. Here he is working on the very worst wall, which is right near the staircase:

One of the reasons we’re jacking is to straighten out our sloping floors. Another is that a few of our posts look like this:

We’re slowly doing away with these lovelies, replacing them with new posts and footings.

I know, you’re soooo totally jealous of our wild weekend.

Back to top

Hello, Syracuse!

Diary

I just wanted to welcome all the newcomers that read about us in today’s Syracuse Post Standard article. There is plenty here to keep you busy – we’ve written over 200 posts in the last year, so go ahead and explore ;)

For those not in the area, the story is available online here, and you can view the front page in PDF format:

http://www.syracuse.com/poststandard/pageone/pdf/fri-a.pdf

Back to top

Kitchen Show & Tell

Annex/Kitchen

We’re about 90% done with the interior kitchen renovation, and I know you’re all curious, so I thought a slideshow might be in order. But first, a few before and afters – click on a thumbnail below to see a larger version:

Before After
Before After

All in all, it’s been quite an experience. We started with a scary, rotted out back room and a dim little box for a kitchen. Now, we have a bright and airy kitchen space and a to-die-for pantry. And it only took……… about a year!!!! But we did lots of other stuff inbetween, so the timeline is not as bad as it sounds.

As you may recall, we started tearing down the back room last spring. That was a major, major project – we got rid of 2 large dumpsters overflowing with debris, and had to carefully remove all of the clapboard siding so we could reuse it. Not easy or fun, but ultimately worth it because it matches the rest of the house perfectly.

We rebuilt the back of the house and combined the two spaces into one large kitchen, with two new windows and a large set of salvaged french doors to bring more light in.

For budget’s sake, we left the existing cabinetry (and added some molding and new hardware so it wasn’t as ugly). Instead, we blew our budget on a new tile floor that looks amazing and hides all the dog dirt. We also splurged on a new apron-front kitchen sink, which made the kitchen look really pulled together. But we desperately needed more counter space, so Teague ended up building some great custom cabinet pieces (like this) for the kitchen. One is on wheels so that someday when we get a new stove it can scoot over as necessary to fit it. Another hides our garbage can, which is now on a track – and I really love having it tucked away like that.

Teague squared off the rounded countertop and used two pieces of leftover butcher block as shelving. I made sure the shelves were deep enough for my big cookbooks – so that someday, maybe, I will be inspired to actually cook.

If you want to see additional photos, check out the Wagner Design and Construction showcase for a slideshow!

Back to top

A change of scenery

Bathrooms

Yesterday, Teague and I got to take a little roadtrip down to Hazleton, Pennsylvania to visit the Vintage Tub & Bath showroom and warehouse, where we helped review products for their website. The sun was shining, there was no snow in sight, and the dogs were napping happily in the back seat so the 3.5 hour drive was actually really relaxing.

We spent the day with Allan and Maria, two VTB employees, who took us to a great greasy spoon diner and let us play with all sorts of products. It was sort of like Christmas morning, opening up each fixture and playing with the parts. You wouldn’t believe how heavy some of the faucets were! I was impressed. We even uncrated a tub in the warehouse, where I totally embarrassed myself with my bad drilling technique.

Here’s Teague checking out one of the bigger tubs that would surely not fit in our teeny tiny bathroom:

And a wall-o-tub feet, each cooler than the last:

So of course, more than ever, I want a clawfoot tub and a made-for-a-princess telephone handle shower sprayer. And I want it now. How very Veruca Salt of me.

Back to top

Your to-do list for Saturday

Diary

If you live in the Syracuse area, pick up a Post Standard on Saturday, February 18th and look for your favorite bloggers – one of their very cool journalists is writing an article about us!

Back to top

Super-girly shower curtain

Downstairs Bathroom, How-To

Last spring, we received a lovely shower curtain from my cousin and his wife. It was a wedding gift, and I adored it. And then, like everything else we own, dirty grimey handprints somehow magically appeared on it.

So, I washed it. You would think a shower curtain would be machine-washable, but NO…. after one innocent little wash, ours turned a really ugly shade of yellowy-white, reminiscent of sweaty t-shirt armpits. Hmmpph. Perhaps I should have read the washing instructions, eh?

That prompted my mission for a new, cheap shower curtain. But not some plain old boring one, because I’m as picky as they come. I looked and looked, and nothing in our price range fit the one I’d dreamt up in my head. Furthermore, I became obsessed with the wickedly overpriced but very pretty ruffled ones ones they carry at Anthropologie.

Never one to give in and settle for second best, I decided I could make my own pretty ruffled shower curtain for next to nothing.

And so, I give you two curtains:


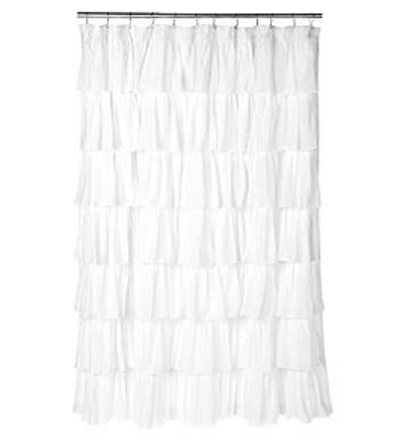
The $98.00 one from Anthropologie.com


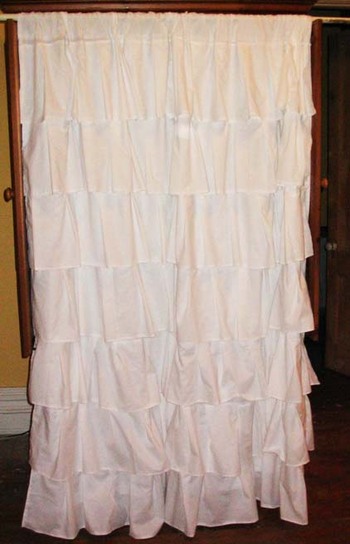
My version, made for $15 in fabric (6 yards) and about 6 hours of mind-numbing sewing.

The only thing left to do is add the grommets so it can hang on rings with the liner. It was really easy – time consuming and tedious, but easy. It’s just one large curtain with 7 12″ ruffled tiers sewed on, spaced about 11 inches apart so they overlap slightly.

EDIT: I’ve had a few requests for a pattern/direction. I didn’t have a pattern, but I did write up some basic directions that will help you pull together you’re own ruffled beauty…it is SUPER easy if you know how basic sewing techniques and have a machine. The math was the hardest part for me ;)

First, I cut out a piece of white muslin that was about 2 feet wider than the width of the shower, and with a length long enough to almost (but not quite) reach the floor from the shower bar. Remember to leave room for hems – the top part needs a decent size hem- mine was 3″ – and the bottom just needs about a 2″ straight hem.

I sewed all hems and the pocket for the large piece, then cut longer pieces for ruffles. The ruffles I used are about 10″ tall, and I made them twice as long as the width of the base piece. The wider they are, the rufflier it will be. 1.5 times would probably be fine –  mine kind of takes over the bathroom.

The height for the ruffles can be figured in accordance with the height of your base piece. You want the ruffles to overlap by about 1.5-2″, and the last one should end right before the bottom of your base.

You have to hem up the edges on each ruffle piece. This is the most time consuming part! Turn the hems in so that they won’t fray in the wash.

After that, I worked on one ruffle at a time – I folded the fabric up every few inches and pinned it to the base piece, creating the ruffle effect. Then I ran a tight straight stitch over the entire length to secure it. I didn’t get too exact with the folding over – kind of
winged that part, but it still worked out fine in the end. If you’re pretty confident your measurements are correct, start from the bottom and work up – it’s easier, because you won’t have to flip the previous ruffle up. If you’re not confident, start at the top – you can always shorten up that last ruffle, no one would notice ;)

The last step was to create large button holes (in the top hem) for the shower curtain rings. I think I did 12 across to match the number of holes in plastic liners.

I think I ended up doing 6 ruffle layers – it took all day, but it’s a very cool curtain and the materials were incredibly cheap.

Back to top

The prettiest lantern

Exterior

My friend Jonah is a great photographer. I was flipping through his portfolio tonight, and came across a photo of a truly beautiful lantern:

lantern.JPG

You can see the large version (and his porfolio) here.

Back to top

Community involvement

Diary

A post over at Bungalow 23 got me thinking about our little neighborhood. Lately I’ve been wondering why we’re not more “involved” in our community.

I partially blame the age gap – I’m pretty sure we’re the youngest homeowners on the block, and we don’t run into too many people our age who are passionate about home restoration. So if there are existing groups out there, we wouldn’t hear about them from anyone in our circle of friends. We’ve also become quite anti-social, since most our free time gets sucked up by home improvement projects. Being social would help, I’m sure.

I’ve been looking around for any type of committee or group that might interest us and help us meet people. Neighborhood associations, preservation societies, community beautfication, that type of thing. Bigger cities (like Syracuse) have some interesting offerings – like this group – but in tiny little Canastota, the best I can find is the Chamber of Commerce.

Has anyone out there started their own neighborhood group? And if so, how’d you go about it? I know there are plenty of old-home restorers/lovers in and around town…. but how do I meet them?

Back to top

Oooh, overhead lighting

Electrical, First-Floor Basics

Yes, we’re moving up in the world. We’ve now got overhead lighting in the living room and the bedroom, without any 80’s overhead fans attached, and WITH A SWITCH! Yeehaw.

Because the old knob and tube “knobs” are still in the wall behind plaster and lathe, it’s not easy fishing wire around without getting caught up on one of those. After a whole lot of swearing, Teague ended up using the patented Kurt Shea notch trick, named after the very handy friend who taught us this technique.

Basically, you notch out a nice neat path in the plaster for the wire to sit in. You run the wire in, securing it tightly to the lathe, and patch back over it. After a good sanding and a coat of paint you’d never know the difference.

Here’s a good pic to illustrate it – before paint, of course:

And this pic is for the person who accused me of neglecting/abusing my dogs (in the dog-crate hideaway article’s comment section):

bruiserSweater.JPG

See the closed eyes and content smile? That, my friend, is a happy dog. He loves to bask in the sun, but alas it’s mid-winter so he settled for the spotlight. He cuddled up so close to it we were afraid he was going to start smoking!

Back to top