It’s February in upstate New York, and I just got back from an hour-long walk with the dogs, wearing nothing but a fleece. No winter jacket, no hat, no gloves. No snow!
We’ve had the warmest January on record, but the rumor is we’re heading into a record-cold February. So…….. I thought I better take advantage of this last nice day before the lake-effect snow starts pounding us. Everyone here is just waiting for the miserable weather that no doubt awaits us. We all know it’s too good to be true.

I’m sure it’s outrageously out of our price range, but Brooklyn wallpaper designer Wook Kim has a very cool take on traditional patterns…

If you’re transitioning your furniture style from college chic to all-grown-up, you’ve probably got more than a few laminate furniture pieces in your house. And you’re probably sick of looking at their ugly mugs. Right?
Well, Ask MetaFilter has a pretty good round-up of suggestions for painting over them, including one at the bottom to faux-wood-grain it. Genius!
Worth a read if you’re looking to successfully transform that old desk from WalMart…. http://ask.metafilter.com/mefi/31813
Read more about this faux finishing technique:
HGTV – Faux Wood Graining
Bob Vila – Faux Grain Finish
Best of all, it’s actually an “authentic” Victorian style. Unable to afford the rising cost of materials, the Victorians got creative and started faux finishing instead. In this article, they explain in more depth.
I’m not a huge fan of faux finish because people seem to get carried away – much like stenciling, it starts showing up on every surface in the hosue! But it does have it’s applications – and this might be worth trying.
It’s tax time again. Are you all anxiously waiting to file so we can see how much of our hard-earned money we’re getting back? And are you all dreading the process of getting them filed? Blech.
This year there’s much more preparation involved, what with the house and the new small business to deal with. So I’ve been the receipt-organizing queen, and this activity has taught me a few things. For instance, we buy caulk every single time we go to Home Depot and should have enough paint in our possession to cover half the neighborhood. Also, although it has felt like we’ve been spending at a constant and steady rate, we really didn’t do too bad until November. And then, WOW, we shopped like fiends.
That’s because most of last year’s work focused on the basics. Plugging holes, fixing leaks, etc. So those are the projects we’re returning to – which is where we *should* have been all along I guess, but it’s not nearly as much fun.
Last night while I dug around JoAnne’s for cheap curtain fabric, Teague was busy getting rid of more knob and tube and adding a new overhead light to the living room. While he was at it, he found a squirrel-chewed wire in the entryway that had to get cut. It was old knob and tube, so we’re not too sad about it. Electrical one of our least favorite projects, but it makes a big difference. Not having to cross a room in the pitch dark (tripping on chew toys along the way) to turn on a light is AWESOME!
During rewiring, we have to add light switches to two more rooms downstairs, and everything but the bathroom upstairs. What I want to know is, how did the previous owners live in the house for 20 years without light switches and not seriously injure themselves??
One of my biggest cleaning chores has always been the dog cage. It’s big, it’s unwieldly, and my little guys aren’t too proud to let loose and pee in it from time to time.
I’ve gone through a few different “systems” trying to find the best solution to this problem. For a while, I had a giant plastic carrier like this:
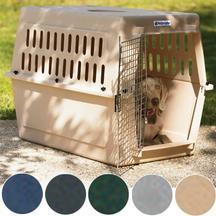
I put a piece of 2×4 lumber under the back end to tip it forward just a tad, so the urine would at least flow downhill. Not a great solution, even with newspaper lining the cage floor, because when I came to let them out they danced all over the pee-paper and flung droplets at my face. Mmmmm.
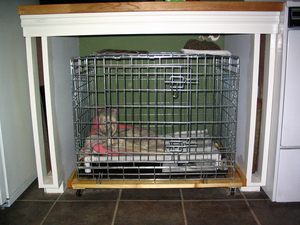
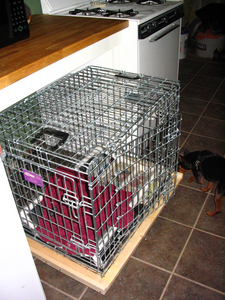
Next, I bought a wire cage with a pull-out bottom, like this:

I wanted one that kept them up out of the pee completely, but couldn’t find that anywhere. So instead, I built my own platform out of PVC pipe, zip ties, and mesh screen. Super cheap, easy to clean, (I just spray it down in the shower) and it does the trick. This made everyone cleaner and happier.
But now, I feel like a princess because Teague built me a rolling cart to set the cage on. It fits perfectly under our new countertop, so he built some sheet-pan shelves on either side and I’ll be hanging some fabric on the front to hide the cage.
I also *might* have sewn them up a little doggy sleeping bag to cuddle up in. And they *might* be too stupid to figure out how it works, making all my hard work for naught.
Oooh, fancy!
Our new kitchen faucet is a dud. What a huge disappointment.

A few weeks ago we purchased a Pegasus two-handle high spout faucuet, very similar to this one, from Home Depot. We paid $179, an amount of money I had a hard time parting with even though the faucet was very pretty and exactly the look we were going for. And even though I know that isn’t that much money for a stylish faucet – in fact, it’s actually on the low side. Our reasoning was that we’d regret the money spent on something we didn’t love (even if it was less money), whereas this one would be admired and appreciated for many years and we would have no urges to replace it with something else.
Well…….. it would have been admired, had it actually worked properly. The sprayer part leaked badly whenever you ran the water. It was poorly put together and the handle/nozzle part was loose. Teague tried using teflon tape to fix the problem, but that didn’t work. Next he tried replacing the internal spring mechanism with something tighter, but that didn’t entirely fix the problem either. Finally we swapped the sprayer for a new one, only to find this one was even WORSE. Ugggh.
So in the end, we had to swap the Pegasus faucet for the old one we had (luckily we’d saved it) and bring it back to Home Depot. To their credit they took it back without any hassle. I guess if you’re going to sell something in your store that is both crappy and expensive, you better have a good return policy.
On the bright side, that’s $179 less in credit debt, so we’re going to live with the old faucet for a while!
In our quest to turn the kitchen into something usable, we got a little carried away. You may recall that our original goal was to get the back side of the house repaired so we would qualify for real insurance, instead of the scary NYPUIA hazard insurance. (The name alone is scary, isn’t it??)
We reached the point of insurability some time ago and have a new, comprehensive policy to prove it. But somewhere along the way we got sucked into all the FUN of renovation, and started spending money willy-nilly to make our kitchen functional and pretty.
Now, it’s very functional – more than I ever imagined – and it gets prettier every day. But it’s also not paid for. It’s the first project we’ve overextended on, and the debt is not too crazy, but it has got us feeling a little uneasy. So a decision was made – until the Home Depot card is paid off, NO NEW PROJECTS. At least, no pricey ones. You know there will always be a project ;)
Time to come up with a list of cheap projects to keep us busy this winter!
- Finish ridding the house of knob and tube (not cost-free, but pretty cheap)
- Strip the stairs
- Replace the bedroom ceiling light and wire up a light switch for it (have the fixture already)
- Make a transition strip for the kitchen using some of our excess lumber
- Remove all the leftover carpet staples from the bedroom and office (so very not-fun)
- Get the wood floors patched and ready for refinishing in the spring/summer
- Finish jacking and repairing the foundation
- Finish putting up the kitchen crown molding
Hmmph. That’s plenty to keep us busy for a while.
So tell me, what’s your favorite low-cost home improvement project? And paint doesn’t count, that’s too easy :)
We’ve had a few roof leaks over the past year, and plan to redo one of our roofs in the spring.
The original roof was flat, and now has a second roof built up over it.
When we do the repairs, we’d like to take it back to a flat roof in keeping with the Italianate sytle. So this article on This Old House should come in handy
http://www.thisoldhouse.com/toh/tvprograms/houseproject/article/0,16516,1062246-1127447,00.html
On a related note, we decided to let our This Old House subscription lapse because although we enjoy the articles, the budgets they work with are much different from ours. With every “come on, we want you back!” notice sent, they lowered their asking price a few bucks. When the last one came, it was at $10 – so I signed us back up!
Lesson learned: sometimes it pays to procrastinate.
There is a house two blocks from us that has always interested me. It’s a huge Victorian on Peterboro Street, and it’s porch is always filled with neat looking furniture and collectibles. Recently, I spotted an “Antiques” sign hanging out front and was lucky enough to catch it open.
All I can say is WOW.
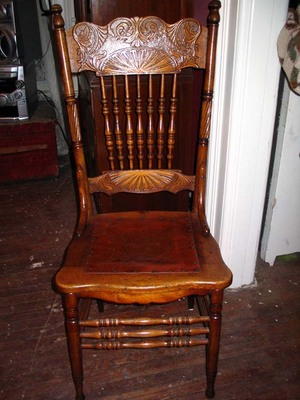
I had no idea what our neighbors were hiding inside that house. First of all, they’re extremely nice people with some very unique (and well priced) antiques for sale. They try to keep the shop open in between outings and auctions. They had plenty of Victorian things, including some great pieces of large furniture. There was a dark-stained Eastlake bedroom set that had my name all over it – too bad I haven’t won the lottery yet.
But what really surprised me was the house’s interior. It is so very, very grand. It was built by the Crouse family, a well-known name around this area. It was also a Masonic Lodge at some point. The current owners have been there about twenty years and it serves as both their home and shop.
Their … well, I guess I’d call it a ballroom… has incredibly high ceilings with a GIANT floor to ceiling oval mirror. I have never seen something so breathtaking, except in museums. The mirror has a gilded frame, and there is gilded plasterwork on the ceiling as well. There’s another large mirror at the opposite end of the room, gilded also. It was an incredible surprise, and it’s got me wondering what our other neighbors have behind their front doors!
The best part of my visit, aside from meeting such cool new neighbors, is what we ended up taking home with us….. 5 lovely pressed-back dining room chairs. Now we can get rid of the ugly fabric chair covers our dogs insist on marking.


I can’t wait to go back, and when I do I’m bringing my camera so I can show you all the mirrors!
This weekend, our kitchen took another giant step away from a drab, dirty, box of a room we hate to an attractive and functional room we actually WANT to use and spend time in.
First, the goodies we purchased to make it happen:
A Whitehaus double-bowl farmer sink from Buykitchensinks.com and a very pretty Pegasus faucet from our favorite shopping-at-the-last-minute fallback store, Home Depot ;)
The sink was ordered last week and arrived on Monday. Gotta love quick shipments! We spent most of the weekend prepping for it’s arrival, so Teague hit the ground running when the UPS man dropped the giant box off on our front porch. By the time I got home from running errands, he was already half done with the install. He’s a madman.
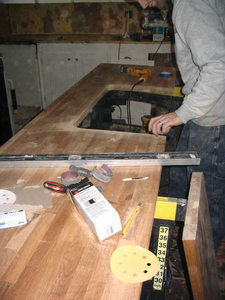
It was simpler than I expected (easy for me to say – I mostly stood back and watched the progress). All in all, it took about 4 hours to cut the wood countertop and get the sink mounted, and another 2 hours to install the new faucet.
His first step was to decide on a rough layout for the sink and fixtures. He took careful measurements, decided on placement, and traced out the sink profile on one of our countertop slabs.

After that he used a scrollsaw to cut out the hole for the sink. He did this in the kitchen since it’s absolutely freezing out, so we’ve got the sawdust to prove it.
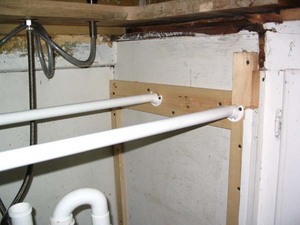
After cutting out the opening, he installed framing for the undermount bars that came with the sink. The cupboard sides we attached the bars to didn’t seem too sturdy, so the additional framing was mostly for peace of mind.
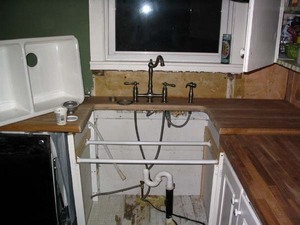
Once the mount bars were screwed in, we sat the sink in and set the countertop in place, and stood back to take a long, proud look.

The plumbing part wasn’t too bad either – there are two drains, so he had to T the original PVC line. The dishwasher drain line runs under the sink too, so it’s an interesting intersection, but by the end of last night it was ready to go and working great.
Today, Teague set a bead of caulk (yes, caulk again!) to the sink rim and set the counter.

Tada!!! We’re ready for washing and rinsing in style.
|

