Just thought you guys would be interested in the latest project that This Old House is undertaking. It’s a cute, fairly average looking old house in their fave city, Boston.

Personally, though the Cambridge House and DC House were cool, I’m excited because this one ought to be a little more relative to what we’re doing at our own house. Well, except for the giant budget, camera crew, and a team of master carpenters on hand to fulfill our every construction whim.
You can view a few preview pics of the house here:
http://www.thisoldhouse.com/toh/tvhouseprojects/gallery/0,25895,1179110-0,00.html
And, if you’re so inclined, you can check out the houses that didn’t meet the cut here: http://www.thisoldhouse.com/toh/tvhouseprojects/gallery/0,25895,1172589-0,00.htmlÂ

I’m a researcher at heart; I went to nearly every store in the area comparing rug prices and selection. I hit Home Depot, Target, Kohls, Macy’s, JCPenney, Marshalls, TJ Maxx, and a host of online shops including buyrugsdirect.com, homedecorators.com, and ebay. I put about 20 rugs on my “watch list” for ebay so that I could track what their ending prices were; this gave me a good idea as to what price I’d have to pay by the end of an auction, and I will probably buy one or more off of ebay in the near-ish future.
But all of my local shopping paid off – thanks to a tip from a friend, who mentioned that a Thomasville Furniture store near us was going out of business and had advertised a sale on rugs. And rugs, indeed! Two stores in the area were closed down, and all of the merchandise was brought to this location where a team of “liquidation experts” were brought in to get rid of everything as fast as possible. They had massive piles of traditional and contemporary rugs piled high with great markdowns – 65% off. But little old me, on a teensy budget, still felt way out of my league. The room-sized rugs were original $2-$3k… even at 65% off, that’s a hefty wad of cash to part with.
Still, I had to look – for the sake of research. ;) 3 immigrant workers flipped rug after rug after rug while I oohed and aahed (and inwardly cringed at some ugly ones). I felt a little strange having people flip rugs for me, and stranger still to have an older Russian gentleman standing next to me trying to gauge my reactions. When ones came up I liked, I told him – he took out his calculator and gave me his “lowest price”, a further reduction off the clearance prices. Verdict? Still too expensive.
Luckily, the friendly salesman the rugs took pity on me, or realized I was about to leave without having bought anything. He showed me a few in the stack that he could further reduce to a number I was comfortable with. I ended up walking out with a gorgeous 11×8 Turkish wool rug for about 1/5 it’s original cost. It’s beautiful, and quite possibly the nicest piece of home decor we own. Certainly the nicest piece we’ve purchased ourselves!
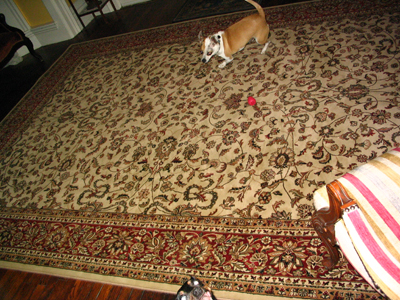
The colors are somewhat muted, with nice tans, creams, and golds – plus mossy green and a dark reddish-orange. It looks amazing next to the dark hardwoods.

The dogs are in love…… it’s given them a place to run in tight, endless circles without slipping and sliding into something. I couldn’t even get a photo without them in it, try as I might.
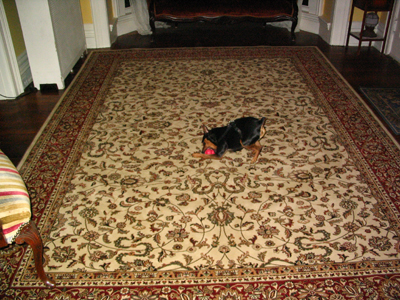
We’re still debating what room it’s going to live in, but for now it’s resting in the foyer where we can admire it’s beauty for the 3 days that it will remain clean.
Pfft. Let me begin by saying that this whole blown-in insulation project goes down in Fixer-Upper history as one of our least favorite. Ever. Which is saying a lot. It wasn’t one thing, but a combination of lots of little annoying things that made it suck so bad.
On Saturday morning Teague drove out to Home Depot bright and early to rent the “blower” – a machine that blows the insulation through a long hose and into your walls. Only, that H.D. only had one blower and it was broken. Yay hoorah. So he drove in the opposite direction to the other nearby H.D., where they promised a blower would be waiting for him. It was, but that H.D. was out of cellulose. SO…. he made a third stop at Lowes to pick that up.
The blower:

By the time he got home, the truck was jam-packed with insulating gear and it was nearly noon. We got to work immediately, unloading the unwieldly blower and dragging it out to a spot near a window. We hooked the hoses up, and duct taped them together since it was obvious they wouldn’t stay put for long.
Duct-taped hoses:
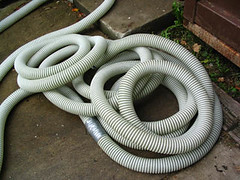
We started by insulating a ceiling upstairs. It’s one that we left accessible when we tore the hallway apart; it had no prior insulation so it was an easy place to start. I fed the “hopper” (the blue part of the blower) with cellulose, breaking it up into little bits before putting it in. Teague manned the hose, and ran the remote on/off switch so that he could stop the blower when moving the hose between joists. Things went really smoothly, and we had that ceiling insulated in about half an hour. I’d heard this stuff was a pain, so I was pleasantly surprised with how easy it was. HA!
Next, we moved on the living room. It has 3 exterior walls, one of them north-facing. In the winter you can actually feel gusts of wind through them. Teague drilled holes (maybe 1.5″?) between each of the studs, which made a small but manageable mess. We dragged the hose in, making sure there were no kinks or sharp bends, and hooked up the wall attachment, a metal fitter with a small 1″ opening at the end.
By the time we got to the third wall cavity (out of approximately 25), the line was majorly clogged. We futzed, and emptied parts out, and tried again. Clogged. After futzing around for about a half an hour we got frustrated, started swearing, and generally lost patience. Teague called the store for tips, while I ran inside to do some internet research. We realized simultaneously that we had the hopper open too wide. We were sending too much cellulose at once, and the little nozzle couldn’t handle the pressure. Doh! We spent another half hour thoroughly cleaning out the hose again, set the hopper to the lowest width, and tried once more. CLOGGED. I was ready to cry.
Finally, we decided that the tiny little 1″ fitter they gave us was useless. Teague rifled through the shed and found a piece of leftover plumbing that had a wider opening. We duct-taped that to the hose, and VOILA. Like magic, that solved everything. Except that it was a little bit bigger than the holes we’d drilled, so we had to hold the hose up close to the wall and try our darndest not to make a giant mess. This resulted in major arm pain, but it worked.
We failed at the non-mess making. By the time we finished the living room and one other outer wall, it was getting dark out and our entire downstairs was covered in dust and cellulose debris. Every single surface. It was also scattered all over our driveway area, where the hopper was loaded. Obviously, we had not thought about how messy this stuff was going to be.
Lessons learned:
- Prepare for a big mess. Put plastic up in your doorways and tape the seams so you can keep the mess in one place. Put a big tarp under the hopper for easy clean-up outdoors.
- It’s more time consuming than you might think. We did 4 outer walls and one ceiling in about 8 hours. We had a major setback with the clogging, though.
- It’s definitely a two-person job. Three would be ideal, since it was hard to hold the hose in place and run the remote control at the same time. It took two hands to hold the hose steadily against the wall for that long.
- Don’t bother with the tiny nozzle! Start with something bigger, like 2″.
- Break your cellulose up into very small chunks, the smaller the better. The machine doesn’t agitate and break them up all that well.
- Watch your hose closely so you can catch it clogging before the whole thing is packed up. Once it’s packed, it’s a major pain to get cleaned out.
We ended up doing four walls and one ceiling in one 8-hour workday. We then spent the entire next day cleaning up the mess. The machine was $35/day to rent, and we used up 9.5 bricks of cellulose at $10/brick. So… not too costly, but a major pain. Hope it’ll be worth it when winter rolls around!
Last week, I found a sweet surprise in my mailbox – 3 prints from talented photographer (and former neighbor) Andrew Burdick.
I’ve known Drew nearly all my life; we grew up about a block from each other. But since embarking on our grown-up lives, I hadn’t heard much about his travels and adventures. When I went to see his exhibit at a local library this summer, I was not expecting to see such beautiful and unique photos from all over the world. Take a look at his online portfolio to see what I mean!
I ordered three photos from his “Organic” collection, which I plan to hang in a set once I get the time to mat and frame them. We’re starting to build a nice little collection from local artists, which I think is really fun – I like having a personal connection to the art on my walls.
On Thursday, I attended my very first stained glass class. I’m a person who craves knowledge; I eat up books, magazines, and tv shows that teach me new things. It’s something of an obsession, this needing to know. It stems from my type-a competitive personality; deep down, it bugs me if someone can do something that I can’t. It also merges with my frugal side. The part of me that sees something at a craft fair or a boutique store and says “Cute, but I could make that for 1/4 the cost!”
The point being, classes have always been fun for me. And classes involving crafts? Ultra fun. My new teacher, Mike, seems like a very nice guy. He has been working with stained glass for over 20 years, and has his own shop. The way he scores and breaks glass makes it look deceivingly simple.
 The class started out with some basic safety guidelines and an intro to the tools we’ll use. Our first piece will be in the “tiffany style” or copper foil technique. You can build a window using this method, but you wouldn’t want to expose it to the elements. For exterior windows like the ones I eventually want to make, the lead-came technique is recommended. So I’ve got some learning ahead of me! The class started out with some basic safety guidelines and an intro to the tools we’ll use. Our first piece will be in the “tiffany style” or copper foil technique. You can build a window using this method, but you wouldn’t want to expose it to the elements. For exterior windows like the ones I eventually want to make, the lead-came technique is recommended. So I’ve got some learning ahead of me!
We got around to scoring and break glass about an hour into the first class. I love jumping right in, so I’m glad it’s mostly hands-on learning. The scoring tool we’re using is a “pistol grip” cutter, which looks like a fun kids toy but is actually a crazy sharp little rotary cutter. It’s amazing how little effort you have to put into scoring the glass; it’s like rolling a rotary cutter across a single strip of fabric. Zip…. snap. That’s it.
We used running pliers and breaker pliers to snap the glass off. Holding giant shards of glass in your hand is anxiety-producing at first, but once I got over my initial fears I had a much easier time with the snapping. I slashed myself twice, but neither were gushers and by the end of the night I was able to cut deep half-circles out of a straight piece of glass. Not bad for one lesson!
I’m looking forward to next week’s class. We’ll be making a small suncatcher-type thing with a flower in it. It has quite a few curves and odd shapes in it, so I think it’ll be sufficiently challenging ;)
Check out Wikipedia’s entry on lead-came and coppor-foil glass work – it’s a good one!
We didn’t make any progress last night – too tired, too bored with drywall – but I thought I’d post some photos of last weekend’s wallapalooza.
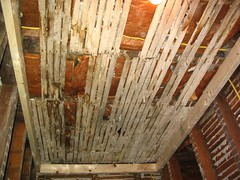
That is the ceiling “before” – you can see the insulation peeking through, and the rough shape of the lathe. This is why we decided to frame up a new ceiling beneath it.
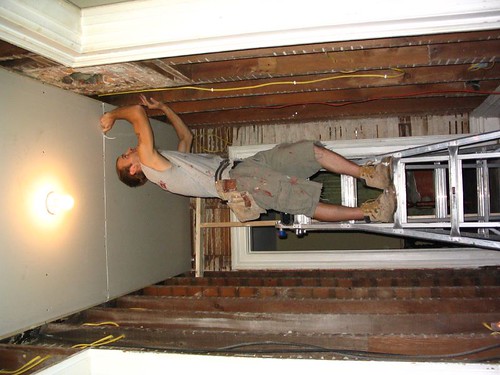
Here, you can see the ceiling has been installed. You can see what’s left of an old brick chimney to the right of his arm. You can also see our deadman (for supporting the ceiling boards while we screw them in) in the back, by the doorway. Teague is notching out the edges of the boards to create a nicer seam for smushing sheetrock into. This is a little trick he just taught me, and it’s genius! You can get a closer look here.
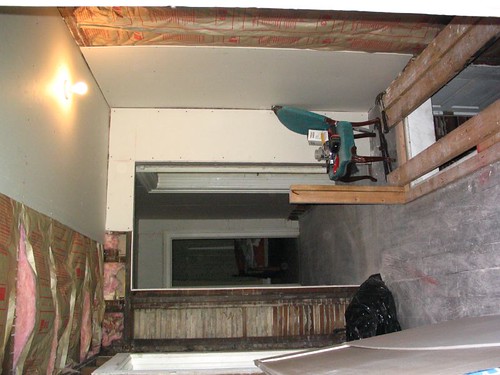
This is where we’re at now. The back part of the hallway is finished. You can see our “scaffolding” over the stairwell, consisting of 3 long boards nailed to the floor and a few props underneath them keeping them steady.
Here’s what this carefully crafted system looked like in action:
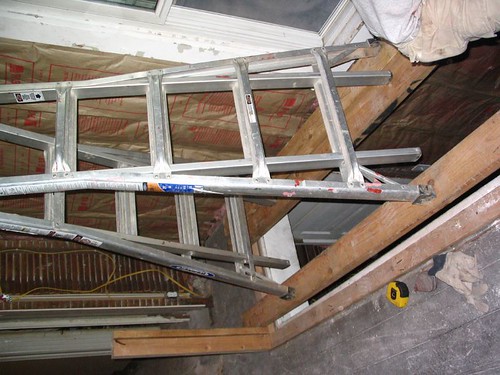
At one point, both of us were on this ladder with a wobbling piece of sheetrock balancing precariously on the top of our heads. I do not recommend this particular route and must add “DO NOT TRY THIS AT HOME”. It was neither safe, nor fun, but it got the job done and we’re alive to tell the tale.
We’re going on day 3 of using our stairwell with the boards still in place, and the dust you see there? It remains, still, this nasty and dirty. There’s nothing like getting out of the shower all nice and clean, only to squidge up your feet the minute you leave the bathroom. Then wriggling between boards and bits of wallboard to make your way downstairs… Oh well. More motivation to finish up soon! As I mentioned before, I refuse to clean the same mess up twenty times.
If you’re planning to install wallboard anytime soon, here are a few helpful links:
Installing Wallboad (diyornot.com)
With drywall, easy does it (Washington Post)
Drywalling over plaster (This Old House)
How to install drywall (howstuffworks.com)Â
We’ve been talking about biting the bullet and investing in 2-3 area rugs to protect our hardwood floors. After all the hard work, we’d hate to see them destroyed by our own dirty sneakers.
Though I’d love to get some gorgeous high-end Persian rugs, they’re not in the budget – and not a smart investment for us, with two male diaper-wearing dogs in the house. We’re looking for something that passes for nice but won’t lead to the wringing of necks if urine does happen to show up on them.
I know Kristin did some buying on Ebay – and I’ve browsed there plenty, but I’m very nervous about buying something this big and color-related sight unseen. I’m going to check out Marshalls and TJ Maxx to see what they have in stock.
Does anyone have good suggestions (or top-secret sources) for buying affordable room-sized area rugs?
With our upstairs electrical finished and a full weekend ahead of us, we decided to get crazy and start putting up walls in our stairwel/hallway. Not that I don’t love the open, airy feel of the exposed plaster and framing… it’s the dirt and debris that shakes out of it with every footstep I’m getting tired of.
Because the lathe in the hallway ceiling was holding up a good amount of salvageable attic insulation, we decided to leave it where it was. But attaching drywall directly to it was not going to be pretty; there were too many little ridges and bumps to worry about. Instead, we decided to frame up a new ceiling directly below it using 2×4’s. The only minus is that we lost about 5″ of ceiling height, but this portion of the hallway went all the way up (10′) so those few inches aren’t noticeable.
Framing the old ceiling took a while; without a single right angle to work with, it meant lots of trips up and down the stairs to cut down pieces “just a smidge” so they’d all fit together snugly. It was hard to get perfect measurements, and each piece had to be custom measured and cut. Teague stayed on the ladder measuring and I acted as the runner/cutter. The team approach worked out well – I can’t imagine how long it would have taken one person!
Once the ceiling was framed up, we started cutting and installing the drywall, boring (but easy) process. We bought 16 8′ sheets (10′ would have been impossible to maneuver up the steps!) and had 10 of them installed by the end of the weekend. That covered the entire first half of the hallway plus a good chunk of the stairwell ceiling. Not bad, considering we were both tired and cranky and not particularly excited about having another work weekend.
We should have the rest of the walls up within a few days. After that, we plan to put a new ceiling up in one of the bedrooms that has crumbling plaster from an old (long ignored) roof leak.
My personal goal is to leave the spackling/sanding until we’re ready in ALL upstairs rooms that need it, so we can clean up one giant drywall mess instead of 25. I’ve gotten really lax about the cleanup lately. We used to spend hours cleaning after every day of work. Now I’m all about leaving it be and tiptoeing around it until the project is at a good stopping point. This practice, while somewhat disgusting, saves LOTS of time!
I had to have Teague check me before leaving this morning – I had plaster dust on my work clothes in 3 different places ;)
Photos of our progress will be up soon, I swear. I was feeling too lazy to download them….
If (unlike us) you’re ready to start preparing your house for fall, This Old House has a very comprehensive Fall Inspection checklist. If you hit every item on this list, you’re bound to find enough to keep you busy till the snow flies.
Get it now:Fall Inspection Checklist
As for us, we’re just hoping to get our radiators re-attached so we have heat this winter. And walls up, so that heat doesn’t go straight out to the neighbors.
I showed you the work in progress, and the house it was built for, so I thought you might be interested in seeing the final product. Here it is, in all it’s glory:
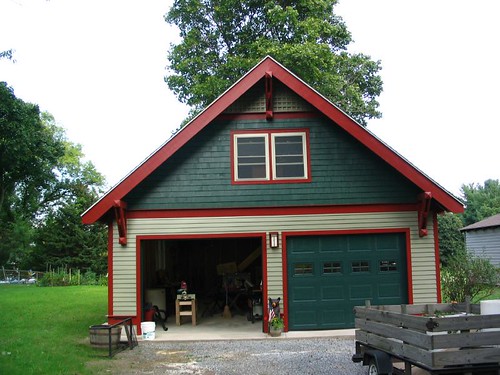

The owners of this garage (dubbed “the cathedral” by neighbors) have excellent taste, and Teague was thrilled to get the chance to build something so purdy. He’s currently stalking it – we drive by every chance we can get ;)
|

