I’m a huge fan of Halloween. Anyone who knows me can attest to this. So can the neighbors, the people who own the masquerade store, my dogs (who have their own costumes), and the pumpkin farm we drop loads of cash at every year. It’s my favorite holiday, mostly because it involves costumes. I love getting to dress up and being someone else for the night. In fact, I’ve been known to plan themed parties (80’s night anyone?) just to have an excuse to wear a wig.
Every fall, Teague and I daydream about making our house the scary one on the block. You know the one – the one that each Halloween goes all out with strobe lights, sound effects, cobwebs on the bushes and fake skeletons hanging from the porch rafters. We had a house like that in our neighborhood when I was a kid, and I was absolutely terrified to ring their doorbell. My father had to coax me up their porch steps every year. It scarred me for life, yet for some reason I feel the need to recreate that terror at my own house!
We can’t really afford an army of fake plastic skeletons, so we’ve got to DIY it. This is the first year we’ve actually had time to craft up anything spooky, so of course we went big. We decided to carve our own graveyard out of 2″ thick rigid insulation. Fitting, isn’t it?
As a starting point, I used templates found on Micheal and Tamara Hedstrom’s Halloween Site along with some fancy looking free fonts. I set everything up in Photoshop at full size, and printed it out in sections on 8×10 paper. Then I taped it altogether to make one giant template.
Here’s a photo of the template. We traced the overall grave shape right onto the foam:
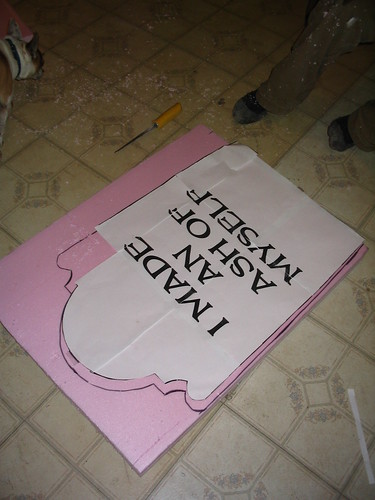
We used a small drywall saw because we had one on hand; I’m sure there are easier tools, but it was free and available and worked just fine. The edges were pretty rough and far to crisp for an old weathered tombstone, so we used regular sandpaper to smooth and round them. A word of caution – the cutting and sanding made a HUGE mess, with little bits of static-clingy insulation flying everywhere. That’s why we did it in one of our junky upstairs rooms, with a ShopVac on hand for cleanup.
The next step was to cut out all of the lettering using an Exacto knife. We taped the paper template to the insulation and carved out the shapes, then removed the paper and cleaned it up a bit afterwards, like so:
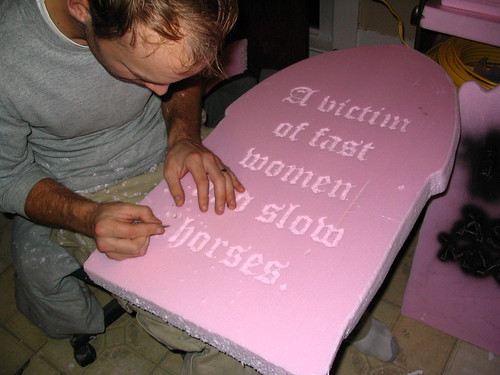
That’s as far as we’ve gotten. Next up will be adding bases and a metal rod to keep them standing. Then we’ll be priming them with gray primer (NOT spray paint, as the tutorials stress and Teague learned the hard way – it eats away at the insulation), and adding some faux finish to them to make them look ancient.
We’ll show you the other half of the process when we get to it, but if you’re itching to make your own tombstones I’ve got some excellent tutorial links for you. There are some VERY dedicated tombstone makers out there, and they’re happy to share their techniques. Check out:
Take a look at the galleries on those sites, and you’ll see that these people are GOOD. Their creations could pass for the real thing. Like this one, from Hedstrom’s site:

How cool is that?? Ours will be less impressive, I’m sure, but good enough for our small town!

This past weekend a good friend of mine married a gorgeous, artisitic, and truly unique woman that I am sure is going to keep a smile on his face for years to come – and I was lucky enough to witness it. It was an honor to be a part of their wedding celebration; they’re obviously madly in love. I had a great time, and came home with plenty of photos to prove it. And because I am obsessed, I couldn’t help but bring home a few house-related ones to share with all of you!
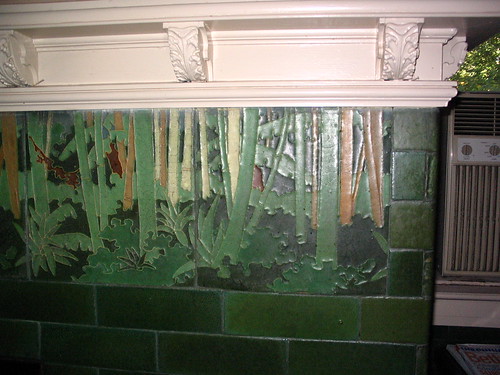
The ceremony and reception took place at a beautiful Tudor-style mansion in Baltimore, Maryland. So while other people were snapping photos of the bride and groom, I was snapping photos of the tile…. but just look at this stuff, would you? It was about 10″ tall, if I’m remembering right, and the colors were amazing!!
Below is a photo of the exterior, stolen from their website. As you can see, they had beautiful gardens and grounds to explore:

A bit of history, also stolen from their website:
Built in 1902 by Alexander J. Cassatt, owner of the Pennsylvania Railroad and brother of the American Impressionist painter, Mary Cassatt, Gramercy Mansion was presented as a wedding gift to his daughter, Eliza. Later owners included the prominent Brewster family, descendants of Benjamin Franklin, from whom a grandson became a Senator from Maryland. In the 1950’s the estate became home to the Koinonia Foundation, a predecessor of the Peace Corps, before being bought and restored by Dr. & Mrs. Pomykala in 1985.
This is the foyer – complete with fancy furniture, a grand staircase and beautiful dark wood trim:

The entire place was so well-decorated and decadent, it literally left me feeling like I had gone back in time. If you ever happen to find yourself in Baltimore in need of a swanky place to crash, this would be a great place to stay!
I’ve always been a listmaker, a diligent note-taker, a recorder of all things. I have kept a diary (in some form or another) for every year of my life from age 10 on. I always have notes written on the back of my hand, post-it’s stuck to my countertop and computer screen, and a pen on hand at all times. If you got a peek at my old college notebooks, you’d quickly diagnose me with OCD.
It’s deeply rooted in my personality, for good or bad. As this site illustrates nicely, I like to document the mundane. I like to have projects, and I like ticking things off as I accomplish them. Lists are pretty much a non-negotiable necessity for our fixer-upper lifestyle. Even small things, like “get sandpaper”, are fun to draw a line through. Lists keep me moving and stops me from forgetting the little things when life is busy and my mind is on overload.
That’s why I got such a kick out of this article from AOL – The Way We List Now. Not only am I not alone in this obsession, I am clearly not as crazy as the people they describe. Hooray – I’m only moderately OCD! What a relief.
I’m a fan of some aspects of David Allen’s “Getting Things Done“, namely the idea that capturing all those floating to-do’s in some written form keeps them from becoming a worrisome thought in the back of your mind.
I’ve explored all sorts of free web apps for the process, such as:
- Ta-Da Lists – One of my favorites, a simple and very functional solution from 37 Signals (I also highly recommend two others apps of theirs, Backpack and Basecamp, if you’re a project manager type)
- Remember the Milk – An extra cool one with features such as email or sms reminders, tagging, searching, etc. Very cool if you’re the high-tech type.
- Rough Underbelly – Has cool color coding and a point system, so you can set point goals for the week and compete with yourself ;) (The system is based on David Seah’s Printable CEO)
In the end, I found that what worked best for me is a plain old notebook. It’s portable, it’s always “on”, it’s easy to share with Teague, and there’s something really gratifying about crossing things off with a nice pen. If you’re into the paper thing too, check out DIY Planner for some great ideas and templates.
Are you a listmaker? And if so, what do you use?
Ah yes, it’s that time of year here in Upstate New York – time to start cranking the heat (and lining the pockets of our favorite gas company). We’ve only turned it on twice, on cold weekend mornings, but pretty soon it’ll be a 24/7 affair. If you haven’t done it already, it’s time to make sure your heating systems are in good working order!
We’re lucky enough to have steam heat. When we first moved in, nearly every radiator had a leak and the pipes banged incessantly. We’ve done quiet a few little tune-ups to get it running smoothly. It’s not perfect – we’ve still got one that needs a new valve, and a little bit of banging – but it’s much improved. And most of the maintenance is easy to do yourself.
Want to get rid of knocking? Try this comprehensive post from the always-helpful House in Progress.
Need to do some general maintenance? This Old House has a helpful article here.
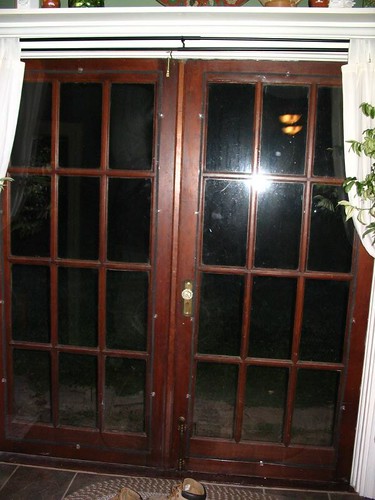
When we bought our salvaged french doors from Historic House parts two springs ago, we knew they wouldn’t be great for the frigid Upstate winters. They’re single-pane glass, and they could really use new glazing. They weren’t built to be exterior doors, but we just didn’t care. They’re beautiful, they let in tons of light and they make us happy – gas bills be damned.
Last winter we layered them up with 4 thick curtain panels, which kept the cold out but also ruined all the fun of having pretty doors since we didn’t see them from October until late April. This year, we’re testing out a solution that just might let us have our cake and eat it too.
We bought 2 large pieces of plexiglass, which Teague cut down to 1″ larger than the overall window pane area. Then we ran a piece of foam insulation around the entire perimeter of each piece, right next to the edge. The foam gives it a good tight seal. To hold the plexiglass on, we screwed little mirror clips into the door. (I know… holes in our pretty door… but it’s better than the alternatives!)
Voila – we now have a system that holds out the gusting wind and lets in the warm, house-heating sunlight. It seems to be working at least as well as the curtains did; there’s no condensation on the glass when I wake up in the morning, which seems like a big improvement to me.
Here is a closeup of the doors, with plexiglass and clips:

And here’s what it looks like from further away – you can see the foam insulation, but other than that it’s pretty invisible.
We’ll update you on the success (or failure) of this particular project when the snow starts to pile up….. ;)
In the past, we’ve always used two ladders, a deadman, and our heads to hoist giant sheets of drywall when doing ceilings. It’s not a fun way to do it, and it has caused a few minor injuries in the past. This past weekend we finally got smart and rented our first drywall jack.
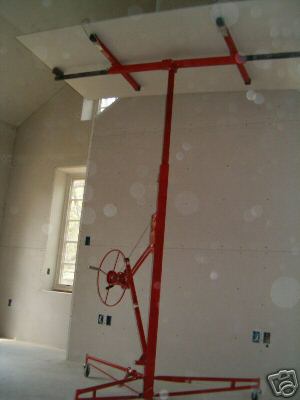
I took pics, but blew them away so we’ll have to go all generic… here’s what a drywall jack looks like:

It comes broken down into smaller pieces, and only takes about 2 minutes to put together. The drywall sits on those arms (at the top) and you crank the wheel to move it up and down. If you have a tilted ceiling, you can tilt the arms to match the angle. Incredibly easy. It makes it possible for one person to put up sheetrock while another person, say, blissfully screeprints Wagner Design & Construction t-shirts in the room next door. (By the way, I plan to write a how-to screenprint posts one of these days!)
Here’s what the drywall jack looks like with a piece of sheetrock loaded on it:
With this nifty tool, Teague was able to finish an entire bedroom ceiling in about two hours. Normally this would have taken us all day, and would have resulted in much swearing, accusatory insults, and overall marital strain. It’s the best invention EVER; $35 is a small price to pay for peace and harmony.
We’ve been avoiding some of our bigger projects lately. Feeling guilty? Me? Always. Anyway…
Our next BIG project is the master bathroom. It’s big in a few ways; big money, big changes, big investment of time and energy. So while we should be planning for it, we’re avoiding it instead. The only real step we’ve taken is to sketch out the existing layout of the bathroom and the upstairs “kitchen” – a large room adjoining the bathroom that is pretty much unused, save for the washer and dryer that reside there. The room is very long, so the plan is to steal some of it’s space to make the master bathroom bigger. We’re also planning a small laundry room that connects to the bathroom.
This means knocking down existing walls, putting new ones up, and rerouting some plumbing. Good times. We’ll be ripping everything that exists out, including the nasty old shower, the 70’s cabinet and sink, and the linoleum we threw down for the sake of hygiene. Lest you’ve forgotten, our master bathroom looked like this when we moved in. We made a few minor upgrades last fall when my brother came to stay with us.
Aside from all the new walls and whatnot, our basic plan calls for a new tub/shower (perhaps a clawfoot, if I can get Teague to agree to dragging one up the stairs), a new tile floor, and a new sink and vanity. And probably additional storage of some kind.
We have a very nice exposed shower fixture (like this) that we can use with a clawfoot OR save for our downstairs stand-up shower (on the to-do list for sometime this decade). We also have a really cool toilet flush lever just waiting to get installed. Other than that, we haven’t purchased any materials yet…….. so we’ve got some saving to do.
We’ll be asking for opinions in the weeks to come, I’m sure. Hopefully we’ll get our floorplan ideas worked out this weekend, and we’ll post them for critique!
Came across this and had to share…. because you can never have enough tools, and some people have exorbitant amounts of spare change sitting around just waiting to be spent.
I give you the $1,200 “Giant Knife, Version 1.0” (no kidding, that is apparently it’s name):

It has 85 tools, including such useful features as a golf shoe spike wrench, a fine fork for watch spring bars, and a cupped cigar cutter with double-honed edges.
From Outdoor Life:
Dennis Pireta, Wenger’s marketing director put it succinctly when he noted, “This is not exactly going to win any awards for lightest, smallest or most efficient tools…†The knife is a brute, weighing 2 pounds, 11 ounces and measuring 8.75 inches. But don’t worry, it has a key ring so you can carry it on a belt loop.
See the full feature list and more pics in the Outdoor Life article: The Most Incredible Knife
One of our most popular posts is a plea for help I wrote during a humid week two summers ago, when our hardwood floors started seeping cat urine. You can read the full post here. It seems that many, many people have similar problems in their own homes and are googling awfully hard to find the answers.
I wrote a few updates within the post, detailing the various chemicals and techniques we tried in an effort to get rid of the smell. When we finally got around to refinishing the floors and varnishing them, the smell finally disappeared completely – but if you’re not planning drastic measures like that, our latest commentor, Phil, might have the answer: hire professional cleaners, the type that know how to take out really nasty smells – like rotting corpse!
We never thought to hire pros. Not sure why… it probably would have been cheaper than the piles of worthless chemical treatments we bought if you added them all up.
Phil wrote:
I bought a house that was used as a rental…..the tenants had 5 BIG dogs that, after they were evicted, were allowed to stay in the house , only being fed & given water maybe twice a week….when they finally left & took their poor dogs , I had the biggest mess I’ve ever seen on my hands…..I pulled up all the carpets , but the urine had gotten into the pine plank subfloor……I tried everything to get it out until I found a local company that does restoration work that guaranteed me they could get the smell out , never to return again ( unless I let a dog pee in there again )……they used the same method on my house that they use when cleaning up after a human corpse had been in a house for a long time………they put their guarantee in writing. & I was told nobody has ever in 20 yrs. called & said the smell came back……….they’ve done the work for $480 + tax……..
Had to share this idea, since so many people are looking for the magic bullet. Thanks, Phil!
On a related note, we’ve had our beautiful oriental rug for almost a week now and neither dog has defiled it. Could they know they’ll be locked in the basement if I see them even scoot across it?
(A note for all the animal lovers of the blogosphere who may feel the need to report me for animal cruelty – I am kidding. I don’t lock my dogs in basements. Often. The sweaters and christmas outfits, however, could be considered torture.)
A while back, I posed our pre-winter to-do list. And because we had a very quiet weekend with no real house-related accomplishments to speak of other than a few washed windows, I thought I’d make myself feel better by going through our list and checking things off.
Our must-do before freezing temps list:
Finish the upstairs electricalInsulate the outer stairwell wallHang drywall in the hallway and stairwell, including the ceilingInsulate as many other outer walls as we can before winter (using blown-in)Re-varnish the french doors with a few coats of spar varnish to protect them this winter
The want-to-do’s are:
Wash all window exteriors (they’re nasty)- Strip and stain the other front-door (I did the first one last summer)
- Replace the side door with something a little thicker and prettier that actually closes without a rough hip-slam (we have the door already, just need to put it up)
So… we’ve gotten through all the must’s and one of the wants. Not so bad, since it’s still September. We’ve yet to start either door project, and we definitely have to sneak in some lawn maintenance before the local wildlife mistakes our back yard for a swamp, but overall we’re in good shape. My oh-my-god-winter-is-coming panic has very nearly subsided.
How are you all doing on your pre-winter checklists?
|

