When I win the next Powerball, I’ll have enough dream items bookmarked to easily blow the $254 million. It seems like every day I come across something fantastic (and fantastically expensive).
Damn the internet; if I couldn’t see these things online, I would never know they existed. It’s not like JCPenney carries them. And then I would not secretly pine for ridiculous fancy-schmanciness. I could happily live a life of simplicity if not for the constant stream of “oh my god that’s amazing” coming through my ethernet cable.
So, here’s another one for the dream house: William Morris tapestries.


For those of you who don’t know the name, William Morris was a very influential designer and one of the principal founders of the British Arts and Crafts movement. He’s well known for his wallpaper designs and fabric patterns. I love his use of color, and have pulled his color schemes for various rooms throught the house. His work is great inspiration!
They also have some nice Art Noveau picks, like this one called Spring:

The prices are not so horrible as to be unmentionable – smaller ones can be bought in the $100 – $300 dollar range. The bigger ones are $1k plus, though. So find a small wall space and fill it with gorgeousness!

Adding trimwork and molding is one of the best ways to add elegance to a plain room; I can’t tell you what a difference it makes. It’s one of the main reasons historic houses have so much charm… they have layer upon layer of built-up trim throughout the house accenting the windows, doors, and walls beautifully.
To get ideas for our bathroom molding, we took our cues from the original trim found throughout the house. It’s not over the top ginger-bready; it’s simple, curvy, and rather weighty. We’ve often tossed around the idea of having molding custom-cut to match our original, but given our budget it just never happened. And that’s ok. The molding scheme that Teague designed matches very closely, and I really doubt anyone will notice the difference.
I’ll admit, this isn’t the easiest DIY project out there – old houses don’t have right angles, so cutting the inside and outside angles is a crapshoot at best. We had half new walls, half old walls, which basically just means chaos. They sell tools to help you find the perfect angle, but that’d take all the fun out of it, right? It can also be a pretty expensive endeavor, especially if you look at the fancy pre-built stuff. But with a little creativity, you can get beautiful results withought the super hefty pricetag.
Our trim ended up being quite complex……. you might say we got carried away. We’ve been known to do that on occasion, and it’s the reason this bathroom is wayyyy over budget. But the results are FANTASTIC.
Here is what the bottom half of the room looks like now:
We just finished installing the crown molding last night, and the doors and windows are done as well. Everything needed two coats of primer, and two coats of semi-gloss white paint. We caulked the seams to ensure a seamless look, so even though the baseboard is made up of 4 seperate pieces, it looks like one giant one.
Including the crown molding, we applied 8 pieces of trim to each wall. Plus beadboard. Plus some fancy-pants trickery around the windows. That’s alot of cutting and measuring, not to mention priming and painting. Here’s a little diagram showing how the lower half of the wall came together:
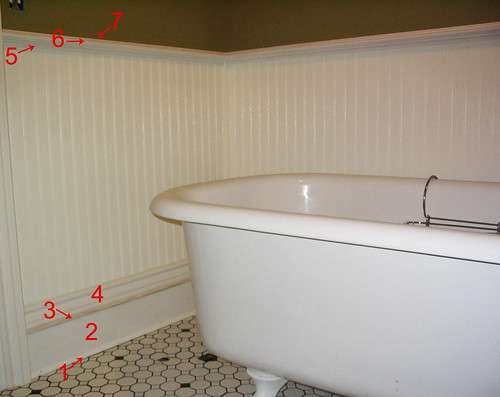
The small piece of molding above the chair rail is hard to see, but it was an essential add-on; since our old walls were a little wavy, this piece was bendy enough to curve with the wall – unlike the chair rail. No gaps!
A few tips and ideas for building your own custom molding:
- Think about ways to use cheap molding pieces such as quarter round to add detail to plain boards. Our baseboard is made up of 1″x6″, two pieces of quarter round, and a piece of nice molding on top. It looks much more expensive than it was. The quarter round hides the seams, meets with any ups and downs the floor might have, and adds complexity without much extra cost.
- If you’re going to paint your trim and money is a concern, think about using pre-primed MDF. It’s much cheaper, and looks exactly the same when painted.
- Bring home samples pieces to test your idea before buying a whole batch of trim. Most Big Box stores and lumberyards have leftovers that you can get for a good price, or they’ll let you cut a 1″ piece off of something on the shelf.
- Buy your trim in lengths that will need as few splices as possible. In some cases splices are unavoidable, especially on long walls, but the fewer the better. If possible, plan to hide the splice behind furniture, appliances, etc.
- Measure twice. Then measure a third time. Seriously – it’s easy to get your measurements wrong, and this stuff isn’t cheap!
- If you can borrow a finish nailer, do it! It’ll save you tons of time and frustration, not to mention hammer dings in your new trim. (Thanks for letting us borrow yours, Garrett!)
- After priming, fill in your nail holes with wood putty or caulk before your final painting. The primer makes them extremely easy to see.
I highly recommend the book “Decorating with Architectural Trimwork: Planning, Designing, Installing“ for ideas on how trim and molding can transform a room. Our teeny tiny library had it, so yours probably will to. Once you see the possibilities, you’ll be as obsessed as we are.
As always, more pics can be found on our Flickr account: http://flickr.com/photos/fixerupper/
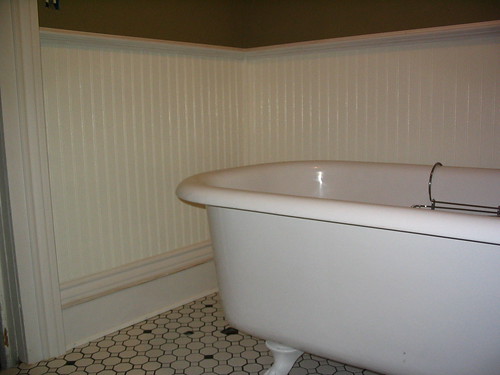
There’s one major “flaw”, if you will, in the design of clawfoot tubs. There is absolutely no good place for my aresenal of shampoos, conditioners, soaps, sponges, loofahs, and body washes. I swear, I’m really not high maintenance… but if you looked at my bathroom full o’ supplies, you’d think I spent 2 hours every morning prettying up.
I have lots and lots of “products”. It’s partly because I fall for those ridiculous commercials that promise smoother skin, shinier hair, and a lovesick husband after just 3 applications, but mostly it’s that I refuse to throw anything out until it’s absolutely 100% gone. Ask Teague – I even keep miniscule soap shards until they melt into nothingness, to his dismay.
So…. I’m having trouble deciding how best to keep these shower goods under control. Do I go for the traditional bath caddy (in the way?), a hanging shower caddy (notoriously annoying, since they always seem to slip and throw shampoo bottles in your face), a mesh organizer thingamajig, or some type of external shelf/bar type thing? Anyone have a system they’re particularly pleased with? Do share!
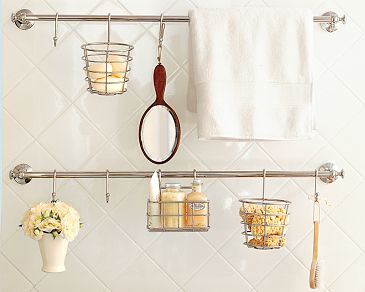
My heart is pitter-pattering over Pottery Barn’s Mercer Bath System – except for that ridiculous pricetag. I’ve looked for a cheaper version, but haven’t come up with much. I know IKEA carries something similar for kitchens, but we’re about 4.5 snowy hours away from the nearest store so that’s out. I may just make my own set. The bar could easily be replaced by a cheaper towel bar, I could round up some S-hooks, and cheap wire baskets are easy to come by. I’m crafty, I can figure it out. BUT – am I going to drip water and soapy gunk all over our floors and regret having it all outside the tub like that?
I’ve been mulling over this decision for weeks now. But seeing as we may just have the shower installed by the end of this weekend (I know! Excitement!), you better help me put an end to it.
Haven’t read part one, which covers cement backer board, tile layout and mortar? It’s right here.
Once the mortar is fully set, you can move on to grouting. We chose charcoal gray grout to hide our dirt and grit; white grout would look pretty for a week or two, but I know after that I’d regret it ;)
We bought one bag of sanded “polymer-modified” grout. The grout comes in powder form, and is mixed with water. Follow the instructions on the bag, mixing well with the trowel. We used a shallow mop bucket for mixing, which makes it easier to scoop the mortar out.

We mixed the grout right in the bathroom, since our faucet is all hooked up. Convenient, eh?
Using a grout float, which has a spongy bottom to it, start at the back corner of your floor and put a big glob of your grout down. Spread the grout with the float by holding it at about a 30 degree angle and wiping it across the tiles. Keep pushing the grout around until all of your gaps have been filled. Then angle your float up closer to 90 degrees and and grab as much excess grout as you can.
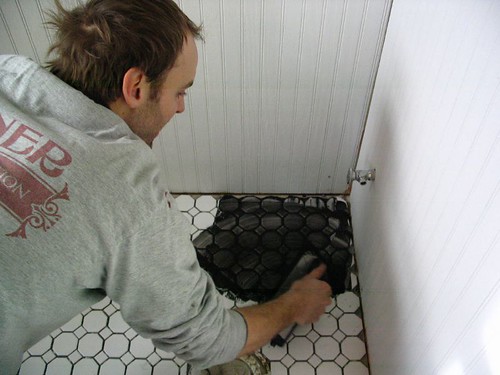
(Teague was just behind me commenting that his hair didn’t look too bad in these pics. He didn’t see this one! Obviousy, we’re far too busy to bother with silly things like combing our hair when we have exciting projects to get to.)Â
We went about 2′ deep with the first pass, and then went back and wiped everything with a wet sponge to get more of the excess off. About two minutes into it, we realized why dark grout kinda sucks. It’s really, really messy work getting the residue up off your tiles. It required lots of trips up and down the stairs for clean water. Somewhat frightful trips that had me praying that neither of us spilled the dark and murky water that sloshed in our buckets with each step. We kept two water pails in the room at all times; one large paint bucket filled with warm water for our first sponge pass, and another large plastic bowl filled with warm water for the second sponge pass. We alternated bucket fill-ups so we could work continously.
When I ran the sponge over the tiles, I made sure to keep my pressure very light and my sponge wet. You don’t want to pull grout out of your gaps; you just want to clean the surface of your tiles. I found it best to make one pass with one side of the sponge, one pass with the other side, and then rinse and wring it out before going back for more.
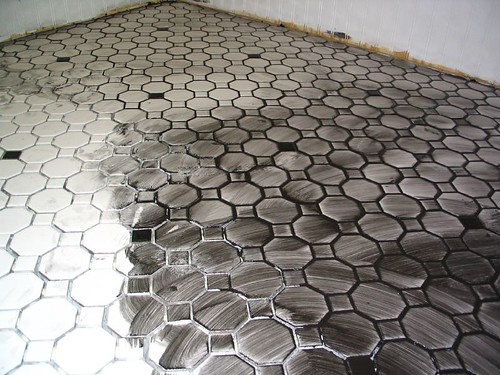
Here you can see that the left corner has had 2 passes with the sponge, while the right corner has only had one. You can also see what a nasty mess the black grout was!
We continued in this fashion, doing sections at a time, until the entire floor was mortared. Then we let the grout sit long enough to harden up (about half an hour) so that we could take a final cleaning pass with a damp sponge.
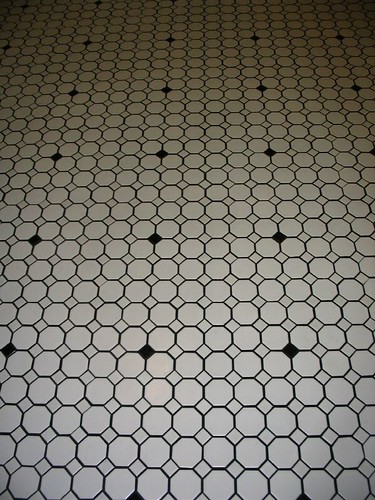
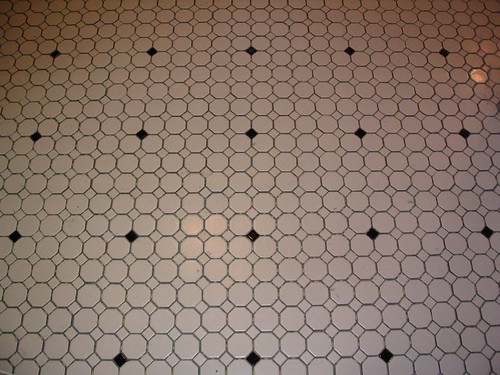
And here is the final product, looking totally amazing! It’s still drying so I couldn’t get full beauty shots, but you can at least see how the charcoal grout looks with the black and white tile. We’re very pleased with the effect, but I will say that my hands and fingernails are disgustingly black right now despite multiple scrubbings, and the black grout makes any variation in the tile layout pretty noticeable. Despite these minor issues, I’m in love with it.
Yes…….. happy days are upon us, because we’re finally getting to the really fun part of the bathroom remodel. Beadboard went up last weekend, and this weekend was tile-o-rama!
We chose white hex tiles from Home Depot, and mixed a few black accent pieces in to make it interesting. The tiles have a very historic feel to them, and at $1.86 a square foot you can’t beat the price. I eyed a few other styles, including basketweave and pinwheel type patterns in black and white, but I just couldn’t justify the extra money. The American Olean 1″ hex tiles, for example, were over $12/sq ft. Since our bathroom is 80+ square feet, that’s a lot of extra cash!
When choosing grout, we took into account what dirty slobs we are and went with a dark charcoal color. If we went with a light grout, our ever-present dirt and grime would be very noticeable. Not that the white hex is gonna hide much… but at least the grout will look clean!
The first step when tiling a floor is to lay down cement backer board. You screw this down to the floor with special screws made with a special corrosion-resistant coating. Ours happened to be green this time around – how purdy. You drive them down nice and low so that the head of the screw gets buried below the surface. Where you have plumbing, you’ll need to cut holes in the backer board to let it through; a jigsaw works fine for this.

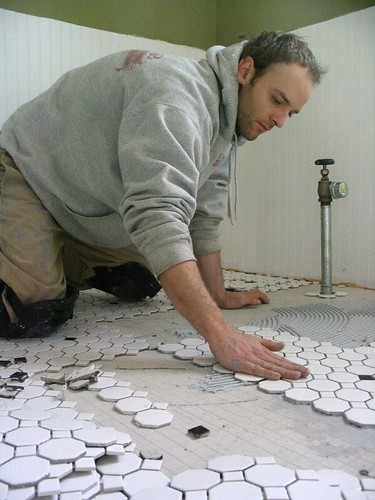
The backer board promotes bonding and provides a clean, sturdy surface to lay your tile on. After the backer board is down, you can take measurements and lay out a chalk line so you know where to start your tile. The hex tiles require a little more planning than big 12″ ones, since there are more cuts to be made. We laid the entire floor out as a “dry run” so that we could see how our black and white pattern was going to look. We laid one black accent piece for every 5 hex tiles, vertically and horizontally.
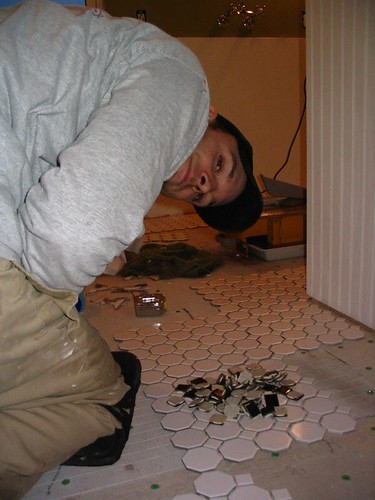
That’s a picture of Teague and our “dry run” floor – plus a pile of black accent tiles. You can see the tile saw in the background. We’ve tiled here before, when we laid 12″x12″ porcelain in the kitchen, so we’re lucky enough to own our own tile cutter. If you don’t have one, definitely rent or buy one – you can cut tiles with by scoring them and breaking them with tile nipper, but it takes FOREVER and it’s tough to get your breaks right.
Once we were satisfied with our layout and had all the edge pieces cut, it was time to mortar. To do this, you apply a thin set of mortar using the smooth side of a trowel. Then, use the notched edge to comb the mortar into ridges. Make sure you don’t have any high or low spots, especially if you’re using smaller tile.
(Note: the extra-tall radiator pipe is raised up to get it out of our way; it’s not permanent!)Â
Carefully lay your tiles down, applying pressure evenly over the surface. Be sure they’re straight and exactly where you want them. Teague is great at this part… I’m a little too impatient. It’s slow work, with constant checking and rechecking to be sure your spacing and alignment looks good. He kept running his hand lightly over the edges of each sheet to make sure it was always level where two sheets met.
Once everything is laid out, leave it be for at least 24 hours to make sure the mortar sets. Whatever you do, don’t walk on it! If the mortar isn’t set all the way, you’ll squish the tiles every which way.
Stay tuned for part two…. grouting. It’s finger-wrinkling, mess-inducing fun.
Months ago, over at One Woman’s Cottage Life, I saw some furniture that really caught my eye. Kim has a great sense of style and finds very unique pieces to fill her place, so I highly recommend you browse her site sometime. It’s very inspiring. Anyway… the kitchen island and table she features on her site were built by Fuzzot’s, a small business that takes reclaimed architectural house parts and turns them into seriously cool one-of-a-kind furniture. Well, they call it furniture. I call it art.
Here are a few samples of their work:
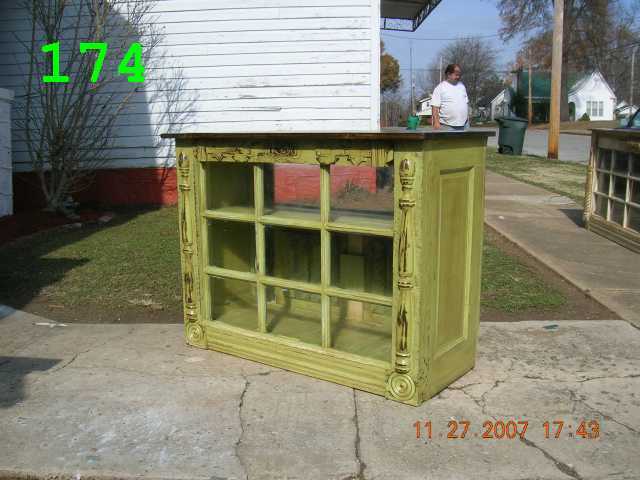

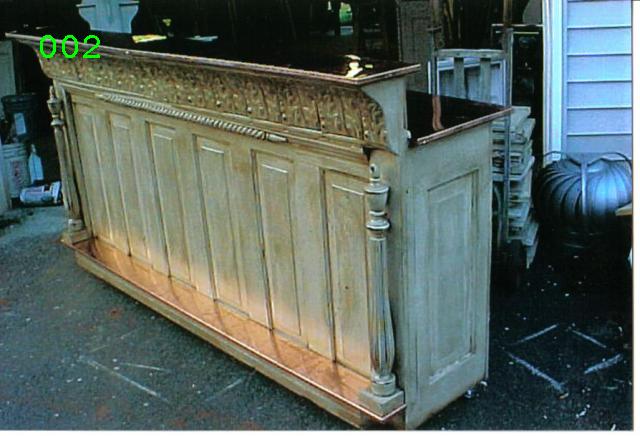
I love to see things being reused in new and different ways; I’m a big fan of “thrift decor”. Maybe because it’s about all I can afford at the moment, but also because it forces me to get creative about finding solutions for problems or “needs”. And these guys are nothing if not creative! I’m especially in love with their clever reuse of tin, and the way their paint finishes look so nice and unevenly worn – unlike the faux stuff you see in stores these days that looks just a wee bit too perfectly worn around the edges. They have a large gallery of thumbnails to flip through, with inspiration galore. I look at the pics every few weeks and sigh, because they are in Alabama and I am in Upstate New York, and furniture that size does not fit into an envelope. Pfft.
Even if I never get a piece of Fuzzot’s Furniture, I can drool. You can drool with me. And maybe someday they’ll start sending pieces up to dealers in our neck of the woods. A girl can dream.
The other day, I finally figured out why this project was stressing me out so much. It wasn’t the mess, or the expense, or the lack of free time. It was having to share a teeny tiny bathroom with Teague every morning.
This is the bathroom we’re using right now:
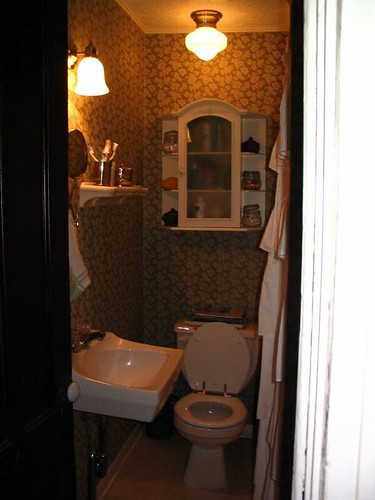
See that teeny tiny little round mirror on the left, underneath the light fixture? That’s the mirror I use for doing my makeup and my hair and all that girly stuff that us girls do. I think it’s 8″ round, and it’s mounted about 2″ too high for me because Teague hung it (and he’s about 2″ taller than me!). I hate that mirror.
I’m not a morning person. Never have been, never will be. I stay in bed until the last possible second, hitting the sleep button at least 2 or 3 times before I drag myself out from under the covers. Which means I’m always rushing to get ready and out the door on time. Teague gets up when I get up, and we both head downstairs at the same time. I hit the bathroom first, but he’s usually only about 2 minutes behind me. He doesn’t have the same “personal space” issues I have, so he regularly barges into the bathroom to chat, brush his teeth, climb around me to grab his deodorant, etc. The other day he stole the mirror from me while I was halfway through putting my eyeliner on, and it dawned on me…. I absolutely HATE sharing a space that small so early in the morning.
I think it’s something of an obsession with him, a need to see what sort of girly things I might be up to in there. The other day, about 2 minutes after I hopped out of the shower, he started banging on the door. “What do you want?” I yelled, a hint of annoyance in my voice. “Can I get in?” he asked. “What for?” I sighed, not yet ready to give in. A long pause followed, and then his answer. “Deodorant.”
Apparently, it was a deodorant emergency. It was late-afternoon, we had no plans to leave the house or make ourselves presentable in any way, and yet he felt compelled to put on deodorant that very minute. It was so important, he wanted me to drop everything I was doing, let all my nice steamy air escape, and invite him into the shoebox we call a bathroom. Needless to say, I did not unlock the door for him.
Luckily, we’re only a few weekends away from the bathroom of our dreams.
Thanks to MLK and the three-day weekend, we have made some major headway on the master bathroom. It finally feels like the end is in sight; I can’t tell you what that’s doing for my psyche!
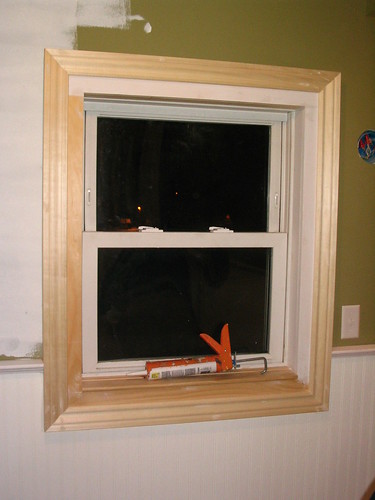
Finishing the drywall has been keeping Teague busy for the past few days, while painting (the vanity, a mirror, a shelf) kept me entertained. And after some flip-flopping, we finally decided on beadboard for the walls. On Saturday morning we bought six 8′ sheets. We went with the sheets (vs. individual slats) since we knew we’d be painting it. The added cost of individual slats didn’t seem worth it for the small aesthetic tradeoff. The 8′ sheets were very economical; we cut each in half and brought the beadboard up 4′ all the way around.
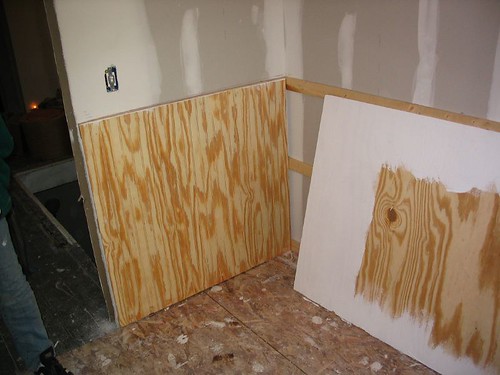
Prior to nailing the beadboard up, we ran stringers to nail it to. You can see them in the photo above. Since the sheets are only 5/8″ thick, they all had some wobbliness to them. The stringers gave us something to nail to, so they all flattened out nicely. We also made sure to prime the back side of the beadboard, since this is a room that wil have lots of moisture. The primer will protect the wood and keep it from growing mold back there ;)
Installing the beadboard went surprisingly fast; Teague measured and cut while I primed. With two of us working efficiently, it only took about 3 hours to get it all hung and primed. The bathroom looks better already!
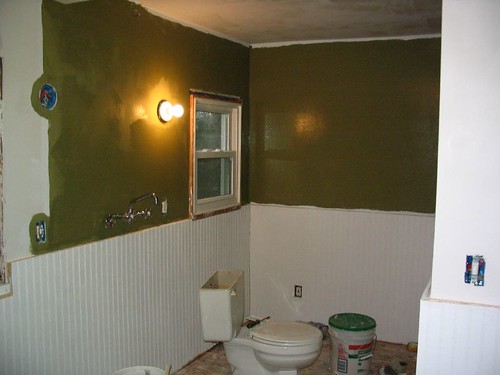
Today, I painted the ceiling and put the first coat of paint on about 1/2 of the walls (the other half still need some drywall touch-ups). We went with a color called “Sweet Annie”, which can be found at Lowe’s. This is the first time I’ve used Lowe’s brand paint. I’m a paint snob and usually stick to Sherwin Williams, but we’ve had sleeting hail and ice storms for the past few days so driving 45 minutes to the paint store was out of the question. I wasn’t sure I’d like the Lowes stuff, but so far I am pleased with it. I’ll hold final judgement until the walls have 2 dry coats on them, though ;)
Here’s where we’re at right now:
A few more weekends, and that leisurely soak in a clawfoot tub will become a reality!
If you’re hardcore Fixer-Upper readers, you might remember that we spray painted our stove and refrigerator a while back. We inherited them from the previous owners, and they were a lovely shade of 70’s beige that did not gel with our color scheme.
We used Rustoleum’s epoxy spray paint for the bodies of both, and high-heat spray paint for the stove top. The stove top only held up for about a year; it has now decided to start cracking and flaking in an ugly “Hey, is that a crumbly bit of toxicity in my food? What a yummy snack!” kind of way. The fridge and stove body, however, have held up beautifully for over 2 years.
Now that stainless steel is the super-craze of the century, you’re probably all “white is sooooooo 1992”. If so, there’s a (somewhat more expensive, but cheaper than new appliances) product out there for you.
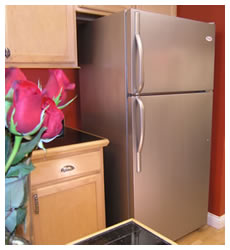
It’s called “Liquid Stainless Steel”, which sounds like a Terminator-esque and badass. And it is pretty bad ass, since apparently it’s actually truly stainless steel and not some metallic wannabe. It also claims to be as durable as your cars finish, which beats the heck out of our spray paint solution.
You could use it for things other than your fridge- think hardware, your blender or a plastic trash can. Or you can go totally nucking futs with it and create a spage-age country kitchen, like this:
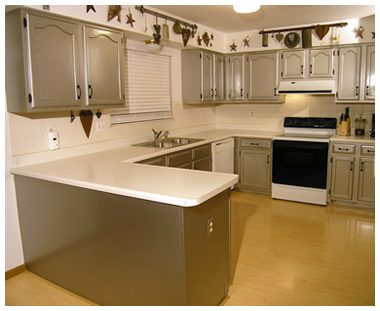
Ok, don’t do that. Please. It’s scary in so many ways. There are much better ways to get that Jetson’s-meets-Hillbillies look you’re craving.
Anyway…. you can learn more about the product here: http://www.liquidstainlesssteel.com/
Found via Curbly
Lately, I’ve been finding more amazing house decor eye-candy than I could possibly keep up with. I love this whole victorian-gone-hip thing going on both in clothing and home fashions, found online in shops like Anthropologie, Urban Outfitters, and Brocade Home. I can’t afford it, naturally, but I love window shopping. It gives me great ideas for transforming thrift shop finds ;)
This article from the LA Times sums it up nicely:
“Ornamentation is back,” says Robert Willson of the L.A. store Downtown. He sums up the growing demand for the carved, the curved and the curious in one word: “maximalism.” He says it’s a reaction to the Modernism of the 1950s and the minimalism of the 1990s.
“People are collecting rocks and shells and specimens from nature and science,” Willson says. “They are looking for unique furniture that goes beyond function to show the imagination and the hand of the artisan.”
Whereas a short-lived Victorian revival in the 1960s emphasized the restrained and the respectable, today “it is done with more style and humor and a little bit of darkness.”
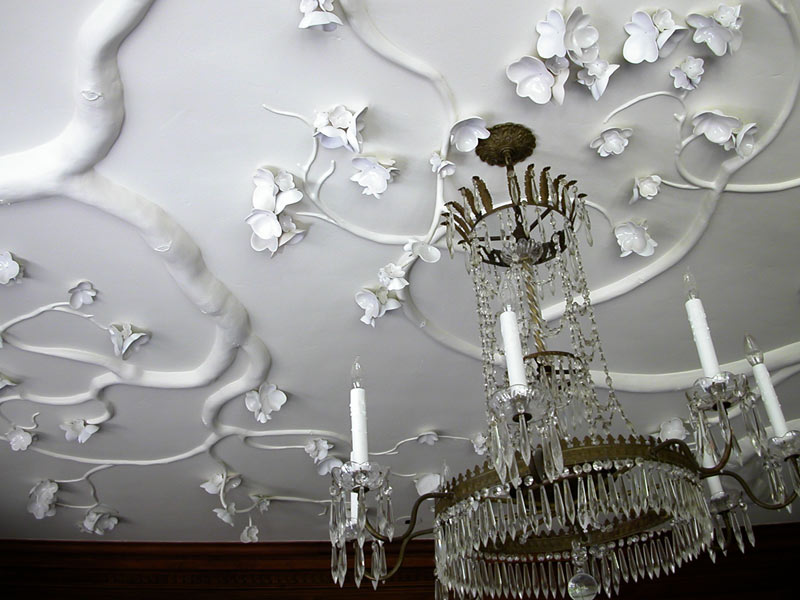
I’m an aestheticist at heart. I love being surrounded by beautiful things. If I had a million dollars, or maybe just a few thousand to spend frivolously, I’d get myself some ob·jets d’art. They’d make my heart flutter every time I walked in the door, and isn’t that worth every penny?
I would start with David Wiseman’s amazing porcelein ceiling installation:
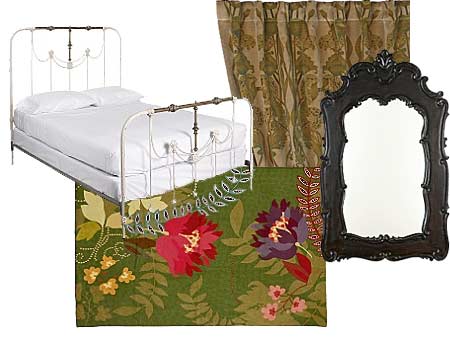
Then I’d head over to Anthropologie to pick up a brass bed, some gorgeous rugs, sumptous velvet curtains and some decadently over the top mirrors to liven up the place.
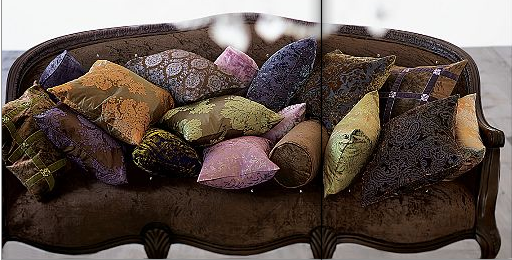
And of course I’d get my couches, side chairs, and pillows from Brocade home – because who can resist upholstery like that??
As for wall art, I’d head on over to Etsy (the art and craft capital of the internet!) and support the community by buying directly from a few “unknown” artists so I could spread the wealth.

Christina Lyon, Bird and Berries Print – 8×10

Gone to Earth, 8×10 print by MagicJelly
|

