First and foremost, let me stress what a total debacle this endeavor was. Why the troubles? Perhaps because Teague and I are know-it-alls, and decided we didn’t need any help choosing the right shower. Or because we ordered the shower about a year ago, before we had a tub in our possession or any type of plan for the master bathroom. Or because STUPIDLY (very, very stupidly) we had the tub refinisher fill in our faucet holes because we wanted the faucet to be seperate from the tub. We did this without checking prices for that particular style, and this decision ended up costing us a pretty penny. All because we didn’t do our due diligence before jumping in. Tsk, tsk.
To summarize: We are idiots.
In round one, I ordered a stand-alone shower set that is beautifully crafted but absolutely positively of no use to us upstairs. For some reason, I thought it would be a “flexible option”, that we’d just hook a faucet up to it and be all set. Decidedly not the case. We were generously given the option of returning it. Instead, we’re keeping it for the downstairs bathroom where we plan to do a stand-up shower rather than a full tub.
In round two, we realized that since we plugged the wall-mount faucet holes the tub originally had, we had to purchase a freestanding shower enclosure – which happens to be the most expensive kind. We plugged them on a whim; neither of us can even remember WHY we thought this was a good idea. Doh!
To be fair, I think the excitement just got to us. We weren’t thinking clearly. And it was mostly me making decisions about plumbing – always a bad idea.
Please – learn from our mistakes, people.
1. If you’re buying a tub (salvaged or new), look at the various styles available. Spend time deciding how your tub will be positioned in your bathroom. There are many things to consider, such as where your plumbing will run and how much room you have. There are three basic faucet styles – wall mount, deck mount, and freestanding. You can have the faucet on one end, in the middle, or completely seperate from the tub itself. Big decisions, with big financial implications. We chose freestanding, which of course ended up being the most expensive of the three – and also the hardest to find.
2. Have a tub in your possession before you go off half-cocked and buy a very expensive shower enclosure. If you’re buying a new tub, by all means – buy a full set. Then you won’t have to figure out all the various plumbing complexities.
3. Look at the schematics carefully. Measure everything twice. Or three times, maybe. And don’t be afraid to ask questions.
I don’t know the first thing about plumbing; it’s one of the jobs I try to stay out of. It smells, little screw-ups mean major headaches, and you generally have to crawl beneath or into something gross to deal with it. So this whole “how it comes together” part was very confusing to me. I had to ask lots of questions and call a few salespeople. The people at Vintage Tub and Bath were incredibly helpful, as always, and we ended up ordering our shower set from them.
Here is the one we finally picked, after much searching and debate:
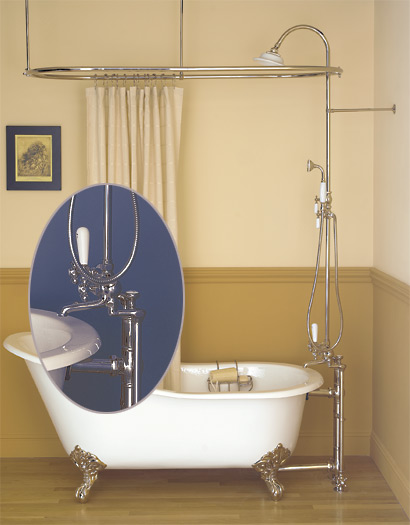
We opted not to order the handshower; it was about $400 more, and the only time I use them is when I’m cleaning. For $400, I’ll figure out another way to clean – I’ve never been a fan of extra doo-dads cluttering up the shower, anyway.
It should come in about two weeks; we’re holding off on roughing-in the shower plumbing until we have it in our possession; the site gives great schematics with detailed measurements, but we’re not up for taking chances right now! This will hold up the tile floor, which saddens me, but there are plenty of other things to take care of.
If you’re starting to research clawfoot tubs or showers, here are a few places to start:

Saw this on the Martha Stewart site and had to pass it along – it’d be easy to create, and extremely useful (around our house at least). It’s a giant wal-sized calendar, painted using chalkboard paint. With such a large space to writ ein, you could write down your appointments, memos, to-dos, etc… and they’d be staring back at you from the wall, very hard to miss!
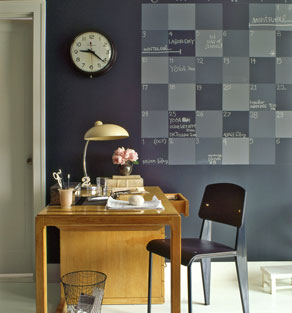
Miss Martha gives pretty detailed directions, but you could have fun with it and go a little “out of the box” if you were feeling frisky.
The chalkboard paint is available just about everywhere now, including Home Depot and Lowes. I also found a recipe for making your own right here, and it’s stupidly simple. I can vouch for the store-bought paint – I have seen it in action, and even drawn goofy girly swirls on it with a giant hunk of pink chalk.
Martha Stewart Wall Calendar how-to article >Â
Want more uses for chalkboard paint? How about using it on an entire kitchen wall, on placemats to keep kids entertained, or to make a super cute kid desk?
Ok, decision time. HELP!
We’re going to go wainscoting in the bathroom. It’s going to be white. Originally, it was going to be 8′ sheets of beadboard because it’s cheap and easy, and looks pretty good. Then I saw this magazine photo of a bathroom with tin tile used as wainscoting, and I pretty much fell in love.
I can’t find the exact photo online anywhere to steal, but basically the look is:
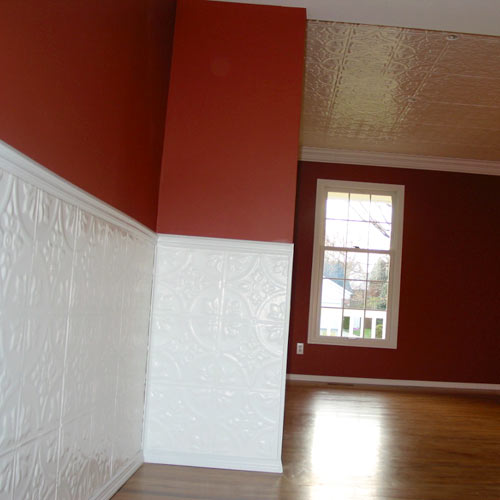
Sorry about the grainy off-kilter photo, but you get the idea.
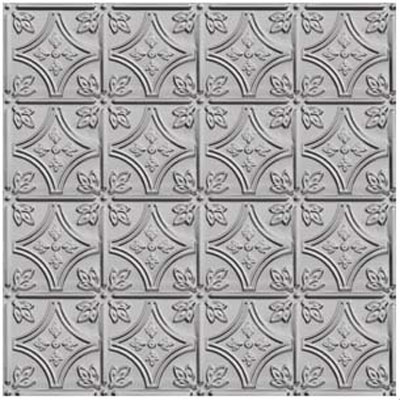
The tile we are looking at is this one, from Architectural Depot:
We have original pressed tin in various random places throughout the house. It’s the backsplash in our kitchen (salvaged from the old kitchen ceiling, cleaned up, and painted black). It’s on the pantry ceiling, still original and never touched. It’s used as wainscoting in our hallway, and we have a bunch saved from the stairwell walls that we’re going to put back up when the upstairs is ready for finish materials. So it’s kind of a theme, and one I am wholeheartedly fond of.
The beadboard would look something like this:
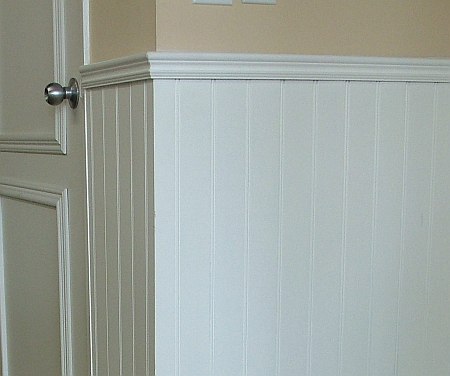
Still very cool, very “historic” looking.
I am hesitant to barrel ahead with the tin because of the additional costs. It’s about twice as expensive to do tin tile, and it’ll be a little more work. (You can read about the installation process here.) So, dear readers, help me clear the mental clutter. Should I stick with our original idea, or is tin tile super cool and worth a little splurge? Will I regret skimping out on it when the bathroom is all done, since the cost difference is a drop in the bucket compared to the total cost of the project? Or am I getting way too carried away with this bathroom design?
PS – Thanks to you guys, I’ve decided on green for the bathroom and I am mulling over the fabric countertop idea. And Beth, I got a third shower curtain, thanks for the heads up! This bathroom is really a team effort ;)
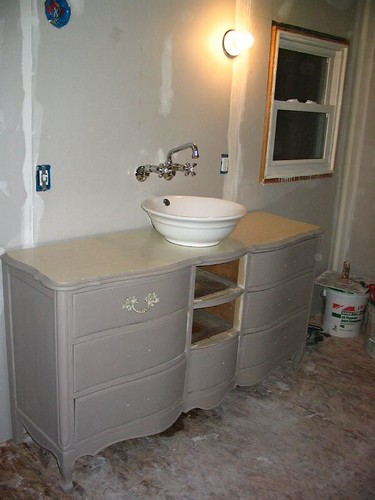
Choosing a vanity for the master bathroom was a drawn out process – much like any design decision I’m involved in. We looked at all sorts of store-bought vanities, but nothing in our price range screamed “take me home”. We looked at antiques, but didn’t want to put a hole in anything too valuable and then set it in the bathroom where it’d no doubt get water damage and makeup stains all over it. When I happened upon an adorable vintage dresser at a local thrift store that was just the right size, I felt like I hit the jackpot – especially after I saw the $25.00 price tag!
I quickly realized I wasn’t up for stripping it, since it had a milk paint finishing on it and the stuff is notoriously hard to remove. Instead, I decided to paint it. And since I’ve been dying to try out milk paint since seeing the stuff at Brimfield this past summer, that is what we went with.

The milk paint we ordered (from www.milkpaint.com) comes in powder form; it’s made of milk protein, lime, clay, and earth pigments. It is best used fresh – when you’re ready to paint, you mix it with water (1:1) and go to work.
STEP 1: PREP
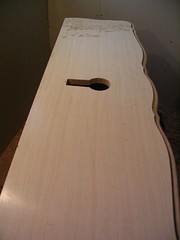
First, I had Teague cut out a hole for the sink drain and plumbing. Then I spent about 4 hours prepping. This is the most important step when painting – the better you prep, the better your results will be. I removed all the stickers and gummy residue with Goof Off, and then scoured the entire thing to get any grease, smudges, dirt, etc off it. Then I sanded everything down with 100 grit sandpaper to give the existing layer of paint some “tooth” for the new layer to bond to.
STEP 2: MIX THE PAINT
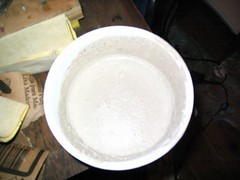
I made the paint in an old plastic container. Anything you don’t use has to be thrown out (it doesn’t last long, overnight at best) so I mixed small batches. (A little goes a long way, I found – I guess I didn’t need to order the gallon of powder, but now I’ll have tons of paint leftover for other projects.) I carefully measured out .5 cups of Light Cream power and .5 cups of warm tap water. I also mixed in 1 cup of ExtraBond for the base coat; this is to help it stick to pre-painted surfaces.
Even after stirring really well, there were a few grainy bits. I wanted them there since I was going for that look, but you can strain the paint through a pair of nylons if you want to get rid of them.
The first coat went on pretty smoothly. About 30 minutes into it I had to run and get some water to thin it out with because it thickens up quickly and becomes hard to spread. Keep a paint stick handy too – you’ll need to mix it about every 10-15 minutes.
STEP 3: FIX YOUR MISTAKES
After two hours, I went back to check on things and see if it was totally dry. It was, but I quickly noticed that the edges were bubbling and peeling. In my hours o’ prep work, I managed to forget to sand the shiny gold paint that was used on the very edges of the drawers. Ooops….

DOH. Frustrated, I peeled off every bit of milkpaint I could, including a few tiny bubbly spots on the drawer faces. I sanded the gold paint off the edges completely, and went back to mix a second coat of paint – this time, I added 3 tablespoons of Driftwood to the Light Cream, to darken it up. I used ExtraBond on this one too, since I was having adhesion problems and I’d removed all of the first coat at the edges.
STEP 4: FINAL COAT
I ended up doing 3 coats total; the last one had 6 tablespoons of Driftwood in it, and came out a nice tan/khaki color that is similar to a color found in our shower curtains. I love the finish. It’s ultra-flat with a tiny bit of graininess, and has nice subtle color variations throughout. It’s hard to get a good photo, but the one below (after 1 coat) gives you some idea as to the barely noticeable “streaks” of color you can produce:

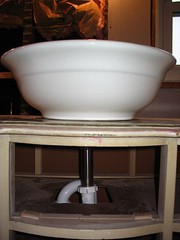
I still have to clear coat it – since it’s going to be in the bathroom I want to be sure it’ll hold up to water and the occassional flying mascara wand. But just for fun, we set it up in it’s new home for a photo:
There’s another step we’re mulling over… what to do with the top of it. Currently, it has some type of old-fashioned laminate surface on it. It’s not in bad shape, but the color is a bit to yellow for my taste. We knew paint wouldn’t stick well or be durable enough, so that’s out. It has to be something thin, since the plumbing and faucet height don’t give us much wiggle room. We’re thinking of trying to cut a piece of veneer to match – stained and coated, of course. Anyone have a creative solution to our vanity-top dilemna?
As always, more photos on our Flickr account – http://flickr.com/photos/fixerupper/

Christmas didn’t feel much like Christmas without snow, but New Years? With temps in the high 40s and sun all day long, it certainly doesn’t like January in Upstate New York. Not that I’m complaining – far from it. Everyone around here is praising global warming and wondering just how bad a beating we’ll be getting in late March to make up for all this moderate weather.
The calendar swears it’s January 1st, so I thought I should reflect a bit on how far we’ve come this year. It’s easy to forget what we have accomplished – each project becomes a far-away blur the minute it’s completed. (Might be all those fumes going to my head.) Luckily, I’ve got the blog to remind me. And when I sat and flipped through 12 months of old posts, I was pretty damn impressed.
Our 2006 to-do list included:
And that’s not all!
We traveled, made the papers, and learned all sorts of new skills. We pushed beyond our comfort zone, and found we could do just about anything we set our minds to.
It’s been 2.5 years since we bought this house, and every week brings something different. New challenges, new stresses, new achievements, and new opportunities for creativity and compromise. With all that behind us, and so much still ahead, I can’t even imagine what 2007 will bring – but I know it’ll be interesting.
Thanks to all of you for sticking by us this year. Your support, opinions, and generally cheering-on and commiseration are much appreciated!
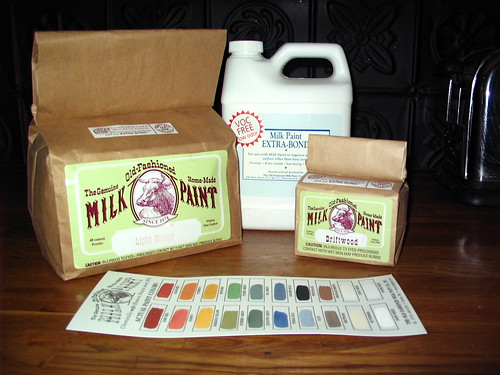
Well, based on great recommendations from a few of our commentors, including John of The Devil Queen and Erilyn of Reviving the Colonial, I went ahead and ordered some milkpaint for the bathroom vanity.
 
I ordered a gallon of “light cream” and a pint of “driftwood” (pictured above, in that order) from Milkpaint.com. I want to go light, but not too light – so I can mix some driftwood in to darken it up. We also ordered ExtraBond, an additive that will help the milkpaint bond to the already-painted surface. If you’re painting onto unfinished wood, you wouldn’t need that.
The company shipped it to us so fast, it arrived the day after we ordered. I’m still amazed at their turnaround time. I was worried we’d be waiting weeks, since speciality items like that tend to take forever to get to you.
I can’t wait to get started… as a color junkie, I have a feeling I’m going to fall in love with this stuff. Stay tuned to see how it turns out!
Well, it finally happened – I’ve been tagged! Blog tagging is sorta like a chain letter… I have to reveal 5 little known facts about myself, and then “tag” 5 more bloggers to do the same. I was tagged by Alan of Vintage Tub and Bath‘s “Daily Tubber” blog. Since Alan once treated me to a “sandwich” loaded down with syrup and canadian bacon, a mouthwatering Pennsylvania calorie-fest I had never before had the pleasure of devouring, I owe it to him to complete the chain ;)
1. In college, I decided to underscore my uniqueness by piercing my tongue (kinda like everyone else). The hole is still visible, but the rather large 1/4″ barbell has been gone for about 5 years. I have 7 man-made holes in my body, mostly in my ears.
2. My real name is Amanda. Mindy is a nickname given to me at birth by my parents. They thought I’d want a “professional” name to fall back on, something less disco and more commanding. But I like Mindy better – despite the Mork jokes – so the only people who call me Amanda are telemarketers.
3. I failed handwriting class in third grade. It’s the only class I ever failed; I did not hold my pencil correctly so they kept forcing those silly rubber triangle things on me. (Like these things.) Despite my teacher’s valiant efforts, I still don’t hold my pencils correctly.
4. My best friend Tianne and I used to draw fake tattoos on each other with markers. Not cute little tattoos, but giant child-like swirly illustrations all over our backs, arms, legs, etc. It was one of our favorite ways to pass time when we were about 16. Once, I accidentally used a permanent marker and she had to soak and scrub in a bathtub full of rubbing alcohol to get it all off.
5. I fought a girl on the playground in 6th grade. We laid down rules and had a nail fight – as in, we scratched the hell out of each other with our fingernails. I had a jacket on and she didn’t, so I left without any injuries while she had pink scratches all up and down her arms. She was picking on my friend Laura, one of the sweetest people on the planet, so she earned a beating. We both went to the principal’s office, but she was the only one to get in trouble because I was a “good kid” ;)
Ok, my turn. I tag….
Kristin at 1902 Victorian, my sister-in-law Eilis, my mother-in-law Geri, talented web developer Marcello from Astrochimp, and crafty lady Becky from Purlescent
Yesterday, I had one of my infamous house-related freakouts. The holidays make me miss my RV’ing parents something wicked, and that unhappiness is multiplied by the stress of shopping, decorating, cooking, and cleaning for three weeks straight. Then, suddenly the big day is over and there’s nothing fun to look forward. Top that all off with a heavy dose of rain(!), then sit me in the middle of a gutted bathroom with a drill and a short fuse. 3…2…1…. meltdown.

Teague and I both had the day off, so in my mind we were going to use this lovely chunk of free time to make some major progress on the bathroom. But we slept in late, dawdled over coffee, and had to run some errands. Noon came and went, and we still hadn’t touched anything. I started to ask what the “next steps” were, and what I could tackle right away. The underlying message was: “Right now, this very minute, we must start doing something productive. Hurry, before I snap!”
When we were still futzing a few hours later, I started to babble about making “forward movement” and “noticeable progress” – two terms I abuse when we’re being sluggish and I want us to work faster. It’s not very motivational, but it’s all I ever seem to muster. I was close to tears over a drywall screw that punched through the paper. I ranted to poor Teague about how we needed the bathroom finished so we could take a break from living in utter filth for a few weeks. All I really wanted to do was call it quits, find a nice clean bedroom in someone else’s house, and take a nap.
The problem was, neither of us had much energy to devote to the house. We weren’t in the zone. And on days like that, no matter how badly I wish for a big surge of motivation, it never seems to come. So we worked, but slowly and without enjoyment. A few pieces of drywall went up, and some shop-vac’ing occured. Little else came of it, and I wasted the entire day being pissed off and frustrated when I should have just let it go and watched some HGTV in my pajamas.
Ah well…….
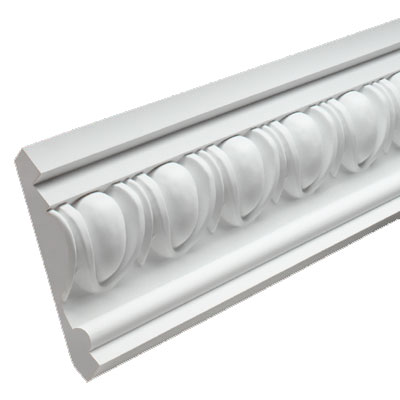
Now that I’m feeling less like the Grinch and more like myself, I’m back in the game. I just spent a good chunk of time surfing over at Architectural Depot’s website, daydreaming about how cool the bathroom would look with some wainscoting, decorative moulding, and a tin tile ceiling. I’m thoroughly impressed with this site – they have some really unique products I haven’t seen elsewhere to “do it up right” – like these pretty stair brackets, and all sorts of fancy onlays and appliques. You could go nuts with this stuff!
Check it out for yourself:
http://www.architecturaldepot.com/
In keeping with our annual Christmas tradition, I present to you Little Dogs In Goofy Outfits Part III:

I can’t get Nero to sit, stay, or stop peeing in the house. But bring out the camera and he starts winking like a trained professional. Watch out, ladies – he’s feeling frisky.

Bruiser thought the snowman getup made him look fat. He was so embarrassed, he refused to look at the camera. I didn’t have the heart to tell him about the flab roll around his collar.
Can’t get enough of dogs in costumes? Me either – you can find more pics on our Flickr page.
Hope you’re all at home partaking in your own holiday traditions and taking a break from the house-fixing grind. Merry Christmas!
Thanks to some Photoshop wizardry and a great shower curtain find, I think I’ve made a decision on the bathroom’s color scheme. I know you’ve all been on the edge of your seats…. how exciting, right?
The basics:
We’ll be painting the vanity (too lazy to strip it) so I had to choose a color for that. We’ll be doing the cheaper by-the-sheet beadboard due to budget constraints, so that also needs paint. And then of course the walls. And all this needs to match a shower curtain that we can afford and find two of (because of the clawfoot needing a curtain on both sides).
The color schemes:
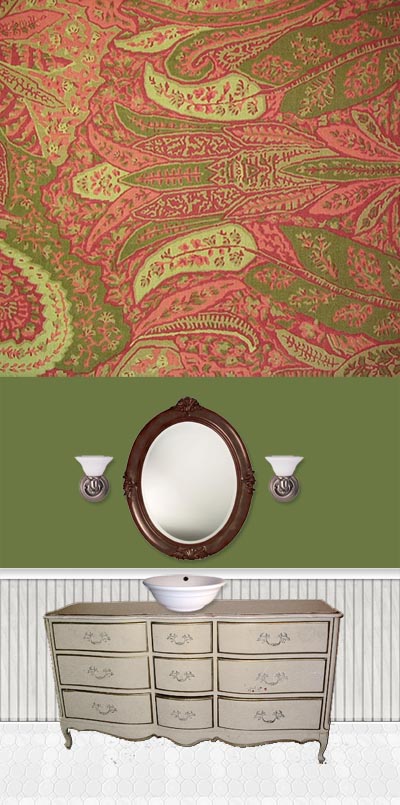
I found a very pretty paisley print curtain at Kmart the other day – on sale even – so I brought two home. I forgot that Kmart carries the Martha Stewart Home line, which is actually adorable despite the nastiness of the Kmart store itself. The green is very similar to that used in our kitchen, and the warm rich hues would echo what’s going on downstairs color-wise.
If we use these curtains, I’m leaning toward a tan/beige for the walls and the vanity, with everything else a neutral white or off-white. And I’d use a wooden mirror of some kind. Kinda like this:
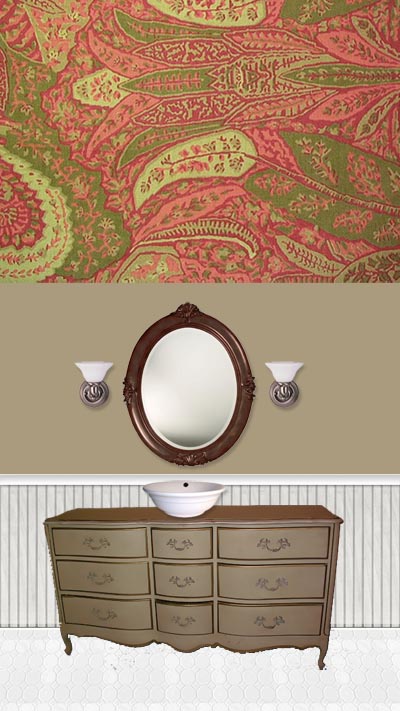
That’s the curtain pattern on the top. Ignore the light fixtures, they’re just for placement because we haven’t chosen lights yet. Also ignore the somewhat shoddy Photoshop job… I only have so many hours in the day, and Christmas shopping is taking priority over color scheming this week!
The beige one feels the most homey and historic to me. We talked about painting the vanity black, but it ends up looking very contemporary in the mockups. IÂ whipped up a few other options that I thought I’d share, since we’re really not dead-set on any one scheme right now. We welcome your thoughts and opinions!
Here’s a light green/white version:
Here’s a darker green with a black vanity and black mirror:

And last but not least, an airy blue with a totally different shower curtain from Pottery Barn. I’m feeling paisley right now, for some reason.

I’d like to use milk paint for the vanity; one of our readerws, Erin, suggested this and I’ve always wanted to try it. Before paint was available commercially, milk paint was made at home by resourceful DIY’ers just like us. In fact, you can even find recipes online for making your own. All of the recipes involve milk and lime, along with some form of pigment or dye. That’s a little rustic for me – I imagine it’d take some time to get things just right. Luckily, a few reputable companies sell their own versions online. Erin vouched for the product available at http://www.milkpaint.com.
I’ve seen milkpaint furniture in shops and boutiques. The finish is so velvety, and the hues makes everything feel old and authentic. It’s also not loaded with chemicals, so it won’t produce fumes that’ll drive you out of the room. You can mix/match and layer colors, so we could get a nice beige by adding a little something to white.
The only downside I can see to using milkpaint is 1) having to order it, and wait for it to get here and 2) having to prep the vanity with a good (somewhat expensive) bonding layer (because it won’t stick well to any coating other than clean wood). The closest dealer is about 2 hours away, but that is an option for getting it without shipping fees and extra waiting time.
More decisions……..
Anyone want to throw in their opinions on our color schemes and/or the milk paint idea? Fire away!
|

