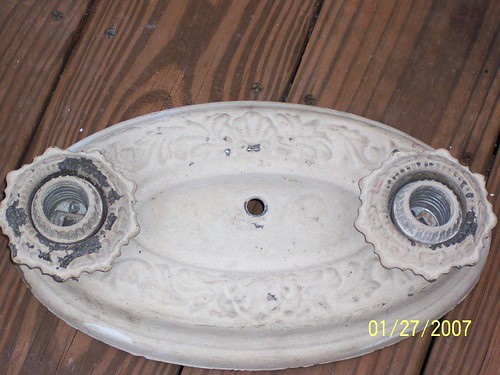
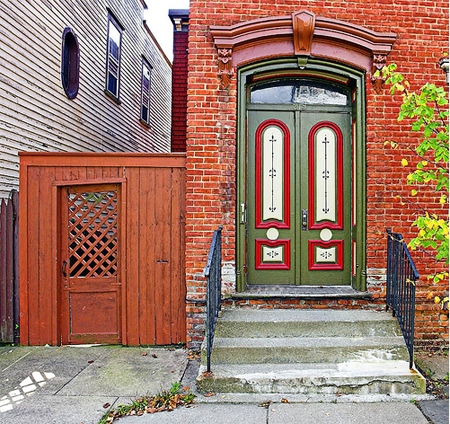
I won this cute little light fixture for $3.50 the other day:
We’re in need of something for the bathroom ceiling, and for just about every other ceiling in the upstairs. We’ve got a grand total of 9 “plastic chandeliers” up right now. Like this:
So a new (cheap) light fixture is always welcome. I think we’ll paint it, since our ceilings are all white. The chipping paint is very shabby chic, but I am afraid the fixture would disappear against all the white behind it. It’s far to cute to camouflage.
There’s a secret to finding good deals on Ebay. I keep an eye on lighting fixtures and other obsessions by setting up Favorite Searches. It’s a great way to find bargains… you receive regular emails that update you on new items that match your favorite searches.
Ebay gives pretty clear details on how to set up and track your favorites, so I’ll let them do the explaining: http://pages.ebay.com/help/myebay/track-favorites.html
It’s a more passive way of browsing what’s out there (no need to constantly check to see what’s new) and if you set up detailed searches then you’ll find some great stuff that other people overlook!
The photo-sharing community Flickr has got to be one of my favorite web tools EVER – second only to blogs, of course. Those of you using it need no convincing as to why it’s amazing. Those of you who aren’t… get over there and check it out! You can start with our Flickr gallery, which contains nearly every photo of the house we’ve ever taken:
But by all means, do not stop there. It’s a fantastic resource for all you house voyeurs. You can find all sorts of great images, old and new. And individual picture-takers can feed into larger groups or “pools”, which is where the fun really begins.
Give these two photo pools a shot when you have about 342 hours to waste:
This pool features all things Victorian-house-related including exterior and interior shots, closeups on details such as lighting and hardware, Victorian-era antiques, and scans of old photos that feature room setups and/or houses. It’s a gold mine!
Vintage Home Interiors
This one is not limited to Victorian interiors, but it has lots of amazing old photos of nearly every era. These pics are priceless, and the good people who spent time scanning them in and sharing them deserve much love. Victorian Style Homes http://www.flickr.com/groups/50675280@N00/pool/
Trying to pick the perfect paint scheme? Wondering what your porch looked like before it got remuddled? This is the pool to check out. Mostly exteriors, but tons of them!
Have you got a favorite Flickr hangout? Do share…… I’m always looking for new inspiration ;)
As you’ve no doubt noticed, I am a huge fan of organizingthings; clutter and chaos makes me itchy. I don’t know when the compulsion to organize began, because my mother can tell you stories about my years of teenage-bedroom-slobbery. I distinctly remember finding a glass of fungus on my bedside table during one of the many forced clean-outs. I was not a born neat freak. It wasn’t until I had my own place that the nesting instincts and subsequent organizing fetish really developed.
With over two years to think about what my dream bathroom would look like, I had plenty of ideas when it came time to outfit our new space. My wishlist went something like this:
A convenient place to hide my hair and makeup arsenal
A place for my jewelry, preferably one that reminded me to wear it
Q-tips, cotton balls, etc. in easy reach
Organized reading materials (no messy pile of magazines thrown behind the toilet!)
Outlet for my blow dryer
More storage! The hidden kind, so I don’t have to look at all my junk.
A reachable place for shower goods – soap, shampoo, lotions, razors, etc.
The vanity solved most of those problems, since it has ample drawer space. I threw a few plastic organizers in there, and voila – instantly, I felt better about life. Even the toothpaste is out of sight in a top drawer, which is great because we’re not so good at keeping it tidy looking. The end of the tube is usually a giant sticky wad of disgustingness.
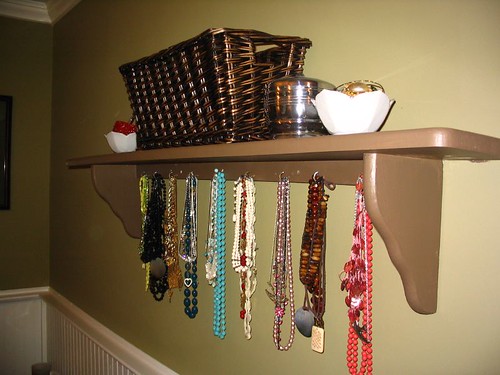
Most of our solutions were super cheap or free, since we recycled things we already owned. My absolute favorite recyled piece is the shelf-turned-jewelry-organizer:
The shelf was $10, on sale at JoAnns. We’d been using it in another room, but it works better here. We put about 10 hooks in, and my collection of necklaces are now on display. The mix of colors and textures are pretty to look at, and it makes picking something out much easier. No more de-tangling strands at 7am. The ceramic dishes (thrifted for $1) on top of the shelf hold bracelets, and the basket holds hair doo-dads. My earrings are in a plastic see-through container in the makeup drawer, so I see them every morning too. Because the more in-your-face something is, the more likely it is that I’ll wear it.
Below, a shelf gifted to us by my sis-in-law; it’s originally from Target, and was white. It got a coat of paint and clearcoat, and now holds all our hygiene necessities in thrifted milk-glass containers. My rarely-used (but hard to part with) collection of hair gels, face masks, etc. sits in a basket on the bottom shelf. Same principle as the jewelry – if I see them, i just might use them. The books and magazines are within reach of the toilet, for a certain someone who likes to educate himself in the bathroom.
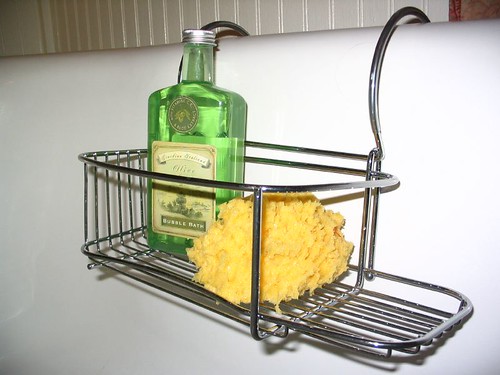
Everyone had great suggestions on where to put our shower goods; based on your ideas, we went with a two-part solution to the soap/shampoo problem…
First, a super easy-to-reach chrome caddy holds our basics – a wash cloth and a bar of soap (neither of which are pictured here, but these things look pretty there, don’t they?!) for bath time.
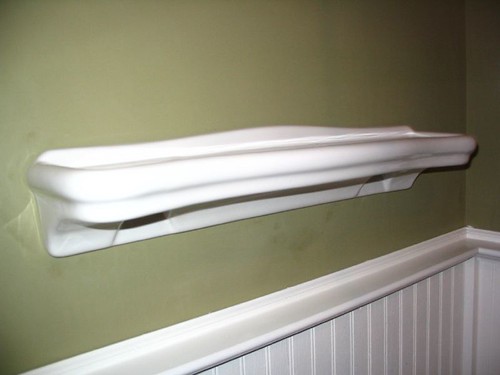
To wrangle multiple bottles of shampoo and conditioner (because you have to switch it up – every girl knows that), razors, body washes, and all that other crap that keeps us primped and smelling like wildflowers, we put up a porcelain shelf. It’s directly behind the shower riser so it’s easy to reach, and it’ll withstand any water drippage that goes on. This shelf used to be in our downstairs bathroom but I think it works better here.
I’m working on creating my own Victorian looking labels for all these goods so we can put them in prettier containers. Because I am totally obsessed, and the neon green Garnier bottles do NOT match our color scheme. ;)
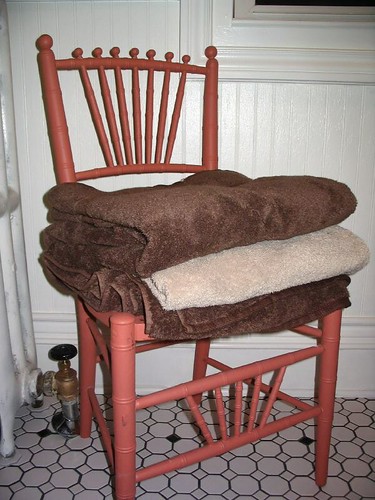
We also have two places for towels – a 24″ bar within arms reach of the tub for our daily-use towels, and a little salvaged chair (this was in the scary back room – it’s in the third pic down – can you believe it?!) that will ideally hold clean towels for potential guests. Right now we don’t have enough matching towels to keep this strategy up, but someday we’ll get there.
With all the extra space and storage, I feel like a queen! It is quite an upgrade from the teeny bathroom we’ve been using downstairs these last few months. I can almost bear sharing it with Teague in the morning ;)
If we ever leave this house, we’re going somewhere south. Somewhere sunny and warm, where winter means a light jacket after sunset. Not snowsuits, triple layers, and full days of shoveling.
All winter we’ve been dodging bullets, revelling in our luck that all giant snowstorms seem to fall just north or south of us. About an hour away they’ve been in a state of emergency since last week, when 100+ inches fell in the span of a few days…. and throughout that storm, we were blessed with merely a few inches. A light dusting, if you will. Nothing that would slow a New Yorker down, especially if that New Yorker is in a SUV barrelling past you on the Thruway.
And then on Valentines Day, we finally got our first big snowstorm of the season and we all stopped laughing about the poor people on the news trying to dig tunnels out their front doors. For the first time that I can remember, stores and banks actually closed down for the day. The University I work at canceled classes for the second time in it’s entire history. But Central New Yorkers are a headstrong bunch… we’ll drive in nearly every type of weather, including whiteouts and blizzards. So by late afternoon, everyone who had a “snow day” was at the grocery store catching up on their errands, including me. It was pretty funny watching people try to maneuver full shopping carts out in the snow-filled parking lot.
When the University declared a snowday, I geared up and spent the next 2 hours digging my car out of the driveway. After that, I spent another two trying to make room for Teague’s truck – and an hour digging a neighbor’s car out of a snowbank in the road. It was a great workout, but by 9 that night all my hard work had been snowed over again. Teague took a turn digging, and the piles grew ginormous.
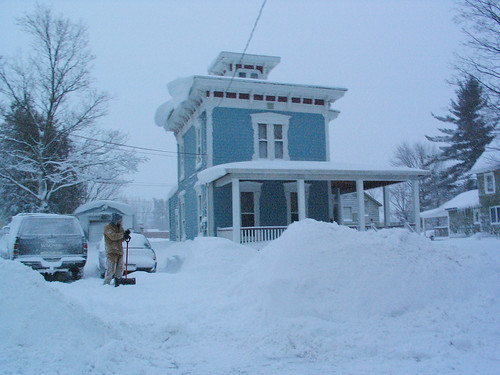
Yesterday, it snowed some more. Just a few inches of lake effect, nothing too notable, but it did make our piles a bit more problematic. The end of the driveway looks like a mini mountain range.
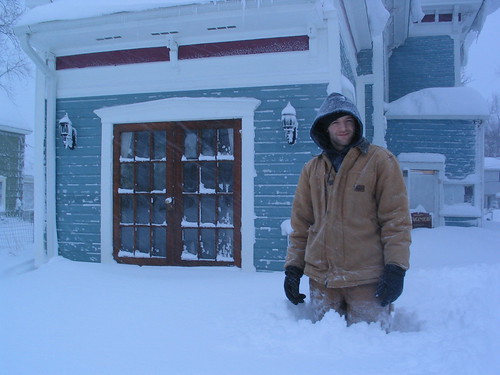
Today we woke up to two more feet of snow…. and now, there is really no place to put it. We started digging around 7:15 this morning and managed to get Teague’s truck out of the driveway by 8:30. Thank god for four wheel drive. I took some photos this morning so you can see how totally excited Teague is about the snow:
(He would not smile. Not even after two cups of hot chocolate and french toast!)
Snow days were certainly more fun back when my father was the one in charge of cleaning the driveway, but for a split second this morning I did truly enjoy our snowy wonderland. The neighborhood is unrecognizable, a big puffy cloud of white. I donned my snowpants and ran around in the backyard, where the snow is up to my waist. It made me feel like a little kid again. We haven’t had snow like this in ages! Itried to get the dogs to come out and play with me, but they steadfastly refuse to leave the warmth of the house – even after I dug them little trails. They want no part of it.
In the meantime, I am snowbound and working from home. My ’94 Corolla just isn’t made for commuting in blizzards. We’ve been calling around frantically for a plow guy, but they’re all trying to catch up with their regular customers so we’re on our own. Teague is on his way to borrow a snowblower from his parents…. no amount of shoveling is going to help us now!
After nearly three months of work (that’s 12 fun-filled weekends, plus the work we squeezed in on weekdays), the master bathroom remodel is officially done. We put the finishing touches on it this past weekend. And now, every time I walk in there, I marvel at the beauty and order we created out of total chaos.It was one of those projects that consumed me so fully, it’s hard to believe it’s over. All that research, all that work, all that expense, all that build up…. and then POOF, the excitement comes and goes in a whirlwind. Don’t get me wrong, I’m absolutely thrilled to have the project completed. Not having to stress about it has lifted a tremendous weight off my shoulders, and I’m loving the all the extra space, the pretty fixtures, and the overall newness of it. But a part of me has already mentally moved on to the next project. That’s sick and twisted, no?
Maybe we’re addicted to the “look what we did!” euphoria. It reminds me of a runner’s high. One minute you’re exercising so vigorously that you’re barely able to catch your breath; your muscles are resisting every single step, and your mind is begging you to stop. And then out of nowhere, you suddenly feel like you could keep going for hours. You’re recharged, energized, and invicible. You’re ready to run another mile, or three… or move on to the next house project!
Anyway….. I know you’re more interested in the photos than my babbling, so let’s get to it. I’ll include some before pics so you can see just how much things have improved here at the Fixer-Upper.
Old shower and tub:
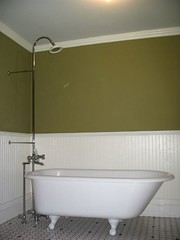
New shower and tub:
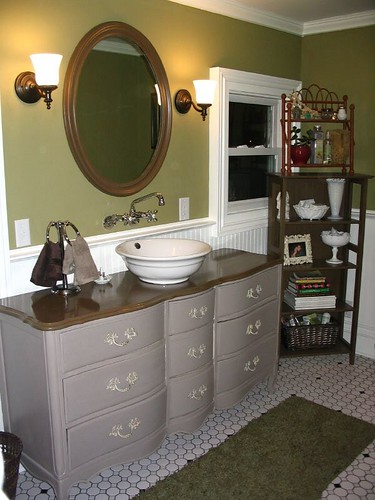
Old vanity/sink:
New vanity/sink:
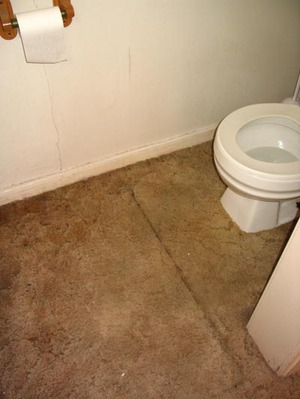
Old toilet area (which had a partial wall seperating it from the shower area – see floorplans for details):
New toilet area:
Old view from the hallway:
New view from the hallway:
I love everything about it; the color scheme, the materials, and the extra space make it feel really extravagant. And our creative use of thrifted stuff (like the dresser-as-vanity), salvaged stuff (like the clawfoot tub our good friends were kind enough to donate) and gratuitous recycling of things we already owned gives it a very unique feel.
I will go into more detail about some special solutions we came up with for specific problems (like a place for shampoo bottles and my newest jewelry organizer!) in my next post… right now, I’m off to clean the tub so it’s ready for a nice romantic Valentines Day bubble bath!
If you want to see our full photo set, including all the before and afters, head here for a slideshow:
Right now, I have a camera full of bathroom photos that I’m dying to share… but since I just spent forever and a day helping Teague type up the shower post, I’m not feeling energetic enough to whip out another long one today. And the bathroom “afters” certainly deserve a long one.
Instead, I’ll practice the fine art of procrastination – at least for a day – and share this hilarious Ze Frank movie with you instead:
Note: This is Teague’s second post in 2.5 years! Let’s all make him feel welcome, and maybe he’ll come share his how-to’s (which are much more thorough than mine, since he tends to lead the process while I follow along) more often! – Mindy
STEP ONE:
The first step to installing our free-standing chrome fixture (a Sunrise Specialty from Vintage Tub and Bath) and tub drain (Strom, also from VTB) was to rough-in the layout. This was done prior to finish materials,ie. flooring, walls, etc. After following the manufacturers schematics for rough-in dimensions and deciding on a final resting place for the clawfoot tub we were ready to run the hot/cold feeds and PVC drainage under the floor.
We used .5″ copper for water supply and 2″ PVC for drainage. 1.5″ PVC is enough to meet NY codes, but bumping it up to 2″ is a good idea for clog-free operation long-term. The chrome drain and overflow are only 1.5″ above the floor so our transition to 2″ is under the floor. This is achieved by using a 1.5″ to 2″ coupling. Once the under side of the floor was roughed-in, we could start making connections from the top side.
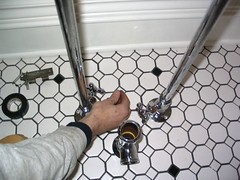
Our fixture is a free-standing model, meaning the water feeds come vertically through the floor and the faucet handles and spout do not connect into the tub. The entire fixture consisted of 6 sections.
STEP TWO:
Starting from the floor up I installed the .5″ threaded end of the mounting flange through the floor and made a tight connection to the copper feeds previously ran. This required 2 people, one under the floor holding the feeds and the other up in the bathroom to make the connections.
STEP THREE:
The second section you need to install is the multi-turn shut-off valves, hot/cold,which need to be in the same position for aesthetics and functionality. To achieve this, leave a section of copper under the floor un-soldered so the shut-offs can be rotated into position once the tight connections above the floor have been made. We did our soldering after connecting the arms to the risers (explained in step five).
STEP FOUR:
The next section to put together is the supply lines for the hot/cold feeds. Make a tight connection into the shut-off valves.
STEP FIVE:
Attach the arms that connect the supply lines to the faucet. These took some adjusting and teflon tape to make a tight and parallel connection. Once you’ve got that figured out, you can go ahead and solder the copper below the floor, making sure the shut-off handles line up the way you want them. This took two people as well; one above to hold the risers straight, and one below the floor to solder.
STEP SIX:
Make the connection from the end of the supply line arms to the faucet.
STEP SEVEN:
Next, you’ll attach the shower riser and mounting brackets. I measured and then cut the brackets to size using a pipe cutter. To keep your chrome clean, use painters tape on the “keeper” side to protect it while cutting.
We were surprised to find that the drywall anchors that came with the set were visible behind the bracket’s mounting plate. The screw holes are very close to the edge, so the plastic anchor is not hidden completely. We screwed into a stud and thus avoided using the plastic anchors. Not a huge deal, but worth noting.
STEP EIGHT:
Attach the shower head to the shower riser. Once you’ve got everything together, cross your fingers and test it out. Be sure to check each connection point for leaks.
As you’ve probably noticed, I have a serious addiction to prettyhousethings. Big things, little things, teeny tiny details that no one but me would ever notice…. the kind of stuff that makes your house unique and memorable and a reflection of you. Of course, it’s all just STUFF, and deep down I know STUFF should not make me happy, but it does. What can I say?
The good news is, plenty of other people share my addiction for pretty STUFF. So I live vicariously through them, and for the most part harness my endless desires for more home decor baubley-bits.
One of my newest eye-candy inspiration sites is decor8. The owner, Holly, has incredibly good taste AND she goes beyond the basic “hey, isn’t this cool” to really get to the heart of WHY it’s cool, and how you can create that type of cool in your own house. My favorite post thus far was Trends 2007: The Nurturing Naturalist; look at these amazing product collages she pulled together:
Head over to decor8 and get inspired while you wait for our bathroom “after” shots ;)
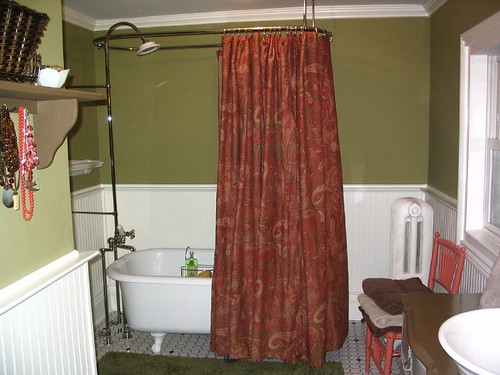
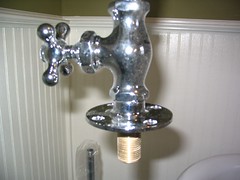
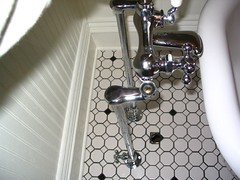
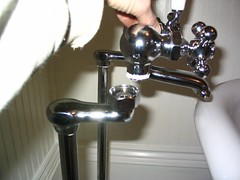
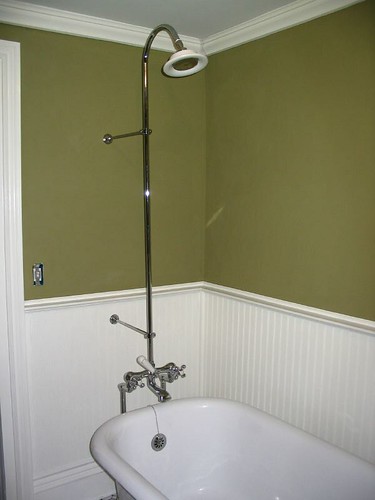
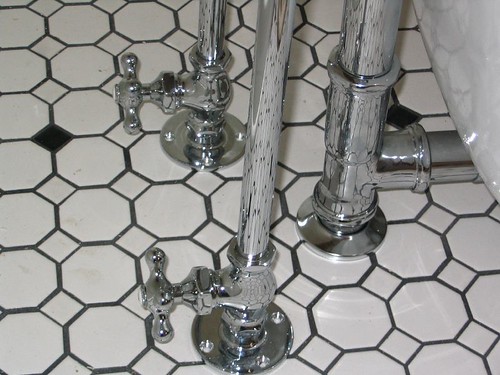
After all the complaining I’ve made you listen to, I figure you guys have earned a look at the glorious freestanding chrome shower, faucet and drain we FINALLY have installed and working properly. It’s a beauty….you know how a piece of real silverware feels decadent and fancy compared to a plain old cheapo fork? That’s how this shower feels. Those pretty porcelain handles are substantial and weighty beneath my fingers.
I love the white porcelain ring, it really adds something to the setup. The two metal braces are screwed into a stud, so we won’t have to worry about the riser pulling out of the wall.
Who knew supply lines could be so beautiful? Or such a pain to line up perfectly? But it was worth the work.
As you can tell from our Flickr photos, we tried to document the installation as we went along. Teague will be writing up a post on the process, since it was certainly a process in every sense of the word and he’s the one who had to labor through most of it. Because plumbing? Not so much my thing.
I will say that installing a clawfoot tub and shower is not what I’d consider a DIY job. Teague has quite a bit of plumbing experience and still had to adjust things a few times to get everything to come together perfectly. But, it is doable – we’re living proof!
I’m saving some bathroom pics for a big reveal, because we’re THIS CLOSE to actually being done. As in, done-done. Not, done but needs trim and hardware and some paint touch-ups. Because this time around, we have not allowed ourselves to start using the room in a half-finished condition. We did that with the kitchen, and it’s still not completely finished 2 years later. We’ve found that is the kiss of death for any project. Once you start using it day-to-day, those last little finishing touches just fall completely off the radar.
Stay tuned for more bathroom goodness. The only things left to do are hang the shower curtain rod, finish painting the door, and give everything a good spit shine. Then I’ll let you see the whole thing AND I’ll post the befores so we can all reminisce about what a total dump the original bathroom was. Is the suspense killing you, or what?
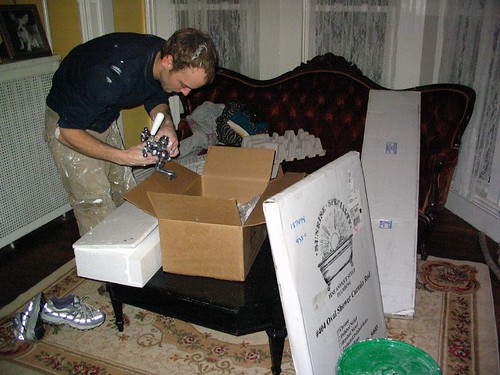
When our Sunrise Speciality shower enclosure came in the mail a few weeks ago, it felt like Christmas. It was a welcome sight, those boxes filled with shiny chrome goodness piled high on our porch. We ripped into them like maniacs, taking each piece out to examine and admire the fixtures inside.
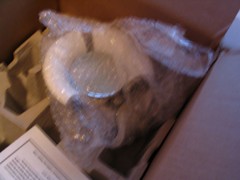
But of course, nothing being easy when it comes to this bathroom, along came a few little problems to burst our bubble. For one, the porcelain shower head was cracked when we opened it up.
No biggie, really – I knew all it would take was a call to Vintage Tub and Bath. They contacted the suppliers, who sent us a new, very well wrapped porcelain ring in a little over a week.
The second, and more heart-wrenching of the bubble bursters, came when we put it all together to test the height. We knew when we ordered it that the height would be close – VERY close. As in, grazing the ceiling close, if we were lucky. That half of the bathroom has a low ceiling to begin with, and we lost even more height when we put the tile floor down. But when we put the shower fixtures together, we found that it was about .5″ too tall. Since this shower set was our only option, we had to make it work.
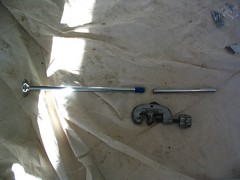
While I panicked and thought up creative ways to cut holes in the ceiling, Teague took the shower riser (the tall pipe that runs from the faucet to the shower head) to a place he knew had a pipe threading machine. (Cutting down a pipe is easy; getting the thread onto it is the harder part.) The guy in the shop seemed to think he could fix it no problem, and did not seem worried even after Teague stressed that it was a) expensive chrome-plated brass b) irreplaceable and c) totally essential to the success of our bathroom, and to his wife’s happiness.
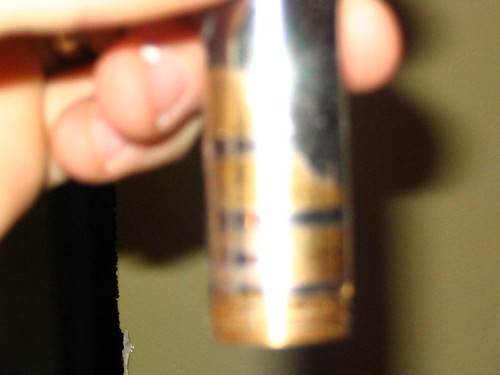
A few minutes later, the guy gave up and handed Teague back this:
Sorry for the blurry pics, but the gist of it is he mangled it beyond belief, and never even got it to thread properly. We were left with a totally useless gnarled-up end on our once-returnable (if not usable to us) riser. The guy blamed the cold weather, and said he couldn’t help us any further. When Teague called to tell me the news, I was ready to throttle someone. I’m sure the guy didn’t mean to make such a mess of it, or anticipate having so much trouble, but I was in no mood for oopsies.
A few plumbers in the shop at the time took pity on Teague and suggested he try using a hand-threader. After a few phone calls, he found a friend who owned one. (It’s times like that when I’m very glad we have handy friends!) Using Thread Cutting Oil and the hand-threader, he managed to save the day and the shower – not to mention my sanity. Have I mentioned my husband is amazing?
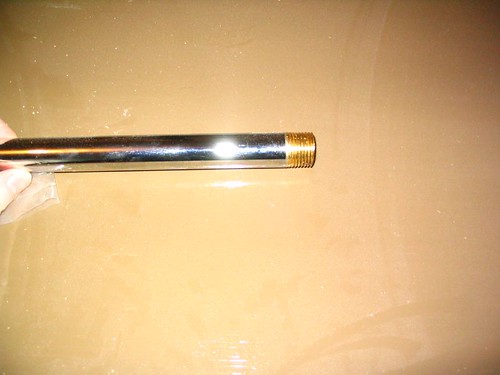
Here is what the shower riser looked like, about 5″ shorter, after Teague finished with it:
And here is the piece we cut off. Guess which end is mangled-man’s end, and which end is Teague’s:
We both breathed a GIANT sigh of relief when this little roller coaster ride was over with. And guess what? This weekend we got it installed! I could fill my tub this very minute if I was feeling spunky. But since the bathroom is still cluttered with tools and half-painted trim work, and the shower curtain isn’t up, I’m holding out just a little bit longer.
We’ll be posting more on the faucet/shower/drain installation this week, since there is lots to say about that process. Needless to say, lesson learned: if you need to cut something like this down, do it yourself minus machines. You’ll have much more control over the situation.