SEARCH SITE:


BROWSE BY CATEGORY
Endsleigh specialise in Home Contents Insurance for people in the UK

Photo Gallery Goodness

Diary

We’ve kept ourselves busy this week by endlessly debating the eighty different ways to repair our roof, the details of which will thoroughly bore you to death. I think we’ve finally come to a decision, but the materials haven’t been purchased yet. I refuse to put it in writing before something is on the Home Depot card, so stay tuned for details.
Our second dumpster of the summer is just waiting to be filled with tear-off debris. As soon as we have the materials, and this crazy heat wave breaks, we’ll climb up there. Temps are improving compared to yesterday; as of right now, the National Weather Service is predicting a high of 92 with a heat index value making it feel like 101 degrees.

While I bathed in sweat yesterday, I did manage to organize some of our photos AND take measurements of all the first-floor rooms. Finally. It only took two years to get to that…….
So check out the Photo Gallery for two new slideshow albums – the exterior, and the dining room – as well as the new diagram!

Back to top

Reclaiming our closets

Diary

My brother Cody moved out this weekend; he has been living in our upstairs “apartment” since December. It was fun to have him up there; he was so quiet we hardly noticed him. He and I rarely crossed paths because of our opposite work schedules, but we made time for Sunday dinners. We also watched Grey’s Anatomy and Lost religiously each week; I would run upstairs 5 minutes before they started and hunker down in one of his chairs. My brother follows storylines better than anyone I know; he is the perfect person to watch tv with. What will I do without him?

We had a going away party last week, and I was surprised to notice that his friends all took their shoes off before walking across our newly-refinished floors. Apparently, our house now warrants shoe-removal. We’re moving up!

Cody leaving for greener pastures

His leaving was bittersweet; I’ll miss him, but he’s moving on to a better job with plenty of opportunity. Plus…….. we get our closets back. And our bedroom will move back upstairs. No more “living-room-as-bedroom” for us. Do you know how many times I’ve woken up with my butt pressed up against the front window, drooling on my pillow for all the neighbors to see??

Back to top

The bungalow

Inspiration

As promised, I’m posting photos of the beautiful bungalow that the garage will one day match. The owners are restoration enthusiasts and have excellent taste, as you can tell from their color scheme. They were once the owners of my FAVORITE italianate in our neighborhood, pictured in this old post (first house shown).

They have been very helpful throughout our renovations, sending Teague home with Victorian Homes magazines, new plants, and all sorts of great ideas!

Here is the front of their house, newly painted last summer:

Bungalow Paint Scheme, front

I love the bushes lining their walkway – we’ve got plans to do this someday when money allows.

Here is the house from the side – it’s much larger than it looks from the front:
Bungalow Paint Scheme, side

We’re starting to collect house photos with nice color schemes, since exterior paint is in our future. Anyone have any favorites they would like to share with the world?

Back to top

Wallpaper for Budding Artists

Tips & Tools

While this isn’t in keeping with our house’s original wallpaper, I can’t help but love the “Frames” pattern from Graham and Brown:

Graham and Brown Wallpaper - Frames

It’s “interactive”, meaning you’re invited to color, paint, add photos, and go nuts with it. How much fun is that?? I think this is the perfect wallpaper for one “feature” wall in my craft room.

Thanks to design*sponge for the link!

Back to top

A Bungalow Garage (I’m jealous)

Inspiration, Photo Gallery

I know many of you have bungalows, so I thought I would share Teague’s latest construction project – a garage for a beautiful bungalow he repainted last year.
We don’t have a garage, so when I saw the latest pics of his work I was amazed at what the man can do, and also disappointed it wasn’t being built in our backyard!

Here is the work in progress:

Arts and Crafts Garage - Bungalow Style

Teague helped to design the structure, a 24′ x 30′ 2-car garage with a 10/12 pitch roof (which makes for a very big attic). He has done all of the building thus far including framing, installing the prefab trusses, roofing it, and creating the custom brackets. When finished, it should match the house perfectly – down to the trim, siding, paint and window placement.
My favorite part thus far:

Arts and Crafts Garage - Bungalow Style - Bracket

It’s hard to tell from the photos, but these brackets are massive – 36″ tall!
Arts and Crafts Garage - Bungalow Style - Roof

To see the house it’s designed to match, visit the WDC showcase page and scroll down to the 5th slideshow, “A Little Paint Goes A Long Way”

Back to top

For the caulk-a-holic in your life…

Tips & Tools

Caulk T-shirt

My sister-in-law sent me the link to this one from NoiseBot, and it’s available in a rainbow of colors. Loving it. How often do you come across caulk-related t-shirts?? Actually, according to my quick Google search, more often than you might think…..

Like this one from Vintage Tees:

caulk01.jpg

Or my personal favorite, this vulgar beauty from Teetastic:


image-php.jpg

I’m sure this list could go on, but really, how many caulk t-shirts does one need?

Back to top

Bathroom brainstorms

Bathrooms, Inspiration

We haven’t made much progress on the house in the past two weeks, which doesn’t mean I haven’t been scheming and planning what our next 10 projects will be.

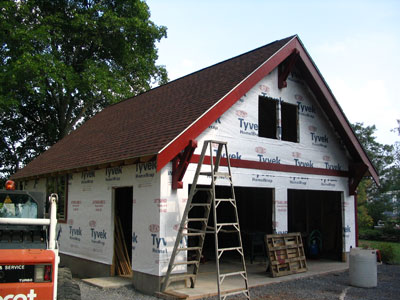
The roof will come first; we’re hoping to start that in late August since every weekend from now until then is at least partially booked, and we want a good solid chunk of time to do the tear-off. After that, we’ll be moving back indoors. My brother is moving on to greener pastures, so the upstairs will be ours once again. That means we’ll have two bathrooms again. Which means one of them is getting gutted!

We will probably start with the first floor bathroom, since it’s smaller and requires less reworking. We did a quick-fix makeover on it shortly after moving in, but it really needs a full overhaul. Right now, it looks something like this:

Bathroom

We’ve been picking up pieces for our future-bathroom little by little so as to avoid sticker-shock; a very nice shower head and faucet are sitting in a box in our shed, and a sink faucet is tucked away in the basement. I’ve been browsing for medicine cabinets on ebay. But first, we have to decide on the best floorplan.

The plan is to move some plumbing around, rip out the tub and install a stand-up shower instead. We want to keep the second shower, since it’s come in very handy thus-far. We just don’t need the full-blown bath enclosure.

In an ideal world, with limitless budgets, we’d get one of these babies:
Clawfoot Shower Pan

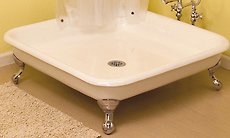
Too cute, right? It’s perfect for a small bathroom like ours. You can find them online for around $800 – $1000. Vintage Tub and Bath seems to have the lowest price for them, and we’ve always been happy with their products and service. Unfortunately, I just can’t reconcile spending that much for a shower pan – especially since that doesn’t include the drain plumbing. Sigh….

The linoleum will also be going; in it’s place will be some form of tile. I’m a fan of black and white hex, but something plain and white might be better to keep it from feeling too tiny. Thoughts on this?

We’ll probably keep with the green/white theme since it blends well with the colors we’re using throughout the downstairs and seems to be soothing. I’ve been checking out Rejuvenation’s Customer Gallery for extra inspiration – if you haven’t visited this part of their site yet, check it out now. Definitely worth the effort.

Back to top

Sand Castle Virtues

Photo Gallery, Tips & Tools

While walking through the halls of Crouse College yesterday en route to a meeting at work, I was struck by a piece of art I must have seen dozens of times. I had to bring my camera back today to snap the frame, because the top embellishment looks very similar to to the decorative elements found on our settee frame.

Antique painting and frame
Here is a close-up of the top – sorry about the shoddy quality, they have very dim lighting in there:
Closeup of antique picture frame

I’ll have to find out more about the age and origin of this particular piece – I’ve got some connections up there ;)
While I was snapping away, I realized I haven’t shared much of Syracuse University’s architecture with all of you. I often take it for granted since I’m in and out of these buildings every day, but some are truly breathtaking. Crouse is my favorite campus building; it’s the second one to be built on campus, dedicated in 1889. It was designed by Archimedes Russell, a very prolific Upstate New York architect. It’s built from Longmeadow sandstone with beautiful interior woodwork throughout, and is often referred to as “the castle” for obvious reasons.

I took this photo of Crouse this afternoon – proof that we DO actually have nice weather every once in a while. That blue sky is not a Photoshop job!

Crouse College Visual and Performing Arts Syracuse University

Here it is over a century ago:

Crouse College Visual and Performing Arts Syracuse University

This is one of my favorite viewpoints of an interior stairwell that looks exactly the same today:

Crouse College Visual and Performing Arts Syracuse University

And check out this newel post – hard to tell from the pics, but it’s taller than me!

Crouse College Visual and Performing Arts Syracuse University

More on the history of Crouse College: http://www.syracusethenandnow.net/Dwntwn/SU/CrouseCollege/CrouseCollege.html
http://archives.syr.edu/arch/buildings/crousepics.htm

More on Archimedes Russell:
http://www.syracusethenandnow.net/Architects/Russel/Archimedes_Russel.htm

Great photos of Syracuse area architecture:

Historic 1890’s: http://www.syracusethenandnow.net/ArtSyr/ArtOfSyracuse.htm
Current: http://www.davidmetraux.com/centralny.html

Back to top

Removing stain from wood – best route?

How-To

This is a plea for expert opinions from all you smarty-pants wood strippers out there…
A coworker of mine is wondering how best to remove stain from woodwork in his house. Everything I’ve stripped has involved paint, shellac, or a combination of both, so my favorite route has always been the heat gun (if I have lots of spare time) or PeelAway (if I’m in a hurry). This sounds like a simpler combination (?) of wood stain and a coat of varnish, and I’m not sure what his best route would be.
He says he can scrape the varnish off with his fingernail. The stain is over gumwood (he thinks) and has a funky green color to it. Do any of you have ideas as to what method would work best? I don’t want to steer him wrong!

Back to top

Our New “Parlor Settee”

Diary

Antique Parlor Settee

Introducing the newest member of our antique collection, our purdy little sofa thing. We got (I think) a very fair deal on it. The show was winding down, and many of the dealers were looking to get rid of builky items such as this.

It’s not in perfect condition – the back needs regluing and the velvet upholstery (which appears to be original) is faded and a little worn at the arms, but it looks perfect sitting in our bay window. The wood tone matches our existing antiques (mostly inherited), and the fabric is an orangey-red-brown color that ties in really well with the adjacent dining room wall color.

See?

bayColors.jpg

It’s got plenty of nice carving around the legs and top – here is a closeup of the middle arch:
Details, Parlor Settee

It’s the type of sofa I picture old movie stars reclining on. It’s feminine and dramatic – definitely makes more of a statement than the two Salvation Army chairs I had in that spot previously! Anyone have any guesses as to it’s era? The dealer said probably 30’s – does that sound right?

Back to top